|
The
inspiration for this little guy came from my real crafting days
before I became addicted to my computer. I must have made close to a
hundred of these for fellow teachers and friends. I will always have
fond memories of Mom and Dad's hanging from the chandelier over the
dining room table all during the holiday season. What follows is my
attempt to computerize him.
What You Will Need to Start
...PSP 6
or 7 (this was done in 6)...
... good knowledge of basic terms
and tools...
... either a gold fill of your own or you can copy
mine below ...
...a plaid fill for the legs and head...
I have
made several small versions in different colours below you can copy
as well. Right click and "save as" to your own hard drive. Choose
the one you want or take them all. I made them for this
tutorial.


We will
start off making the bell first. Open a new image 160 by 160
transparent 16mil colours. Go to "Save as" and give it a name and
then save in psp format. Remember to save your work often.
Create
a new raster layer and then floodfill with either your own gold
gradient or the copy of my fill that was provided
above.
Create another new raster layer. From the tool bar
select the shape tool and set to rectangle, (filled, antialias
checked, feather none) using the colour black, start at
approximately points 30 across and 110 down, create a rectangle to
45 across and 160 down.
Then change the shape from rectangle
to circle (keeping everything else the same), start at points 37
across and 100 down and extend until you have a circle that is wider
than the rectangle and carries on just a little lower than the top
of the rectangle. See the image below.
Go to "layers" and
then "duplicate". Go to menu "Images" and choose "mirror". Your
image should now look like the last one below.
At this point, go to "Layers" and "merge visible".
Go to the menu "Effects" and choose
"Deformation--circle".

Go
to the toolbar and choose the "Selection" tool. Set it to circle,
antialias checked, feather unchecked. Starting at points 80 across
and 80 down, draw out a circle until you almost reach the edges of
the bell. Then go to "Selections - invert" and press your keyboard
"delete" key once. Then deselect by holding down the control key and
D. I left this image larger so you can see the marching ants more
clearly.

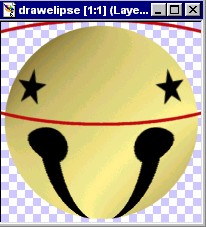
Add a
new raster layer. Choose the shape tool and set to "elipse", line
width 3, unfilled, antialias checked. I have demonstrated in red so
it would show up clearly. We are going to fill it with the gold
gradient anyway. Start at the points 80 across and 40 down. Draw out
your elipse until the bottom appears to make a ring around the
centre. To do this, I had to drag the tool right off the image into
the PSP work area and you will notice the ends of your elipse
disappear. Look at the image below.
Choose the selection tool set to rectangle and make
a selection around the bottom part of the elipse. Click inside the
rectangle and the marching ants will surround the bottom section of
the elipse. Go to "Selections - invert" and hit the delete key once
to remove the top part of the elipse that is not needed. Go to
"Selections - invert" again to return the ants to the bottom of the
elipse. Flood fill with the gold gradient and then add a drop shadow
using these settings.

Magnify your viewing area and take the
eraser tool set to 1 and erase the few ring pixels that reach right
to the edges of your image. I only had to erase 3 or 4 pixels of
colour on each side. You just want a few to extend beyond the bell
to give the appearance of it surrounding the
bell.
PAGE
TWO
MAIN
TUTORIAL LIST
This
tutorial was posted at the site of "P. Ann's Place" Oct.24,2001 and
written by P. Sherman. All I ask is that you do not claim it as your
own.
| |