|
YOU WILL NEED |
|
 Paint Shop Pro Paint Shop Pro
Download a trial version here 
EyeCandy4000 by AlienSkin (Optional)
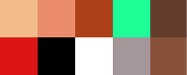 ColorChart...Right click and save to your
HD. ColorChart...Right click and save to your
HD.
Basic
knowledge of vectors and layers |
|
Remember to Save OftenSTEPS - These are the steps I used. OftenSTEPS - These are the steps I used. |
| 1. |
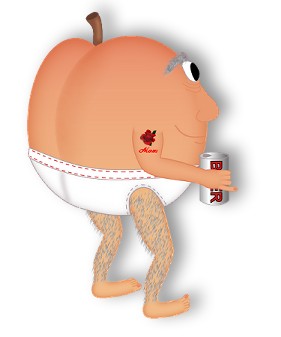
Let's Begin |
|
New Image 500 X 600
File/Save As: Izzy.psp |
| 2. |
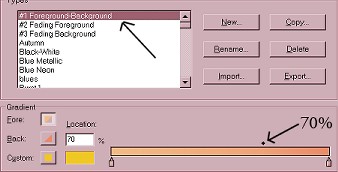
Make The Gradient |
|
Foreground solid color:#F2BC88
Background solid color:#EA8B6B

Foreground Style: Null
Background Style: Foreground-Background Gradient
Click on the Background Style Window
Invert gradient: not checked
Click the Edit button
Click on the
little diamond between the two color tubes
Adjust to read 70%
|
| 3. |
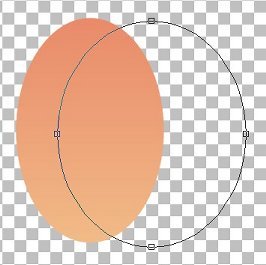
Draw the Body |
|
Preset: Ellipse
Antialias:Checked
Create as Vector:
Checked
Line Width: doesn't matter
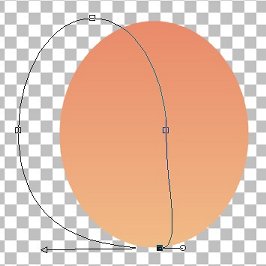
On the left side of the canvas draw a large
oval approximately 250 pixels long.
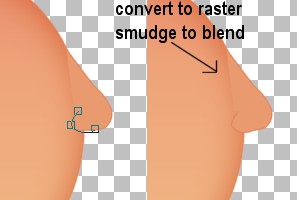
Make a
New Vector Layer and draw a second oval overlapping the first. See
image below.
|
|
On your ToolBar select the Vector-ObjectSelector.
Click on your first oval to select. Right click and choose "node
edit" from the drop down menu. Select the bottom node and drag to
the right to about the center of the second oval. Elongate the left
side of the arrow until the overall shape of the peach is more or
less round. Make other adjustments if necessary (see image below).
In Layer Palette click on layer 2 to
highlight...right click and select Covert to Raster Layer from the
drop down menu. Click on layer 3 to highlight...select the
ObjectSelector from the tool bar and click the second oval on the
canvas to select. Right click to get the drop down menu and select
Create Raster Selection. You now have the marching ants around the
second oval. Go to the layer palette, right click and convert layer
3 to a raster layer. The marching ant selection remains.
|
| 4. |
Shading |
|
Foreground solid color: #AE411A
Background solid color: Null
Add a
raster layer
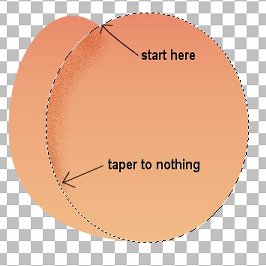
AirBrush with these
settings...
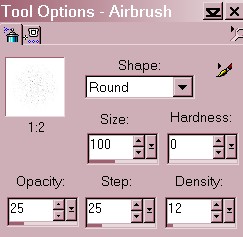
Spray lightly between points indicated
Effects/Blur/GaussianBlur/Radius4 (if it looks too
dark use Control+Y to repeat the blur until it suits you.
Deselect
In the Layer
Palette click on the glasses for layer 1. Click on layer2 to
highlight...goto Layers/Merge/Merge Visible
Rename the merged layer "body"
Click on Selections/Select All then Selections again and
choose Float...the ants will be marching around the entire
peach.
From the Effects menu choose 3D
Effects/Cutout and apply with the following settings.

Deselect.
|
| 5. |
The Face |
|
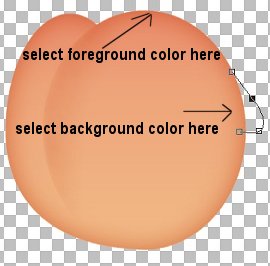
Here things to do with color get a little tricky
due to using a gradient fill on the body. With your eyedropper set
on the very edge at the top (the darkest part) Left click to select
the foreground color. On the right side where the nose goes move the
eyedropper in a few pixels from the edge and Right click to select
the background color.
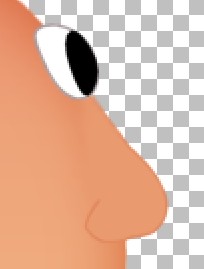
Choose the Draw Pencil from the Tool Bar. Tool Options
settings: Freehand Line, Width: 1, Antialias: checked, Create as
vector: checked, Close path: UNchecked.
Draw the main part of the nose as shown in the image
above.
Draw the nostril as just a
small curved line. Node edit if needed to get the lines to match up.
Convert the vector layer to a raster layer. Rename it to "nose". I
used the following settings to smudge the area lightly to
blend.

Let's give him an eye so he
can watch what you are doing.
Foreground
solid color: #A59699 gray
Background solid
color: #FFFFFF white
Preset: Ellipse
Antialias: Checked
Create
as Vector: Checked
Line Width: 1
Make a small oval. Tilt it slightly and flatten
the left side just a bit.
Change the
Foreground to Null the Background to Black
Draw a smaller oval, tilt it slightly and place it similar
to the image below. Convert to raster layer. Rename it "eye".
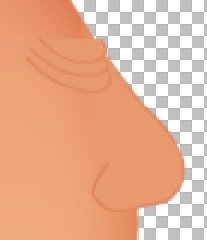
Under the eye go the wrinkles. Believe
me...I am an expert on this subject.
Set
the Foreground and Background colors the same way we did for the
nose.
Using the Draw tool and the same
settings draw a series of 3 arcs under the eye in the manner
depicted in the image below. Starting with the lower one and moving
upwards. The wrinkles can be node edited if necessary. Once the
wrinkles suit you...convert this vector layer to a raster layer.
Rename it "wrinkles" and drag it below your eye layer. You may want
to use your eraser to shorten one or two of the wrinkle lines for
added character. Reposition the eye a bit if needed. In any case
make sure the eye layer is highlighted so we are in position to
start the brow layer.
Are you still remembering to SAVE your work?
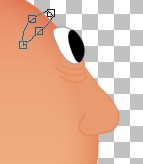
The Eyebrow...Your first glipse of Izzy may
have raised a few.
Foreground solid color:
Null
Background solid color: #A59699
Gray
Preset: Ellipse
Antialias:Checked
Create as Vector:
Checked
Line Width: doesn't matter
Just above the eye make an oval. Node edit to
shape. Straight, arched, thin or bushy! When you like what you see
then Convert to Raster. Rename the layer to "brow".
It was here that I used the EyeCandy fur filter.
If you don't have it he looks just fine with plain brows or even
smudged ones.
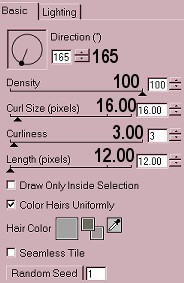
Open EyeCandy4000 and select
Fur. On the Fur settings menu select "short grey whiskers" to get
the lighting and color. Change the basic settings as indicated on
the image below.
Repeat the EC Fur but
change the direction to 248
The Mouth...
ADD a new raster
layer.Name it "mouth".
Foreground solid
color: Repeat the eyedropper left click on the darkest area on top
of his head to select.
Background solid
color: Null
Select the Draw tool...Freehand
line.
Antialias:Checked
Create as Vector: UNchecked
Line
Width: 2
Draw a long curved line for his
smile and a short line underneath for a lower lip.
 Continued on Page
2.
Continued on Page
2. |