|
Izzy A. Peach |

|
|
©By Mary aka CowLady...January 19,
2003 |
|
|
| 6. |
The Legs |
|
Foreground solid color: the same as you just
used for the mouth.
Background solid
color: With the eyedropper right click on the area of the body
about where you expect the top of the leg to be...see image
below.

Preset: Ellipse
Antialias: Checked
Create as
Vector: Checked
Line Width:1
Draw out a long ellipse. Node edit until it
looks similar to the shape in the image above.
When satisfied convert your vector
layer to a raster layer...Rename it "right leg".
Goto Selections/Select all...again goto
Selections and choose Float. Apply the same Cutout we used in
Step 4 but change the Opacity to 50 and the Blur to 20.
Deselect.
Using your Freehand
Selection Tool set Point to Point...Feather: 0 and Antialias:
Checked...draw a box around the upper portion of the leg as
pictured and then hit the delete key. Deselect and smudge to
blend if needed.

Still on the same
layer..Selections/Select All...Selections/Float
We are preparing to put hair on these legs
and give him a "macho" look. We do not, however, want hair on
his feet so we grab our trusty Freehand Selection Tool again.
Hold down the Control key and draw a box around the foot area.
Voila...you still have the marching ants around the leg where
we want the hair, but the foot is no longer selected.

Go to
Effects/EyeCandy4000/Fur...Same settings as before, but change
the Density to 60 and the Length to 13. Apply the
fur...Deselect. Copy and paste as a new layer. Move this layer
down so it is below the "body" layer. Position it so it looks
like he has a "good understanding". Rename this layer "left
leg".
The Toes of the Right
Foot...
Foreground solid color: the
same as you just used for the leg.
Background solid color: With the eyedropper right
click on the area of the foot about where the Cutout shading
ends.
The Draw Tool
Antialias: Checked
Create as
Vector: Checked
Line Width:1
In your layer palette hightlight the right
leg layer...this should be your top layer. Start forming the
toes at the top of the foot and work down over lapping as you
go. See image below.

Okay...five toes. Once again I remind you
these toes can be node edited. When they suit you convert the
layer to raster and rename it "right toes".
The toes of the left foot are made just the same only
reversed.
Things should now look
similar to this. (See image below).

|
| 7. |
The Shorts |
|
Foreground solid color: #A59699 Gray
Background solid color: #FFFFFF White
Preset: Ellipse
Antialias: Checked
Create as
Vector: Checked
Line Width:1
Make an oval big enough to cover the lower
portion of the body.
Node edit to fit
the contours. Pull up an arch to expose the top of the leg.
Convert to Raster. Rename "shorts".

Selections/Select
All...Selections/Float
Add a new
Raster layer. With the foreground set to #A59699 (gray) the
background set to Null...Draw Tool options: Freehand Line with
width=3...Antialias: Checked and Create as Vector:
UNchecked
Draw a short line down the
back of the shorts for shading. Goto Effects/Blur/Gaussian
Blur/Radius set to 3. Apply and deselect. Rename this layer
"shading".
The Band...
Change the preset to a rounded rectangle and
again make the background color White.
Draw a long narrow rectangle and node edit to fit
snuggly on his waist.

Convert to Raster Layer and Rename it
"band".
With the foreground set
to #DC1615 (red) the background set to Null...Draw Tool
options: Bezier Curve with Line width:1...Antialias: Checked
and Create as Vector: Checked
For the
line style we want something different. So choose #5 Dashed
from the drop down menu for the Draw Tool Options. These
dashes look too long for our stitching so click on the
"Custom" Button and change the"Dash Box" number from 24 to 8.
"Save as new" with any name you choose.
I'm assuming here that you know how to use the Bezier
tool, so draw a line across the band and make curve slightly.
Draw a second Bezier line below that (node edit lines for a
more precise fit). Change your Foreground Color to Gray
#A59699 and draw in the same manner a Bezier curved line
around the leg opening. Convert to Raster and Rename it
"stitching".

|
| 8. |
The Arm |
|
Foreground solid color: Using eyedropper
left click dark area at top of head.
Background solid color: Using eyedropper right click
about where the shoulder will be.
Preset: Ellipse
Antialias:
Checked
Create as Vector:
Checked
Line Width:1
Make a long ellipse and node edit to a
shape similar to the image below. Give him lots of
muscle!

When finished...Convert it to a raster
layer. Rename the layer "arm".
Selections/Select All...Selections/Float. Apply the
same "Cutout" we used for the leg. Deselect
As we did on the leg again using the Freehand
selection tool draw a small box around the top of the arm at
the shoulder and hit the delete key. Smudge to blend if
needed.
We need to draw the beer
can before we can draw the fingers that will be clutching
it.
Foreground solid color: #A59699
gray
Background gradient color:
metallic (the one that came with your PSP Program) Angle set
at 90°
Preset: Rounded
Rectangle
Antialias: Checked
Create as Vector: Checked
Line Width:1
Off to the
side of the hand, anywhere on the canvas where you have a
little room to work...Draw out a small rounded rectangle. Node
Edit and pull the two inner nodes at the bottom down slightly
and towards the center giving the bottom of the can a bit of a
rounded look.
Change the Preset to an
Ellipse.
Draw a small oval the width
of the can and place in on top of the rounded
rectangle.

Make the Foreground color:Null and change
the Background color to #A59699 (gray)
On the preset menu select the "teardrop". Antialias
still checked...Create as Vector still checked and line width
doesn't matter.
Zoom in on the top of
the can and draw out a small teardrop for the opening. Using
the handle tilt it 90° and position it near the edge.
Convert the layer to Raster.
Add a new Raster Layer.
Foreground solid color: #000000 Black
Background solid color: #DC1615 Red
Open up your text entry box and choose the font you
would like to use. I chose Ariel/all caps...the size can vary
depending on the size of your can.
If
you want Izzy to be a teetotaler type the words ROOT BEER
instead of BEER. Flip the text 90° and position it on the can.
*** Go to the Layer
Palette...Right Click and choose View/None from the drop down
menu. Now all the layers will have glasses with red x's. Click
on the layer that contains your can and the layer that
contains your text, this will make them visible.
Layers/Merge/Merge Visible. Rename this merged layer
"Beer".
Again in the Layer
Palette...Right click and choose View/All.
Move the Beer layer to the niche just
below the Arm layer.
Position the can
in his hand and we can go on and draw the fingers.
Foreground solid color: Using eyedropper
left click dark area at top of head.
Background solid color: Using eyedropper right click
on the back of the hand.
Draw Tool:
Freehand Line
Antialias:
Checked
Create as Vector:
Checked
Line Width:1
Line Style: #1 solid.
Note:
Three of these are not a full view of the fingers. They wrap
around the side of the can. The ends of these fingers and the
thumb are hidden from view.
Draw
three short overlapping ovals and then the extended pinkie
finger. Node edit where necessary.

Convert to Raster layer and Rename to
"fingers"
|
|
|
| 9. |
The Stem |
|
Foreground solid color:#633C2D
Background solid color:#89513A
Preset: Ellipse
Antialias: Checked
Create as
Vector: Checked
Line Width:1
Draw a thin oval near the top of the canvas.
Node edit to look like the image below.

Change the foreground color to
null and the background color to the dark brown #633C2D
Zoom in and draw a small circle at the top
of the stem.

Convert to Raster layer.
Add a Raster Layer. Selections/Select
All...Selections/Float
Foreground
solid color:#F2BC88
Background solid
color:Null
Draw tool: Freehand
Line
Antialias: Checked
Create as Vector: UNchecked
Line Width:2
Zoom in...draw a
small line down the length of the stem as a highlight.
Goto Effects/Blur/Gaussian Blur/Radius
3...Apply and deselect.
Merge the
stem and it's highlight layer the same as we did the beer can
and the text (see *** above). Rename the merged layer to
"stem". Move stem layer to a spot below the body layer.
Position the stem to your liking.
| |
| 10. |
Winding Things Up |
|
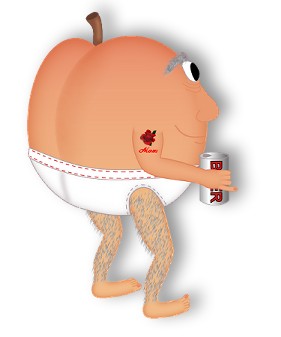
The basic peach is done. If you want to add
the Tattoo, finger and toe nails, or anything else...do it
here. Use your imagination and individualize your work. Thanks
for doing my Tutorial.
| |
|
|