|

Hopefully you have already installed your
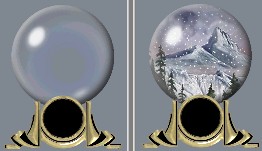
snow tube, so let's begin to add some weather. You should still have
your marching ants in place, but if they have gotten lost, go to
"Selections...load from an alpha channel..." and click okay when our
circular image shows up.
I never use this snow tube at 100% size.
I reduce to 60. Make sure you go now to the layer called "snow 1"
and start adding your snow in a nice random pattern. How much you
add is entirely up to you. Because the area has the marching ants
around it, any snow you add will stay inside the area and will NOT
overflow into the background or outside of the globe. When you are
satisfied, go to the layer palette and hide "snow 1" by clicking on
the glasses and then go to layer "snow 2".
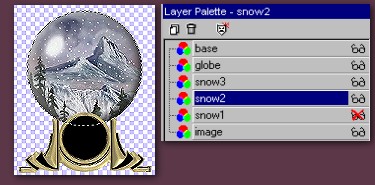
Do the
same steps as above on layer 2 and add the amount of snow you would
like. I always start to add the snow in a different direction than I
did on level 1. When you are finished, return to the layer palette,
click on the glasses to hide "snow 2" then activate "snow 3" and
finish off adding the snow to this layer. When you are finished, you
can hold down the control key and press D to deselect your circle.
Our next step is to add one last new raster layer and call
it "background". It will appear just above snow 3 but we will move
it in a minute. Using colour #7E8697, go to the paintbucket and
floodfill this layer. Then go to the menu "Layers ...
arrange....send to the bottom". At this point I also add some
texture sometimes. You can now if you wish, but I am skipping that
step here.
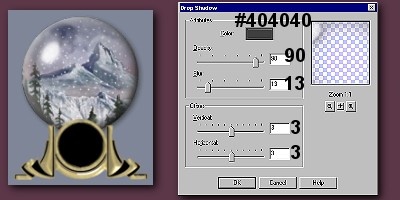
One last thing I like to do before duplicating my
image is to add a drop shadow to the globe. Activate the globe layer
and then you must return to "Selections .. load from alpha channel"
to get the marching ants back. Go to Image.. effects.. drop shadow
and use the settings below. When you are finished hold down the
control key and press D to "deselect" and remove the ants. A last
personal thing I do is go back to the layer palette and click on the
glasses to make all layers visible again. You do not have to do
this, it is just something I always do (for no particular
reason).
If you
would like to add a drop shadow to the base as well, now is the time
to do that by activating the base layer then adding your drop
shadow. I am not doing that here just to save time and not make this
too too long. It depends a lot on which base you are using as to
what shadow settings to use.
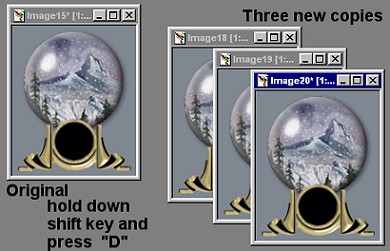
Finally the time has come to
duplicate your main image. Working on one main image like this cures
the "jaggies" and "jiggles" of things other than your snow animating
as well.
We are going to make 3 copies and then set aside the
original just in case somewhere we "goof up" and I have done that
many times. That way you haven't lost all the work you have put in
up to this point. Hold down the shift key and press D to make a
duplicate copy with all the layers intact. Repeat that step twice
more until you have a total of 3 copies of your
original.
BACK
TO PAGE
TWO PAGE
FOUR
MAIN
TUTORIAL LIST
This
tutorial was posted at the site of "P. Ann's Place" Oct.20,2001 and
written by P. Sherman. All I ask is that you do not claim it as your
own.
| |