|
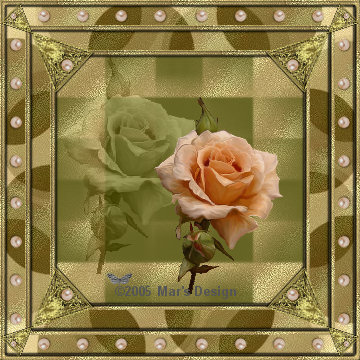
Infinity
Frame
(PSP 8,
9 & 10)
A
tutorial by Mar © 2005.
What you need:
PSP. Download a 30 day trial
here.
The Materials: Download
here.
Open all materials in PSP.
The rose is a digital
painting done by me so
all © rights belong to me "Mar's Art
Design".
This rose is for personal use only and may not be
shared over groups or send in any mailing list.
Do you want
to see more? My
digital art gallery is here.
Save
often.
Let's begin. Good
luck.....
1. Open a new image 250 X 250,
transparent.
Fill with #656323.
If you use an other tube
choose another color that matches.
Layers > New raster
layer.
2. Foreground style to pattern and
find the opened MD-InfinityGold.jpg.
Make sure Texture is uncheck
(blue hand).
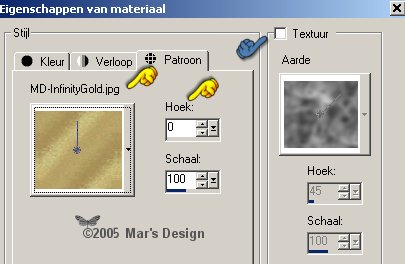
Fill the layer with the gold
pattern.
3. Layers > New mask layer >
From image.
.jpg)
4. Find the opened MD-InfinityMask
image.

Apply.
Layers > Merge
> Merge group.
5. Open the painted
MD-InfinityRose.psp and copy.
Edit > Paste > Paste as a new
layer.
6. Image > Resize > 110% >
all layers unchecked.

7. Move  the
rose a little to the top left. the
rose a little to the top left.
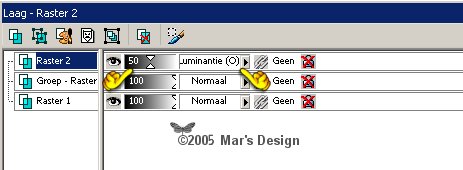
8. In your Layer Palette set your layer to
Luminance (O).
Set this layers opacity to 50%.
Edit > Paste > Paste as a new
layer.
9. Move this rose a little to the
bottom right.
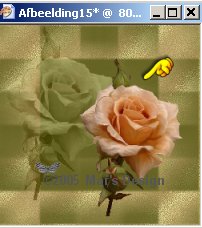
If all went well you'll have this
now:
10. Image > Add borders > 5
Pixels > Symmetric > Black.
11. Confirm the merging of all
layers
12. Selections > Select
all.
Selections > Modify > Contract with 5
pixels.
Selections > Invert.
Fill with the gold
pattern.
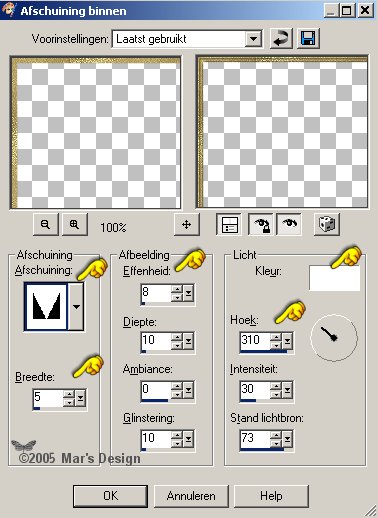
13. Effects > 3D-effects > Inner
bevel > Color white.
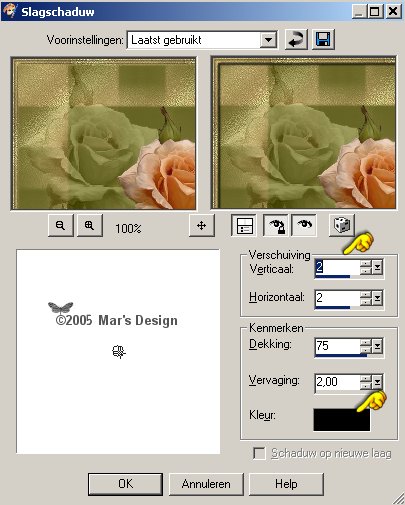
14. Effects > 3D-effects > Drop
shadow > Black.
I will refer to this drop shadow as shadow
1.
15. Repeat the drop shadow (1) but this
time Hoiz. and Vert. to - 2.
16. Image > Add borders > 20
Pixels > Symmetric > Black.
17. Select with your wand  the black border (feather 0, tolerance 10). the black border (feather 0, tolerance 10).
Fill the selection with the gold
pattern.
18. Effects > Artistic effects >
Halftone > Modus to Luminance (Old).
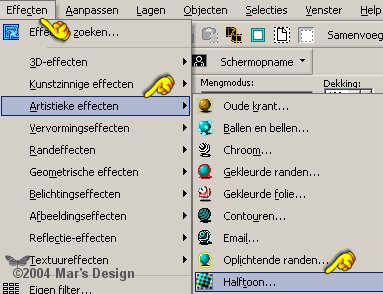
This setting:
.jpg)
19. Image > Add borders > 5
Pixels > Symmetric > Black.
20. Select with your wand the black border (feather 0, tolerance 10).
Fill the selection with the gold
pattern.
21. Repeat the inner bevel and the drop
shadow (1) at 2 and - 2.
22. Open the MD-InfinityCorner-1.psp
and copy.
Edit > Paste > Paste as a new
layer.
23. Move the corner with to
the top left (see screenshot below).

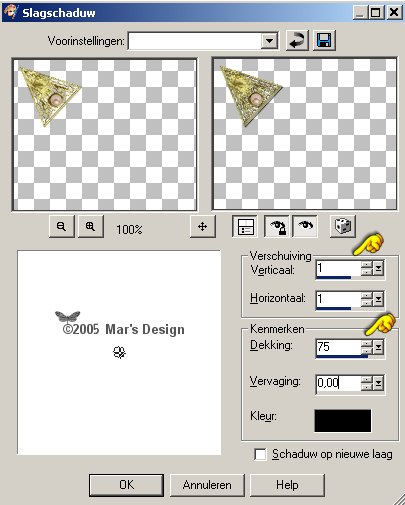
24. Effects > 3D-effects > Drop
shadow > Black.
This drop shadow settings I will refer to as
shadow (2).
25. In your Layer Palette >
Duplicate.
Image > Mirror.
26. In your Layer
Palette > Duplicate.
Image > Flip.
27. In your Layer
Palette > Duplicate.
Image > Mirror.
28. Layers > Merge all flatten.
29. Image > Add borders > 20
Pixels > Symmetric > Black.
30. Select the
black border.
Fill the selection with the gold
pattern.
31. Repeat - Effects > Artistic
effects > Halftone.
32. Image > Add borders > 5
Pixels > Symmetric > Black.
33. Select the black border.
Fill the selection with the gold
pattern.
34. Repeat the inner bevel and the drop
shadow (1) at 2 and - 2.
35. Open the MD-InfinityCorner-2.psp
and copy.
Edit > Paste > Paste as a new
layer.
36. Move the corner with to
the left (see screenshot below).

37. Give this corner the drop shadow
(2).
38. In your Layer Palette >
Duplicate.
Image > Mirror.
39. In your Layer Palette > Duplicate.
Image > Flip.
40. In your Layer Palette >
Duplicate.
Image > Mirror.
41. Layers > Merge all flatten.
42. Now open the MD-InfinityPearls.psp
and copy.
Edit > Paste > Paste as a new
layer.
43. Move the pearls to the top in the
middle.

44. In your Layer Palette >
Duplicate.
Image > Mirror.
45. In your Layer Palette >
Duplicate.
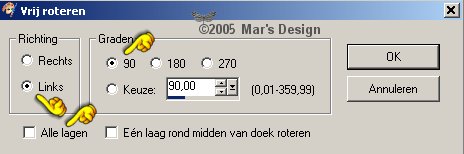
Image > Rotate > Free rotate > All layers
unchecked.
46. Move the pearls to the left
side.
47. In your Layer Palette >
Duplicate.
Image > Mirror.
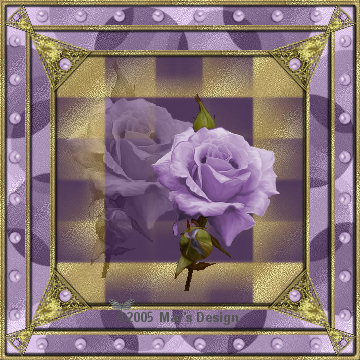
!!! TIP !!!
For the samples
below I first filled the 20 border with the
color I first filled
the image with (bleu and purple).
After that I added a layer and
filled that with the gold pattern.
Then I applied the Halftone.
Since the color is not matching we have to improvise.
In my
Layer Pallet I set the top layer to Luminance (O).
This way the
bottom layer color will reflect.
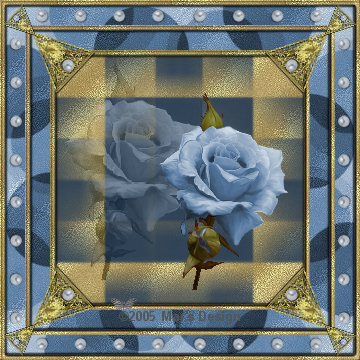
Your Infinity Frame is done.
I
hope you like this tutorial.
Thank you for trying them out.

This tutorial is written and
designed by Mar and therefore her property.
This tutorial may not be
downloaded for any purpose other
than to follow the tutorial. If
you're a Moderator of a group,
please e-mail me
before adding this tutorial to any lessons,
etc.
When you do have my permission..... only a text link is
allowed.
My tutorials are never ever to
be sent over any mailing list or to leave my
site.

Since
05-19-2005:
|