This tutorial was created June 1, 2007
Any resemblance to other online tutorials is purely coincidence
©N@thy 2007
This tutorial was written using PSP 9, but can be done in other versions
~ You will need ~
Paint Shop Pro, a 30 day trial can be downloaded here
Filters Unlimited 2.0, you can download here
My supplies here. The zip includes tubes, picture, pattern, brush and font
Put the brush into your brush folder
Put the pattern into your pattern folder
Open tubes and picture in psp
Tubes have HIDDEN layers which mean you must unhide to see them
Minimize them all
Double click to open the font "Scrap Cursive" and minimize it on your desktop
Set your foreground color to #186DA8
Set your background color to Black (#000000)
~ Step 1 ~
File, New
Set Width to 600 and Height to 450, Transparent background
Set your foreground to pattern
Find lblue036.jpg and use these settings:
Angle: 0, Scale: 100
Fill the layer with the pattern
Effects, Plugins, I.C.NET Software, Filters Unlimited 2
Find Special Effects 2, Border White Fade 1 and set Fade to 40, Invert Unchecked
Image, Resize and use these settings:
90 Percent, Resample using Bicubic, Lock aspect ratio Checked, Resize all layers Unchecked
Crop your working area
~ Step 2 ~
Copy mds4539 Background.pspimage and paste as new layer
Adjust, Hue and Saturation, Colorize and use these settings:
Hue: 127, Saturation: 255
Change the Opacity of this layer to 30
Layers, Duplicate
Image, Flip
Image, Mirror
Adjust, Hue and Saturation, Colorize and use these settings:
Hue: 152, Saturation: 212
Layers, Merge, Merge Visible
~ Step 3 ~
Layers, New Raster Layer
Change your foreground to color (#186DA8)
Activate Selection Tool, Selection Type set to Rectangle
Click on Custom Selection and use these settings:
Left: 80, Top: 63, Right: 459, Bottom 342
Fill the selection with your color
Layers, New Raster Layer
Copy Banyan Moon.jpg and paste into selection
Change the Blend Mode of this layer to Dodge
Do NOT deselect!
~ Step 4 ~
Copy blue_moon.psp and paste as new layer
Image, Resize and use these settings:
75 Percent, Resample using Bicubic, Lock aspect ratio Checked, Resize all layers Unchecked
Move the woman to the left
Selections, Invert
Hit delete once on your keyboard
Change the Blend Mode of this layer to Hard Light
Selections, Select None
Hide the bottom layer
Layers, Merge, Merge Visible
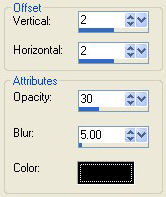
Effects, 3D Effects, Drop Shadow and use these settings:
Unhide the bottom layer
~ Step 5 ~
Copy Inframed by ca_pris_2.pspimage and paste as new layer
Maximize dragonflies.pspimage
Pick the butterfly of your choice and copy it (I chose the one on Raster 5)
Image, Resize and use these settings:
40 Percent, Resample using Bicubic, Lock aspect ratio Checked, Resize all layers Unchecked
Image, Flip
~ Step 6 ~
Image, Rotate, Free Rotate and use these settings:
Direction: Right, Degrees: 45, everything else Unchecked
Position the butterfly to the right (look at my image for placement)
Change the Blend Mode of this layer to Luminance (Legacy)
Effects, 3D Effects, Drop Shadow and use these settings:
Make sure Shadow on new layer is Checked!
~ Step 7 ~
Layers, New Raster Layer
Layers, Arrange, Bring to Top
Activate your Brush Tool, find agiBrush37_wb-ifihadyou and use these settings:

Apply the brush at the top of the picture using your background color (#000000)
~ Step 8 ~
Activate the Text tool and use the following settings:

Set your Foreground color to NULL
Set your Background color to #000000
Type your name
Position your name at the bottom of the picture
Layers, Convert to Raster Layer
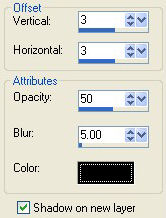
Effects, 3D Effects, Drop Shadow and these same settings as before but
uncheck Shadow on new layer
~ Step 9 ~
Copy coin45.tub and paste as new layer
Position into the top left corner
Effects, 3D Effects, Drop Shadow and these same settings as before
Layers, Duplicate
Image, Flip
Image, Mirror
Layers, Merge All (Flatten)
Add your watermark, resize if you'd like and save your work as jpg
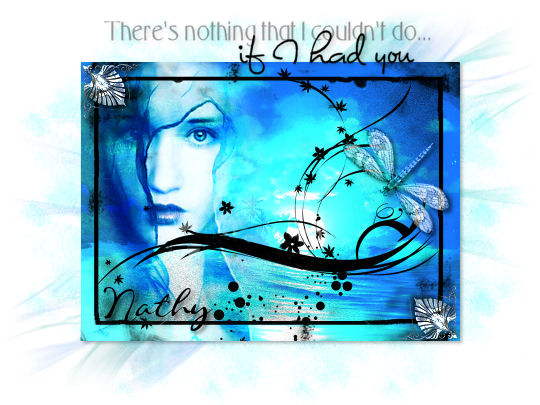
Your tag is finished. I hope you have enjoyed this tutorial.
Any resemblance to other online tutorials is purely coincidence
©N@thy 2007
This tutorial was written using PSP 9, but can be done in other versions
~ You will need ~
Paint Shop Pro, a 30 day trial can be downloaded here
Filters Unlimited 2.0, you can download here
My supplies here. The zip includes tubes, picture, pattern, brush and font
Put the brush into your brush folder
Put the pattern into your pattern folder
Open tubes and picture in psp
Tubes have HIDDEN layers which mean you must unhide to see them
Minimize them all
Double click to open the font "Scrap Cursive" and minimize it on your desktop
Set your foreground color to #186DA8
Set your background color to Black (#000000)
~ Step 1 ~
File, New
Set Width to 600 and Height to 450, Transparent background
Set your foreground to pattern
Find lblue036.jpg and use these settings:
Angle: 0, Scale: 100
Fill the layer with the pattern
Effects, Plugins, I.C.NET Software, Filters Unlimited 2
Find Special Effects 2, Border White Fade 1 and set Fade to 40, Invert Unchecked
Image, Resize and use these settings:
90 Percent, Resample using Bicubic, Lock aspect ratio Checked, Resize all layers Unchecked
Crop your working area
~ Step 2 ~
Copy mds4539 Background.pspimage and paste as new layer
Adjust, Hue and Saturation, Colorize and use these settings:
Hue: 127, Saturation: 255
Change the Opacity of this layer to 30
Layers, Duplicate
Image, Flip
Image, Mirror
Adjust, Hue and Saturation, Colorize and use these settings:
Hue: 152, Saturation: 212
Layers, Merge, Merge Visible
~ Step 3 ~
Layers, New Raster Layer
Change your foreground to color (#186DA8)
Activate Selection Tool, Selection Type set to Rectangle
Click on Custom Selection and use these settings:
Left: 80, Top: 63, Right: 459, Bottom 342
Fill the selection with your color
Layers, New Raster Layer
Copy Banyan Moon.jpg and paste into selection
Change the Blend Mode of this layer to Dodge
Do NOT deselect!
~ Step 4 ~
Copy blue_moon.psp and paste as new layer
Image, Resize and use these settings:
75 Percent, Resample using Bicubic, Lock aspect ratio Checked, Resize all layers Unchecked
Move the woman to the left
Selections, Invert
Hit delete once on your keyboard
Change the Blend Mode of this layer to Hard Light
Selections, Select None
Hide the bottom layer
Layers, Merge, Merge Visible
Effects, 3D Effects, Drop Shadow and use these settings:
Unhide the bottom layer
~ Step 5 ~
Copy Inframed by ca_pris_2.pspimage and paste as new layer
Maximize dragonflies.pspimage
Pick the butterfly of your choice and copy it (I chose the one on Raster 5)
Image, Resize and use these settings:
40 Percent, Resample using Bicubic, Lock aspect ratio Checked, Resize all layers Unchecked
Image, Flip
~ Step 6 ~
Image, Rotate, Free Rotate and use these settings:
Direction: Right, Degrees: 45, everything else Unchecked
Position the butterfly to the right (look at my image for placement)
Change the Blend Mode of this layer to Luminance (Legacy)
Effects, 3D Effects, Drop Shadow and use these settings:
Make sure Shadow on new layer is Checked!
~ Step 7 ~
Layers, New Raster Layer
Layers, Arrange, Bring to Top
Activate your Brush Tool, find agiBrush37_wb-ifihadyou and use these settings:
Apply the brush at the top of the picture using your background color (#000000)
~ Step 8 ~
Activate the Text tool and use the following settings:
Set your Foreground color to NULL
Set your Background color to #000000
Type your name
Position your name at the bottom of the picture
Layers, Convert to Raster Layer
Effects, 3D Effects, Drop Shadow and these same settings as before but
uncheck Shadow on new layer
~ Step 9 ~
Copy coin45.tub and paste as new layer
Position into the top left corner
Effects, 3D Effects, Drop Shadow and these same settings as before
Layers, Duplicate
Image, Flip
Image, Mirror
Layers, Merge All (Flatten)
Add your watermark, resize if you'd like and save your work as jpg
Your tag is finished. I hope you have enjoyed this tutorial.