Tutorial written October
5th 2003
Resemblance to any other tutorial is purely
coincidental
This tutorial uses Filters Unlimited
which there is no
demo
Supplies
Paint Shop
Pro
Toadies Filters
FM Tile Tools
Eye
Candy 3
Filters Unlimited
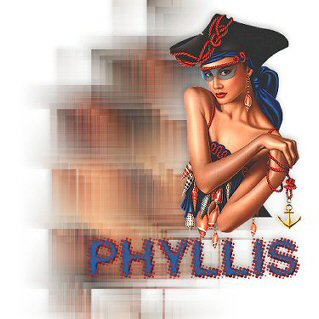
Tube
Font
**Unzip
the tube and the font - minimize the font
in the
taskbar and open the tube in PSP**
1. Open the tube - duplicate and close the
original
Rename the layer to Shiver
2. Image - Canvas Size - 500 x 500
**It will
be resized later**
3. Duplicate the shiver layer
Rename this layer
Tube
Hide this layer for now
4. Click on the Shiver layer
Effects - Plugins -
Toadies - Weaver

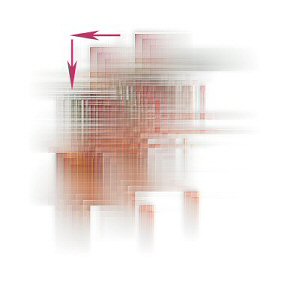
5. Duplicate the Shiver layer
Using your mover
tool, move this layer to the
left and down slightly
as shown below
6. Layers - Merge - Merge Visible
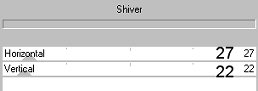
7. Effects - Plugins - Filters Unlimited - Special
Effects 1 - Shiver
Effects - Plugins - FM Tile Tools - Blend
Emboss
Apply the default settings
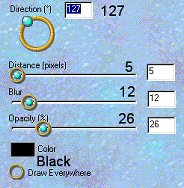
Effects - Plugins - Eye Candy 3 - Drop Shadow
8. Unhide your tube layer
Depending on the tube
used, it may
have to be resized
I resized the
one I am using 85% - Bicubic Resample
**Just make
sure Resize All Layers is Unchecked**
Apply a drop shadow using the same settings as
previous
9. Layers - New Raster Layer
Activate your text tool with the following
settings:

*Please note that your font will show up in the PSP
list
even though not installed in the Windows Font
Folder*
Type in your text
Effects - Plugins - Eye Candy 3 - Inner Bevel
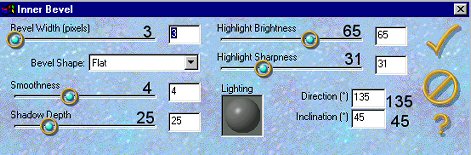
Effects - Plugins - Eye Candy 3 - Drop
Shadow
Apply the same settings as
previous.
If you have all of your parts
placed exactly where
you want them
Layers - Merge - Merge
All(Flatten)
Image - Resize - 75% - Bicubic
Resample
I hope you have enjoyed this tutorial
Any
questions please feel free to email me

Thanks to my testers for trying this tutorial out


Tutorial Copyright Marlie©
2003
Graphics and Page Design © Marlie's Place
2003
|