
This tutorial was created in 2006
Any resemblance to other online tutorials is purely coincidence
©N@thy 2007
This tutorial was written using PSP 9, but can be done in other versions
~ You will need ~
Paint Shop Pro, a 30 day trial can be downloaded here
My supplies here. The zip includes tubes, image and alpha
Open tubes, image and alpha in psp and minimize them all
Set your foreground color to #B4A298
~ Step 1 ~
Maximize Concerto_MistedByGini_08-04-06.jpg
Layers, Promote Background Layer
Selections, Select All
Layers, New Raster Layer
Copy GA_Slats_Wave.pspimage and paste into selection
Selections, Float
Selections, Defloat
Selections, Invert
Delete the slat layer
On the image layer now hit delete once on your keyboard
Selections, Select None
~ Step 2 ~
File, New
Set Width to 507 and Height to 365, Transparent background
Fill the layer with your foreground color
Copy nathymusicbackground.pspimage and paste as new layer
Copy the slat image we just made and paste as a new layer
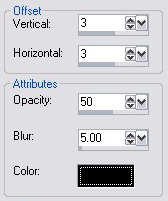
Effects, 3D Effects, Drop Shadow and use the following settings:
~ Step 3 ~
Copy WordArtLove.pspimage and paste as new layer
Move it up a little bit (Look at my image for placement)
Effects, 3D Effects, Drop Shadow and use the following settings:

Repeat this Drop Shadow 2 more times
~ Step 4 ~
Maximize Nadia-Nickykl-corner.pspimage
Copy corner 1 and paste as new layer
Move it up in the top left corner
Copy corner 2 and paste as new layer
Move it up in the bottom right corner
(Look at my image for placement)
~ Step 5 ~
Copy ASD_butterfly4.pspimage and paste as a new layer
Move it in the top right corner
Duplicate this layer
Image, Mirror
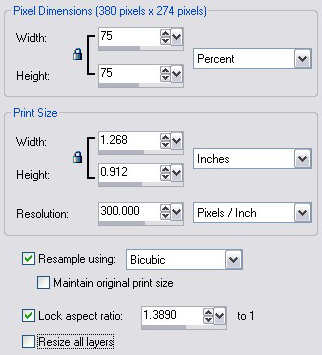
Image, Resize and use the following settings:
~ Step 6 ~
Move it down in the left bottom corner
Duplicate this layer
Image, Mirror
Image, Resize and use the same settings as in step 5
Move the butterfly in the left bottom corner just over the other one
(Look at my image for placement)
~ Step 7 ~
Maximize the musicalphabynathy.pspimage
Copy and paste each letter for your name
Move them down starting in the left bottom corner
and position them beside the butterlies
(Look at my image for placement)
~ Step 8 ~
Image, Add Border, 5 pixels in a black color
Select the border with your magic wand
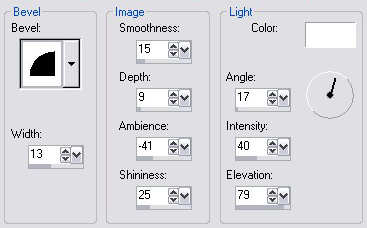
Effects, 3D Effects, Inner Bevel and use the following settings:
Selections, Select None
Save your work as jpg
Add your watermark and your tag is finished. I hope you have enjoyed this tutorial.
Any resemblance to other online tutorials is purely coincidence
©N@thy 2007
This tutorial was written using PSP 9, but can be done in other versions
~ You will need ~
Paint Shop Pro, a 30 day trial can be downloaded here
My supplies here. The zip includes tubes, image and alpha
Open tubes, image and alpha in psp and minimize them all
Set your foreground color to #B4A298
~ Step 1 ~
Maximize Concerto_MistedByGini_08-04-06.jpg
Layers, Promote Background Layer
Selections, Select All
Layers, New Raster Layer
Copy GA_Slats_Wave.pspimage and paste into selection
Selections, Float
Selections, Defloat
Selections, Invert
Delete the slat layer
On the image layer now hit delete once on your keyboard
Selections, Select None
~ Step 2 ~
File, New
Set Width to 507 and Height to 365, Transparent background
Fill the layer with your foreground color
Copy nathymusicbackground.pspimage and paste as new layer
Copy the slat image we just made and paste as a new layer
Effects, 3D Effects, Drop Shadow and use the following settings:
~ Step 3 ~
Copy WordArtLove.pspimage and paste as new layer
Move it up a little bit (Look at my image for placement)
Effects, 3D Effects, Drop Shadow and use the following settings:
Repeat this Drop Shadow 2 more times
~ Step 4 ~
Maximize Nadia-Nickykl-corner.pspimage
Copy corner 1 and paste as new layer
Move it up in the top left corner
Copy corner 2 and paste as new layer
Move it up in the bottom right corner
(Look at my image for placement)
~ Step 5 ~
Copy ASD_butterfly4.pspimage and paste as a new layer
Move it in the top right corner
Duplicate this layer
Image, Mirror
Image, Resize and use the following settings:
~ Step 6 ~
Move it down in the left bottom corner
Duplicate this layer
Image, Mirror
Image, Resize and use the same settings as in step 5
Move the butterfly in the left bottom corner just over the other one
(Look at my image for placement)
~ Step 7 ~
Maximize the musicalphabynathy.pspimage
Copy and paste each letter for your name
Move them down starting in the left bottom corner
and position them beside the butterlies
(Look at my image for placement)
~ Step 8 ~
Image, Add Border, 5 pixels in a black color
Select the border with your magic wand
Effects, 3D Effects, Inner Bevel and use the following settings:
Selections, Select None
Save your work as jpg
Add your watermark and your tag is finished. I hope you have enjoyed this tutorial.