
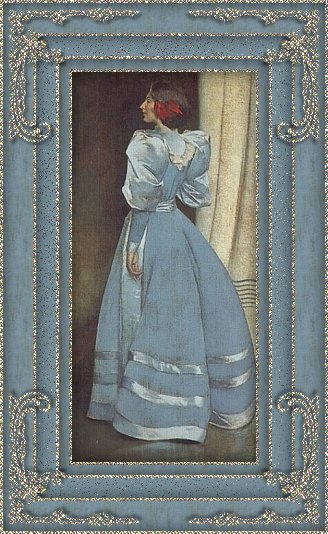
Artwork by John White Alexander
1856 -
1915
Paint
Shop Pro
Super Blade Pro
Supplies
The
corners, graphic, and pattern and VM Tools
Dynamic Diffusion are all included in the zip
file.
Place the VM Tools Dynamic
Diffusion in your PSP Plugin
Folder.
Restart PSP so it will
show in your plugins.
Graphic of Choice - a
long graphic is better with these corners but
feel free to use the corners and graphic of your
choice.
I have included a copy of the
graphic in the zip file.
1. Open
your graphic - resize to a workable size.
Remember to sharpen if you
resize.
Effects - Sharpen -
Sharpen.
2.
Unzip the corners and the pattern and open them
in PSP.
Minimize your corners
until later.
Set your foreground
to pattern and choose the supplied
pattern.
You can colourize it to
match your graphic.
Set your
background to white.
3. Add 3px border - select with
magic wand.
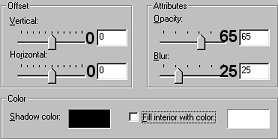
4. Effects - Plugins - Super Blade
Pro - use the preset of your choice.
I
used nk-goldensilver from The
Treasure Trove.
You can find
this preset on page 23.
5. Selections - Invert.
Effects - 3D Effects - Cutout.
Select
none.
6. Add 10px border - select with
magic wand.
7. Flood fill border with
pattern.
Select none.
8. Repeat Steps 3 - 5.
9. Choose a colour from your
graphic and set as background.
I
used #78909C.
10. Add 20px border - select with
magic wand.
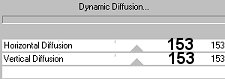
11. Effects - Plugins - VM Tools -
Dynamic Diffusion.
Use the following
settings:
12. Select none.
13. Set background back to white -
select with magic wand.
14. Repeat Steps 3 - 5.
15. Add 30px border - select with
magic wand.
16. Flood fill with
pattern.
Select none.
17. Repeat Steps 3 - 5.
18. Open your corner.psp - if you
have used the same preset as I have there is one
already made for you.
If you didn't
use the same preset, you can apply your preset
to the blank corner provided.
18. Copy and paste the corner as a
new layer on the main image.
Place where I
have on the image above.
19. Layers - Duplicate. Image
- Mirror.
You will have two corners on
the top of your framed image.
20. On your layer palette click on
the glasses beside the background
layer.
This will turn the framed image
off.
Click on one of your corner
layers.
Layers - Merge - Merge
Visible.
21. Make sure you are on your
merged layer.
It should show as
blue on your layer palette.
Layers -
Duplicate.
Image -
Flip.
All of the corners should
be in their proper place.
On the
layer palette, click on the glasses again to
show the whole image.
22. Layers - Merge - Merge
All
Thanks for trying this tutorial and I
hope you enjoyed it.
If you have any
questions please feel free to email
me.


Tutorial © Marlie
2002