|
Garden
Frame
(PSP all
versions)
A tutorial by
Mar © 2006
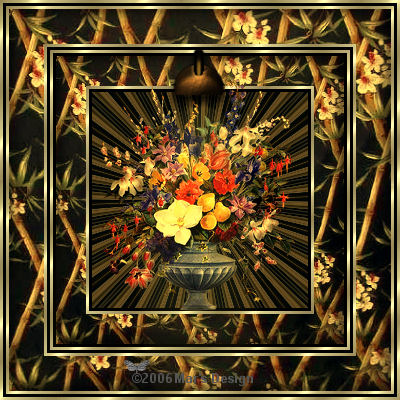
What you need:
Corel PSP. Download a 30 day trial
here.
The materials: Download
here.
Open all images from the ZIP in PSP.
Save
often.
Let's get
started. Good
luck.....
You can use a lot of
your own flower tubes for this tutorial.
If you want your tube
color to match the color of the frame, you
have to use the 3D
Inner bevel effect as used later on in this tutorial.
Notice...
not every tube is suitable. Try the bevel first to see the effect.
1. Open a new image 400 X 400 >
Transparent.
Put your foreground to pattern and find the
MD-Goldfill.jpg.
Texture unchecked (bleu hand).
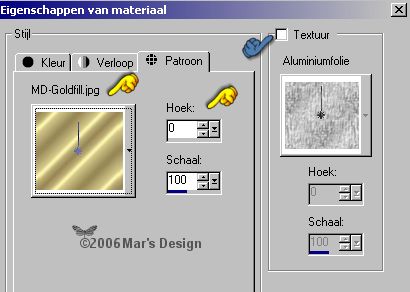
Background to black.
2. Selections > Select
all.
********* This steps between the
star lines will be repeated *********
3. Fill the selection with
the gold pattern.
4. Selections > Modify >
Contract with 3 pixels.
5. Layer > New raster
layer.
Fill your selection with your right
mouse button (the black).
6. Selections > Modify >
Contract with 3 pixels.
7. Fill the selection with the gold
pattern.
8. Selections > Modify >
Contract with 3 pixels.
9. Layer > New raster
layer.
Fill your selection with your right
mouse button (the black).
10. Selections > Modify >
Contract with 3 pixels.
Keep your selection
active.
********* The steps to repeat end here
*********
11. Open the
Gardenpattern.jpg and copy.
Go back to your frame.
Edit > Paste >
Paste into selection.
12. Effects > 3D-effects > Inner
bevel > Color #9e813e.
This frame can be done in a lot of
colors. Just change the color of the
inner bevel. At the bottom
of this tutorial (examples) some color numbers.
.jpg)
13. Layers > Merge > Merge all
flatten.
14. You still have your selection
active.
Selections > Modify > Contract with 35
pixels.
15. Layer > New raster
layer.
Now repeat the steps we have done
before (between the star lines 3-10).
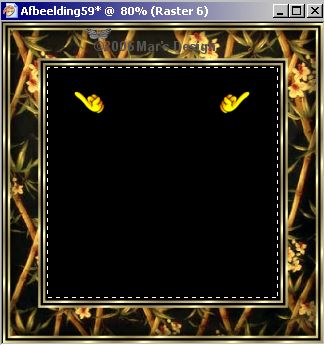
If all went well you must
have this:
16. You still have the garden pattern
on your PC's memory.
If not..... go to it and copy it
again.
Edit > Paste >
Paste into selection.
17. Repeat the inner bevel like
before.
18. Your selection is still
active.
Selections > Modify > Contract with 30
pixels.
19. Layer > New raster
layer.
Fill the selection with the gold
pattern.
20. Selections > Modify >
Contract with 3 pixels.
21. Layer > New raster
layer.
Fill your selection with your right
mouse button (the black).
22. Selections > Modify >
Contract with 3 pixels.
23. You still have the garden pattern
on your PC's memory.
If not..... go to it and copy it
again.
Edit > Paste >
Paste into selection.
24. Repeat the inner bevel like
before.
25. Effects > Reflection-effects
> Kaleidoscope.
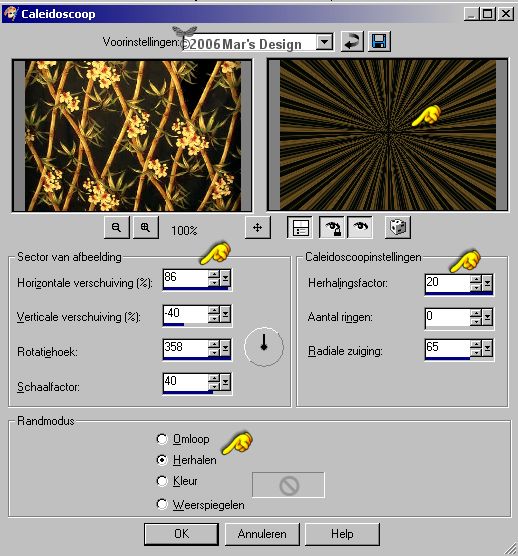
Apply.
26. Selections > None.
Layers > Merge > Merge all
flatten.
27. Choose a tube from the ZIP (or use
your own) and copy it.
Edit > Paste >
Paste as a new layer.
28. Move  the
flower tube to the middle. the
flower tube to the middle.
If you use a vase...... put it on the
gold border.
29. Open the MD-Spotlight.psp and
copy.
Edit > Paste >
Paste as a new layer.
30. Move  the
spotlight on the first or second series the
spotlight on the first or second series
of 2 gold borders. It is all up to you what you like
best.
31. Layers > Merge > Merge all
flatten.
Your Garden Frame is done.
I
hope you like this tutorial.
Thank you for trying them out.

Inner bevel color for this frame is #397339.

Inner bevel color for this frame is #8980b4.
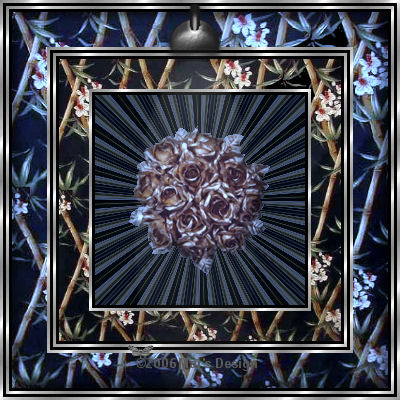
Inner bevel color for this frame is #6a89ce.
I
didn't use inner bevel at the pattern layer in the
middle.
This tutorial is written and
designed by Mar and therefore her property.
This tutorial may not be
downloaded for any purpose other
than to follow the tutorial. If
you're a Moderator of a group,
please e-mail me
before adding this tutorial to any lessons,
etc.
When you do have my permission..... only a text link is
allowed.
My tutorials are never ever to
be sent over any mailing list or to leave my
site.

Since
06-28-2006:
|