|
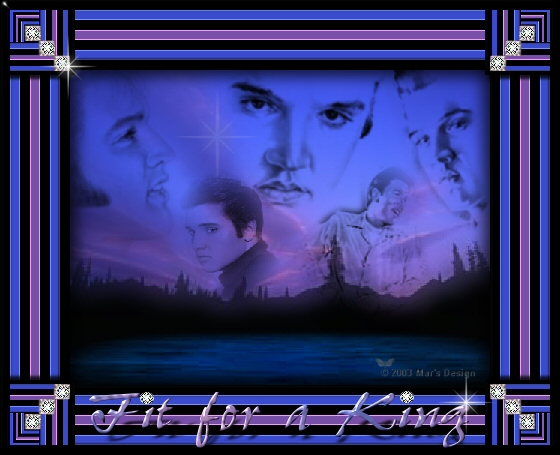
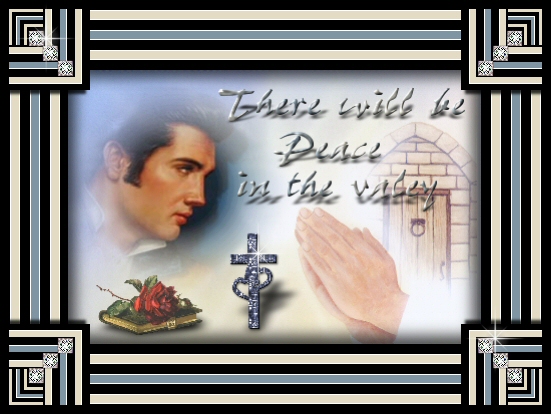
Fit for a King
Frame
(PSP
7, 8, 9 & 10)
A tutorial by Mar ©
2003
First the following:
Everyone
who knows me, knows I'm a huge Elvis fan.
It's not my
habit to put music in a tutorial.
If it bothers you, please turn
off the sound.
The reason I did this, is
because I dedicate this tutorial
to the best performer and
singer ever... Elvis!
What you need:
PSP 7 or
8. Download a
30 trial here.
Eye
Candy 3.1 Filter. (Free).
Extract to your folder
'Plugins' in PSP.
ZIP with
diamonds, Art and Sparkle download
here.
Unzip and open in PSP.
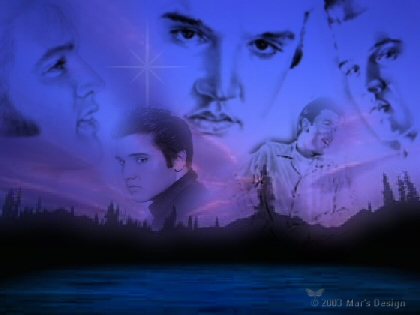
An image. I used this
digital Elvis Art made by me,
for this tutorial. Every other
image is okay.
The © of Elvis Presley
are at Elvis Presley Enterprise.
You may use my Elvis Art
but the © of the original art stay with me.
Everything you
create with the help of this tutorial is yours.
If you want to
place your results on a webpage, please put my banner on.

Elvis Art: 2003© Mar's Design.
Save
often.
Let's go. Good
luck.....
1. Open your Elvis image or
any other you like to use.
Make sure your image size is about
450 X 350.
If you have a smaller image make your borders 5, 6, 7
or 8 pixels.
Don't make your frame too dominating.
You will
have ugly corners.
2. Add borders > 10 Pixels > Symmetric > Black.
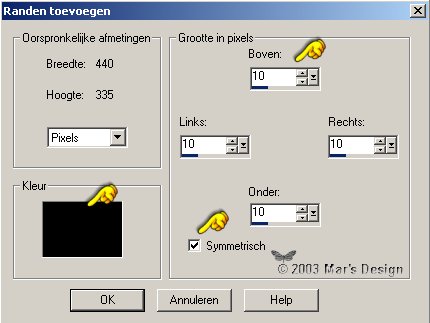
3. Add borders > 10 Pixels > Symmetric >
Color #3B4BCF.
If you use another picture, take
a color that's in your image.
Use  the
color picker. the
color picker.
Click in de color screen and after that in your
image.

4. Repeat adding borders, but use
black.
5. Repeat with color #784FAA.
Or
the color you choose from your image.

6. Repeat again 10 pixels black and
again with #3B4BCF.
Add a last border black.
You have added 7 borders.
You must have this.

7. Selections > All.
Selections > Modify > Contact 70
pixels.
If you used a smaller border it's 7 times the
amount of your pixels.
8. Effects > 3D effects > Cut
out.

Repeat but with H and V at -
8.
9. Selections > Invert.
Effects > Edges >
Enhance.
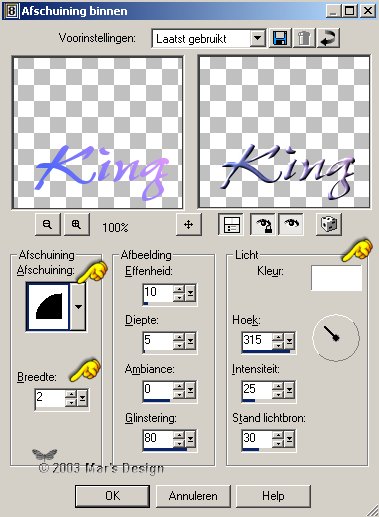
10. Effects > Plugins > Eye
Candy 3.1 > Inner Bevel.

11. Copy.
Selections >
None.
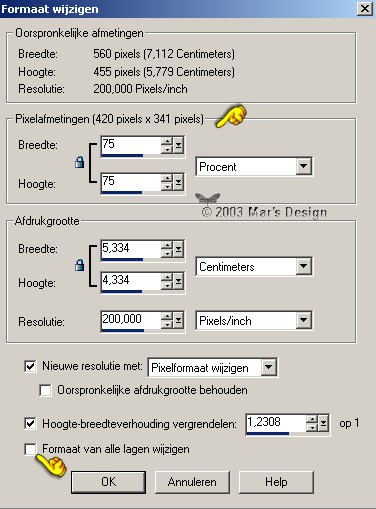
Paste as a new layer.
Resize 75 % > All layers unchecked.
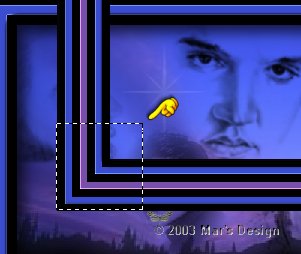
12. With  move a little up, so you can see what you're doing.
13. Use Selection tool set at
square.

Draw a square selection round the
bottom left corner.
We use this corner because the others have to
much
shininess, due to the Eye Candy inner bevel.
14. Copy.
Click undo, till this frame is
gone.
Look in your layer palette.
If there's only the
background layer it's ok.
15. Paste as a new layer.
Be very careful with the next
steps.
Zoom in if necessary.
16. Place the corner top right. Exactly against the
black.
Zoom in, to see if it fits
exactly.

17. You still have the corner on your
clipboard (copy).
Paste as a new layer.
Resize at 50%.
Adjust > Sharpen >
Sharpen.
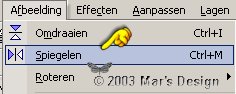
Image > Mirror Image >
Flip.
18. With
place the little corner in the big one.
Look if it fits
exactly.
Watch the black outlines, they have to align.
19. Lock off your background layer  . .
Activate one of the other layers (= blue).
Merge visible.
20. Effects > 3D Effects > Drop
shadow.

It looks like your corner is
A-symmetric, but that's an optical illusion.
21. Duplicate this layer.
Image > Mirror.
22. In your Layer Pallet >
Duplicate.
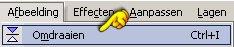
Image > Flip.
Duplicate.
Image > Mirror.
23. Open your background
layer.
24. Open MD-Diamonds.pspimage
(ZIP).
The diamonds and sparkles are saved as a
*.pspimage but can
be opened in PSP 7 as well, because I
saved them as a 7 file.
Copy and paste as a new
layer.
25. With
place in the top left corner.
Make sure the diamonds fit.
With
 you can adjust the size. you can adjust the size.
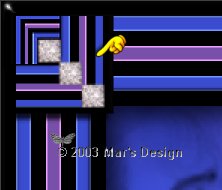
26. Repeat the duplicate > Mirror
and Flip, till all 4 corners have diamonds.
27. Foreground color to #4E66FA (or a
color from your image).
Background color #EF9EFF (or another
color from your image).
28. Go to your material palette and set
it on gradient.
Foreground-Background gradient (most of the time
the first).
Repeats 2. Angle 45. Texture
unchecked.


29. Look for a nice font. I used Pepita
MT (ZIP).
Stroke at 0.
I typed "Fit for a
King" size 48.

If you will use another
text?
With  resize
until it fits. resize
until it fits.
30. Place your text on your
frame.
In PSP 7 > convert to raster.
Effects > 3D effects >
Inner bevel.
31. Effects > Plugins > Eye Candy 3.1 > Glass.

32. Effects > Plugins > Eye Candy 3.1 > Perspective
Shadow.

33. With
place at the top or the bottom.
34. Open MD-sparkle.pspimage
(ZIP) decorate your "Fit for a King" frame and text.
Depending what you will do with
your frame, you can
resize it, if you want to. Don't forget to
sharpen if you do.
Your "Fit for a King" Frame is
done.
I hope you did like it and learned something in the
process.
Thanks for trying this
tutorial.
Elvis Art: 2003© Mar's Design.

Elvis Art: 2003© Mar's Design.

This
frame is made by my dear friend
Tiny van Veelen.
"Wowww Tiny
what an awesome result!"
This tutorial is written and
designed by Mar and therefore her property.
This tutorial may not be
downloaded for any purpose other
than to follow the tutorial. If
you're a Moderator of a group,
please e-mail me
before adding this tutorial to any lessons,
etc.
When you do have my permission..... only a text link is
allowed.
My tutorials are never ever to
be sent over any mailing list or to leave my
site.
Translation into English
with help of my best friends, Trudie.
Thanks sweetie! Couldn't do
it without you.

Since
11-16-2003:
|