
This tutorial was created in 2006
Any resemblance to other online tutorials is purely coincidence
©N@thy 2007
This tutorial was written using PSP 9, but can be done in other versions
~ You will need ~
*** The alpha I used is by Dozi. You can download it here (christmas set, 2nd from top) ***
*** The lace I used is by Dozi. You can download it here (last lace frame at the bottom of the page) ***
Paint Shop Pro, a 30 day trial can be downloaded here
Eye Candy 4000 (Fire), you can download here
Animation Shop, you can download here
My supplies here. The zip includes the tubes, alpha selections, picture, mask, and alpha
Put the mask into the Mask folder
Open everything else in psp
Tubes have HIDDEN layers which mean you must unhide to see them
Do not try to unhide the alpha selections as they are hidden until we call them
Minimize them all
When opening alphaselectionschristmaskitten.pspimage it will look empty but its not
~ Step 1 ~
Maximize alphaselectionschristmaskitten.pspimage
Set your foreground to white and fill the layer
Layers, New Raster Layer
Selections, Select All
Copy kittenchristmaswp1.jpg and paste into selection
Selections, Select None
~ Step 2 ~
Layers, Load/Save Mask, Load Mask From Disk
Find paint mask and use the following settings:
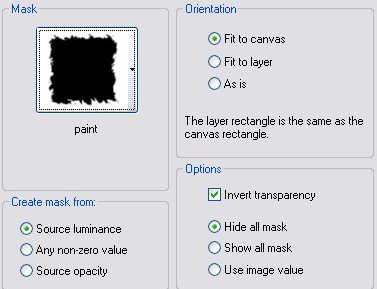
Layers, Merge, Merge Group
Set the opacity of this layer to 20
Layers, Merge, Merge Visible
~ Step 3 ~
Maximize a-dozi's-lace-frame-square-14.psp
Delete the black background layer
Crop the lace then resize using the following settings:
Width: 457 Pixels, Height: 319 Pixels, Resample using Smart Size, Lock aspect ratio Unchecked
and Resize all layers Checked
Image, Canvas Size, Width: 507 Pixels, Height, 369 Pixels, Placement is centered
***This will be our working area for now***
Copy border.pspimage and paste as new layer
Copy kittenchristmaswp1.jpg and paste as new layer
Layers, Merge, Merge Visible
~ Step 4 ~
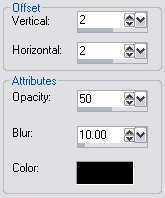
Effects, 3D Effects, Drop Shadow and use the following settings:
Edit, Copy
Do not close it just yet in case you need to copy it again
~ Step 5 ~
Back to alphaselectionschristmaskitten.pspimage
Edit, Paste, Paste as New Layer
Image, Rotate, Free Rotate and use the following settings:
Direction: Left, Degrees: 20, All layers not checked
Move the frame a little bit down and to the right so its on the edge of the right side
(Look at my image for placement)
Layers, Duplicate
Image, Mirror
~ Step 6 ~
Layers, New Raster Layer
Selections, Load/Save Selection, Load Selection From Alpha Channel
Click on the arrow and select picture
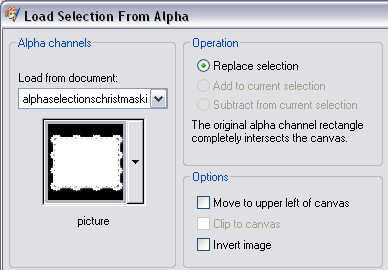
Edit, Paste, Paste into Selection
(If the image is not in the clipboard anymore just go back and copy again)
Selections, Select None
Layers, Merge, Merge Visible
~ Step 7 ~
Copy xmas48b.pspimage and paste as new layer
Position it just so it looks like its hanging from the tree outside
(Look at my image for placement)
Effects, 3D Effects, Drop Shadow and use the same settings as in step 4
Duplicate this layer
Resize 90 % (make sure Resize all layers is not checked)
Move it to the next branch
(Look at my image for placement)
Layers, Merge, Merge Visible
~ Step 8 ~
Copy ccd-xmas-greet02.pspimage and paste as new layer
Position it at the top
(Look at my image for placement)
Effects, 3D Effects, Drop Shadow and use the same settings as in step 4
Layers, Merge, Merge Visible
~ Step 9 ~
Maximize katzerl's-alphas-Xmas-01.psp and katzerl's-alphas-Xmas-02.psp
Using your selection tool set to rectangle
Copy and paste the letters for your name into the working area
Hide the bottom layer
Layers, Merge, Merge Visible
Image, Resize and use the following settings:
Width and Height: 20 Percent, Resample using Smart Size, Lock aspect ratio checked
and Resize all layers Unchecked
Effects, 3D Effects, Drop Shadow and use the same settings as in step 4
Unhide the bottom layer
***If you want to add your watermark it is now time to do it***
~ Step 10 ~
Layers, Merge, Merge Visible
Rename this layer 1
Layers, Duplicate
Rename this layer 2
Layers, Duplicate
Rename this layer 3
Layers, Duplicate
Rename this layer 4
Hide layers 3 and 4
Highlight layer 2 to activate it
~ Step 11 ~
Activate your magic wand and set the mode to Add and Tolerance to 45
Zoom in a little bit and click into the 2 flames to select them
Effects, Plugins, Eye Candy 4000, Fire
Click on Settings at the top and click on "reseat to factory default"
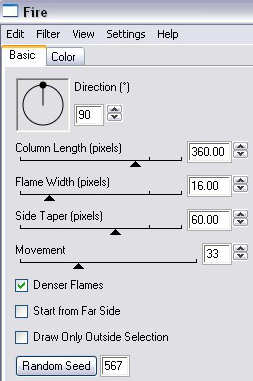
Unhide layer 3 and activate it
Effects, Plugins, Eye Candy 4000, Fire and use the same settings as before but click once
on "Random Seed"
Unhide layer 4 and activate it
Effects, Plugins, Eye Candy 4000, Fire and use the same settings as before but click once
on "Random Seed"
Selections, Select None
~ Step 12 ~
Set your foreground to #E89A00
Layers, New Raster Layer and name it Orange
Selections, Load/Save Selection, Load Selection From Alpha Channel
Click on the arrow and select orange
Fill the selection with your foreground color
(You might have to zoom in to make sure it is filled)
Selections, None
~ Step 13 ~
Set your foreground to #BB0A03
Layers, New Raster Layer and name it Red
Selections, Load/Save Selection, Load Selection From Alpha Channel
Click on the arrow and select red
Fill the selection with your foreground color
Selections, None
~ Step 14 ~
Set your foreground to #0C3882
Layers, New Raster Layer and name it Blue
Selections, Load/Save Selection, Load Selection From Alpha Channel
Click on the arrow and select blue
Fill the selection with your foreground color
Selections, None
~ Step 15 ~
Set your foreground to #8CB773
Layers, New Raster Layer and name it Green
Selections, Load/Save Selection, Load Selection From Alpha Channel
Click on the arrow and select green
Fill the selection with your foreground color
Selections, None
~ Step 16 ~
Hide all layers except 1 and Orange
Edit, Copy Merged
Launch Animation Shop
Edit, Paste, As New Animation
Back to PSP
Hide all layers except 2 and Red
Edit, Copy Merged
Back to Animation Shop
Edit, Paste, After Current Frame
~ Step 17 ~
Back to PSP
Hide all layers except 3 and Blue
Edit, Copy Merged
Back to Animation Shop
Edit, Paste, After Current Frame
Back to PSP
Hide all layers except 4 and Green
Edit, Copy Merged
Back to Animation Shop
Edit, Paste, After Current Frame
~ Step 18 ~
Edit, Select All
Animation, Frame Properties and put 25
***If you want to resize your animation it is now time***
Just click on Animation, Resize Animation then you can resize using pixels or percent
Make sure Resize Type is set to Bicubic resample and Maintain aspect ratio is checked
View, Animation
If satistied then File, Save
Give it a name and click ok on all windows until you are done
Your tag is finished. I hope you have enjoyed this tutorial.
Any resemblance to other online tutorials is purely coincidence
©N@thy 2007
This tutorial was written using PSP 9, but can be done in other versions
~ You will need ~
*** The alpha I used is by Dozi. You can download it here (christmas set, 2nd from top) ***
*** The lace I used is by Dozi. You can download it here (last lace frame at the bottom of the page) ***
Paint Shop Pro, a 30 day trial can be downloaded here
Eye Candy 4000 (Fire), you can download here
Animation Shop, you can download here
My supplies here. The zip includes the tubes, alpha selections, picture, mask, and alpha
Put the mask into the Mask folder
Open everything else in psp
Tubes have HIDDEN layers which mean you must unhide to see them
Do not try to unhide the alpha selections as they are hidden until we call them
Minimize them all
When opening alphaselectionschristmaskitten.pspimage it will look empty but its not
~ Step 1 ~
Maximize alphaselectionschristmaskitten.pspimage
Set your foreground to white and fill the layer
Layers, New Raster Layer
Selections, Select All
Copy kittenchristmaswp1.jpg and paste into selection
Selections, Select None
~ Step 2 ~
Layers, Load/Save Mask, Load Mask From Disk
Find paint mask and use the following settings:
Layers, Merge, Merge Group
Set the opacity of this layer to 20
Layers, Merge, Merge Visible
~ Step 3 ~
Maximize a-dozi's-lace-frame-square-14.psp
Delete the black background layer
Crop the lace then resize using the following settings:
Width: 457 Pixels, Height: 319 Pixels, Resample using Smart Size, Lock aspect ratio Unchecked
and Resize all layers Checked
Image, Canvas Size, Width: 507 Pixels, Height, 369 Pixels, Placement is centered
***This will be our working area for now***
Copy border.pspimage and paste as new layer
Copy kittenchristmaswp1.jpg and paste as new layer
Layers, Merge, Merge Visible
~ Step 4 ~
Effects, 3D Effects, Drop Shadow and use the following settings:
Edit, Copy
Do not close it just yet in case you need to copy it again
~ Step 5 ~
Back to alphaselectionschristmaskitten.pspimage
Edit, Paste, Paste as New Layer
Image, Rotate, Free Rotate and use the following settings:
Direction: Left, Degrees: 20, All layers not checked
Move the frame a little bit down and to the right so its on the edge of the right side
(Look at my image for placement)
Layers, Duplicate
Image, Mirror
~ Step 6 ~
Layers, New Raster Layer
Selections, Load/Save Selection, Load Selection From Alpha Channel
Click on the arrow and select picture
Edit, Paste, Paste into Selection
(If the image is not in the clipboard anymore just go back and copy again)
Selections, Select None
Layers, Merge, Merge Visible
~ Step 7 ~
Copy xmas48b.pspimage and paste as new layer
Position it just so it looks like its hanging from the tree outside
(Look at my image for placement)
Effects, 3D Effects, Drop Shadow and use the same settings as in step 4
Duplicate this layer
Resize 90 % (make sure Resize all layers is not checked)
Move it to the next branch
(Look at my image for placement)
Layers, Merge, Merge Visible
~ Step 8 ~
Copy ccd-xmas-greet02.pspimage and paste as new layer
Position it at the top
(Look at my image for placement)
Effects, 3D Effects, Drop Shadow and use the same settings as in step 4
Layers, Merge, Merge Visible
~ Step 9 ~
Maximize katzerl's-alphas-Xmas-01.psp and katzerl's-alphas-Xmas-02.psp
Using your selection tool set to rectangle
Copy and paste the letters for your name into the working area
Hide the bottom layer
Layers, Merge, Merge Visible
Image, Resize and use the following settings:
Width and Height: 20 Percent, Resample using Smart Size, Lock aspect ratio checked
and Resize all layers Unchecked
Effects, 3D Effects, Drop Shadow and use the same settings as in step 4
Unhide the bottom layer
***If you want to add your watermark it is now time to do it***
~ Step 10 ~
Layers, Merge, Merge Visible
Rename this layer 1
Layers, Duplicate
Rename this layer 2
Layers, Duplicate
Rename this layer 3
Layers, Duplicate
Rename this layer 4
Hide layers 3 and 4
Highlight layer 2 to activate it
~ Step 11 ~
Activate your magic wand and set the mode to Add and Tolerance to 45
Zoom in a little bit and click into the 2 flames to select them
Effects, Plugins, Eye Candy 4000, Fire
Click on Settings at the top and click on "reseat to factory default"
Unhide layer 3 and activate it
Effects, Plugins, Eye Candy 4000, Fire and use the same settings as before but click once
on "Random Seed"
Unhide layer 4 and activate it
Effects, Plugins, Eye Candy 4000, Fire and use the same settings as before but click once
on "Random Seed"
Selections, Select None
~ Step 12 ~
Set your foreground to #E89A00
Layers, New Raster Layer and name it Orange
Selections, Load/Save Selection, Load Selection From Alpha Channel
Click on the arrow and select orange
Fill the selection with your foreground color
(You might have to zoom in to make sure it is filled)
Selections, None
~ Step 13 ~
Set your foreground to #BB0A03
Layers, New Raster Layer and name it Red
Selections, Load/Save Selection, Load Selection From Alpha Channel
Click on the arrow and select red
Fill the selection with your foreground color
Selections, None
~ Step 14 ~
Set your foreground to #0C3882
Layers, New Raster Layer and name it Blue
Selections, Load/Save Selection, Load Selection From Alpha Channel
Click on the arrow and select blue
Fill the selection with your foreground color
Selections, None
~ Step 15 ~
Set your foreground to #8CB773
Layers, New Raster Layer and name it Green
Selections, Load/Save Selection, Load Selection From Alpha Channel
Click on the arrow and select green
Fill the selection with your foreground color
Selections, None
~ Step 16 ~
Hide all layers except 1 and Orange
Edit, Copy Merged
Launch Animation Shop
Edit, Paste, As New Animation
Back to PSP
Hide all layers except 2 and Red
Edit, Copy Merged
Back to Animation Shop
Edit, Paste, After Current Frame
~ Step 17 ~
Back to PSP
Hide all layers except 3 and Blue
Edit, Copy Merged
Back to Animation Shop
Edit, Paste, After Current Frame
Back to PSP
Hide all layers except 4 and Green
Edit, Copy Merged
Back to Animation Shop
Edit, Paste, After Current Frame
~ Step 18 ~
Edit, Select All
Animation, Frame Properties and put 25
***If you want to resize your animation it is now time***
Just click on Animation, Resize Animation then you can resize using pixels or percent
Make sure Resize Type is set to Bicubic resample and Maintain aspect ratio is checked
View, Animation
If satistied then File, Save
Give it a name and click ok on all windows until you are done
Your tag is finished. I hope you have enjoyed this tutorial.