|

Supplies Needed
Paint
Shop Pro
Fantastic Machines - Paint
Engine
Ulead Art Texture
Filter
Factory A
Zip - Here
File
contains the graphic and the VM Distortion -
Radial Pox .
Unzip the file and open the
graphic in PSP.
Place the VM
Distortion Filter in your PSP Plugins
Folder.
Corners Optional
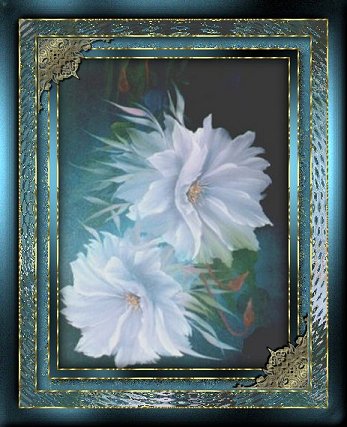
1.
Open graphic and duplicate twice (Shift, D).
Minimize one and we will use it later for
the pattern.
2. Chose a colour from your graphic
and set it as your foreground color - I used
#3F6A7B.
Background set to white.
3. Add 2px border. Select with
magic wand.
4. Effects - Plugins - Ulead
Art Texture.
Edit and chose palette 5. Ok.
On the main screen scroll to pattern
template #9 and chose the first pattern, second
row.
Keep selected

5. Selections - Invert.
Effects 3D Effects - Cutout.
Apply
cutout again V & H
-2.
Deselect.

6.
Add 10px border.
Select with magic wand.
Flood fill with foreground
color.
Keep selected.
7. Effects - Plugins - Filter
Factory A - Pool Shadow.
Apply the
following settings.
My screenshot will
appear different as I am using Filters
Unlimited.
Deselect.

8. Repeat Steps 3 & 4.
In
this repeat, chose a different color from white
as your background for the border
as
the magic wand will pick up some of the white
from the previous border.
I used my
foreground colour.
To apply the Ulead you
don't need to use white for the border colour.
9. Add 15px border.
Select with
magic wand.
Flood fill with foreground
colour.
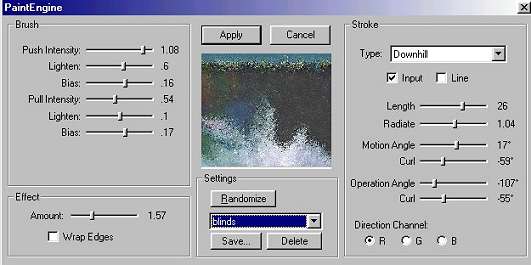
10. Effects - Plugins - Fantastic
Machines - Paint Engine.
Use the following
settings.
Keep
selected.
11.
Effects - 3D Effects - Cutout.
Deselect

12. Repeat Steps 3 &
4.
13.
Add 20px border.
Select with magic
wand.
14. Select pattern and scroll to the
image we minimized earlier.
Flood fill the
border with your pattern.
Keep
selected.
15.
Effects - Plugins - VM Distortion - Radial Pox
using the default settings.
Deselect.

16. Repeat Steps 3 &
4.
17. Add 25px border.
Select with magic wand.
18. Change your style back to colour
and flood fill the border with the foreground
colour.
Effects - Plugins -
Filter Factory A - Pool Shadow using the same
settings as before.
Keep
selected.
19. Effects - Noise -
Add 10% Uniform.
Keep
selected.
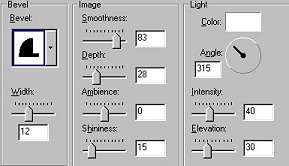
20. Effects - 3D Effects - Inner
Bevel.
21. Deselect.
Thank
you for trying this tutorial
I hope you have
enjoyed it.
If you have any questions or
queries
please feel free to email
me.


Tutorial Copyright ©Marlie
|