|
Emboss at Alpha
Frame
(PSP all
versions)
A tutorial by
Mar © 2007.
You can
Drag & Drop the below hand
for a easy use of this
tutorial.
 |
What you need:
PSP. Download a 30 day trial
here.
The materials: Download
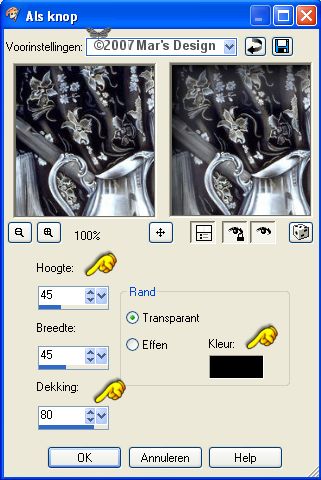
here.
MuRa's Seamless: Download
here.
Save the filter in your Plugins folder in PSP.
Close
and restart PSP otherwise your filter won't work.
Open all images
from the ZIP in PSP.
Save
often.
Let's get started. Good
luck.....
This tutorial is done in PSP
9.
1. Open one of the images from the
ZIP. These images are already colorized.
If you want to use an
image of your own, you'll have to
colorize it first.
Adjust > Hue and saturation >
Colorize.

2. Open a new image 400 X 450 and fill
with #585b67.
3. Open the MD-EmbossMask.jpg from the
ZIP.
I made this mask myself.
4. Layers > New mask layer >
From image.
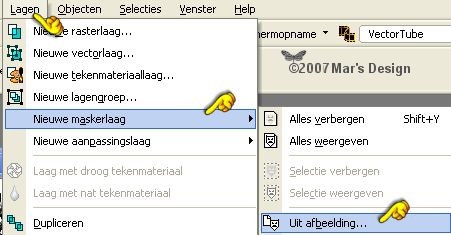
5. Look for the MD-EmbossMask.jpg and
apply.

6. Layers > Merge > Merge
group.
7. Layers > Duplicate.
8. Layers > Merge > Merge
visible.
9. Effects > Plugins > MuRa's
Seamless > Emboss at Alpha.
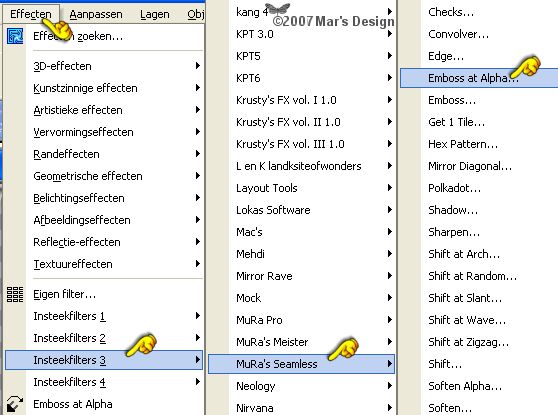
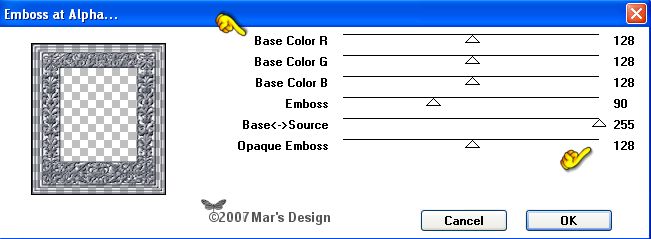
Apply.
10. Adjust > Sharpness >
Sharpen.
11. Layers > New raster
layer.
12. Foreground to
#585b67.
Background to #a4afb9.
Foreground to
gradient.
Look for the "Fore-background" gradient.
Texture
unchecked (bleu hand). Style Linear.

13. Fill your new layer with the
gradient.
14. In your Layer Palette, move this
layer down.
It is your bottom layer now. Lock the
layer.
15. Select the top layer (=
blue).
16. With your magic wand  (feather 0 - tolerance 25) select the middle part.
Selections > Modify > Expand with 3 pixels.
17. Now open the image you want to use
and copy it.
Go back to your frame.
18. Unlock the bottom layer and select
it (= blue).
19. Edit > Paste > Paste into
selection.
20. Selections > Modify >
Contract with 3 pixels.
21. Effects > 3D-effects >
Buttonize > Color black.
Selections > None.
22. In your Layer Palette select the
top layer again (= blue).
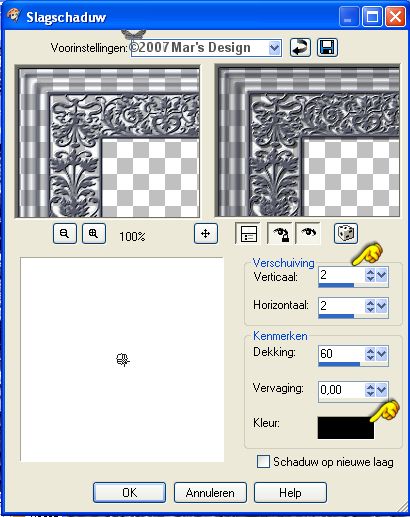
23. Effects > 3D-effects > Drop
shadow > Black.
24. You can colorize the emboss layer
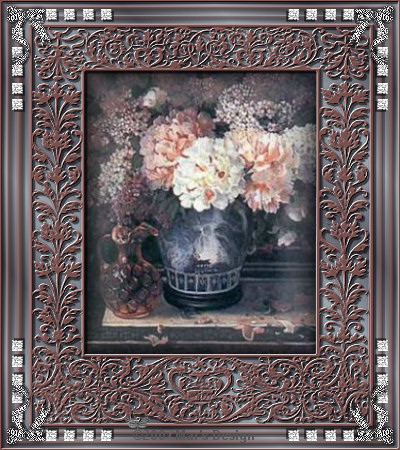
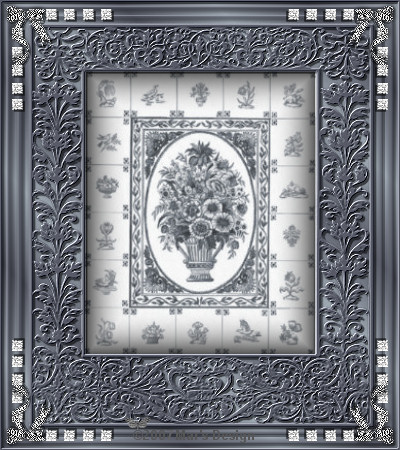
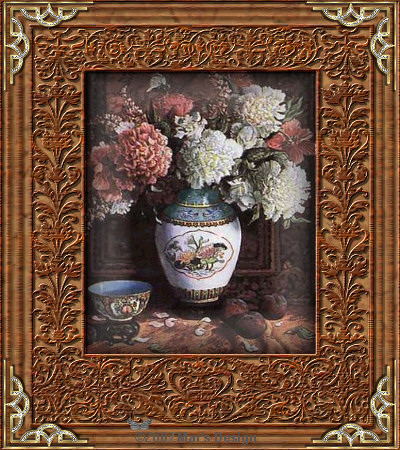
if you like to.
Take a look at my examples at the bottom of this
tutorial.
25. Layers > Merge > Merge all
layers flatten.
26. Open the MD-Embossed-Corner.psp and
copy.
27. Edit > Paste > Paste as a new
layer.
28. Move  the decoration to the left top corner.
29. Repeat the drop shadow with the
same settings as you did before.
30. Layers > Duplicate.
Image
> Mirror.
Layers > Duplicate.
Image > Flip.
Layers
> Duplicate.
Image > Mirror.
31. Layers > Merge > Merge all
layers flatten.
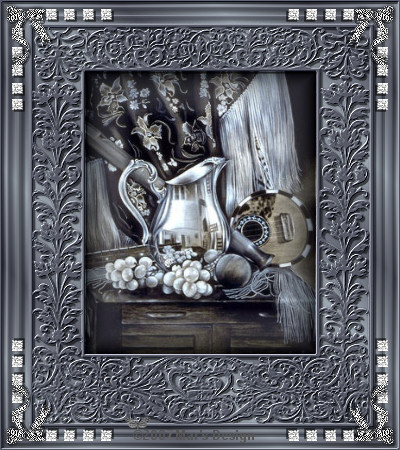
Your Emboss at Alpha Frame is
done.
I hope you like this tutorial and learned something
new.
Thank you for putting my tutorials to the test.
The frame below is done with two
wood patterns.
You can download the two
wood patterns here.
This tutorial is written and
designed by Mar and therefore her property.
This tutorial may not be
downloaded for any purpose other
than to follow the tutorial. If
you're a Moderator of a group,
please e-mail me
before adding this tutorial to any lessons,
etc.
When you do have my permission..... only a text link is
allowed.
My tutorials are never ever to
be sent over any mailing list or to leave my
site.
Since
02-27-2007:
|