
This tutorial was created April 25,
2006
Any resemblance to other online tutorials is purely coincidence
©N@thy 2007
This tutorial was written using PSP 9, but can be done in other versions
~ You will need ~
The picture I used is by Antje Darling. You can find her awesome artwork at Antje's Graphics.com
Paint Shop Pro, a 30 day trial can be downloaded here
Alien Skin Xenofex 2, you can download here
BorderMania, you can download here
My supplies here. The zip includes the image and brush
Put the brush in your brush folder
(If the brush is not working i included it in psp file format)
Open your image in psp and minimize it for later use
Set your Foreground color to #896B6D
Set your background color to #C9B5B7
File, New
Set Width to 500, the Height to 460 and check Transparent
Activate your Selection Tool and use the Custom Selection with the following settings:
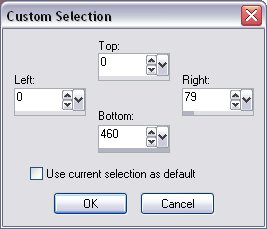
Fill the selection with your dark color
Selections, Select None
Activate your Selection Tool and use the Custom Selection with the following settings:

Fill the selection with your dark color
Selections, Select None
Layers, Duplicate
Image, Flip
Layers, Merge, Merge Visible
Activate your Magic Wand and click in the transparent part
Layers, New Raster Layer
Fill the selection with your light color
Effects, Plugins, Alien Skin Xenofex 2, Little Fluffy Clouds and use the following settings:
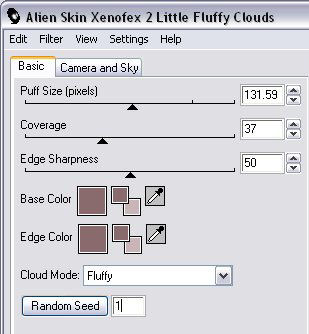
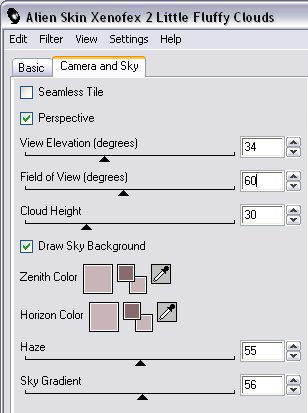
Selections, Select None
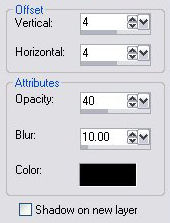
Effects, 3D Effects, Drop Shadow and use the following settings:
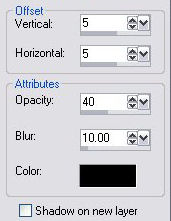
Repeat Drop Shadow but change Vertical and Horizontal to -5
Layers, New Raster Layer
Activate your Selection Tool and use the Custom Selection with the following settings:

Activate the image you minimized earlier and copy it
Back to our main image
Edit, Paste, Paste Into Selection
Selections, Select None
Image, Resize and use the following settings:
Width and Height 90%, Resample using Bicubic, Lock aspect ratio checked and Resize all layers NOT checked
Effects, 3D Effects, Drop Shadow and use the following settings:
Repeat Drop Shadow but change Vertical and Horizontal to -4
Layers, New Raster Layer and move it down so its on top of the merged layer
Activate your Brush Tool, find tp_FaerieDust and use the following settings:

Apply the brush twice at the same place with your light color
Change your foreground color to #374B55
and repeat the brush twice
(Or use the brush provided in psp format and colorize it)
Layers, Merge, Merge All (Flatten)
Change your foreground color back to #896B6D
Image, add border, 3 pixels in your light color
Image, add border, 3 pixels in your dark color
Image, add border, 3 pixels in your light color
Effects, Plugins, BorderMania, Frame #2 and use the following settings:

Add your watermark and your tag is finished. I hope you have enjoyed this tutorial.
Any resemblance to other online tutorials is purely coincidence
©N@thy 2007
This tutorial was written using PSP 9, but can be done in other versions
~ You will need ~
The picture I used is by Antje Darling. You can find her awesome artwork at Antje's Graphics.com
Paint Shop Pro, a 30 day trial can be downloaded here
Alien Skin Xenofex 2, you can download here
BorderMania, you can download here
My supplies here. The zip includes the image and brush
Put the brush in your brush folder
(If the brush is not working i included it in psp file format)
Open your image in psp and minimize it for later use
Set your Foreground color to #896B6D
Set your background color to #C9B5B7
File, New
Set Width to 500, the Height to 460 and check Transparent
Activate your Selection Tool and use the Custom Selection with the following settings:
Fill the selection with your dark color
Selections, Select None
Activate your Selection Tool and use the Custom Selection with the following settings:
Fill the selection with your dark color
Selections, Select None
Layers, Duplicate
Image, Flip
Layers, Merge, Merge Visible
Activate your Magic Wand and click in the transparent part
Layers, New Raster Layer
Fill the selection with your light color
Effects, Plugins, Alien Skin Xenofex 2, Little Fluffy Clouds and use the following settings:
Selections, Select None
Effects, 3D Effects, Drop Shadow and use the following settings:
Repeat Drop Shadow but change Vertical and Horizontal to -5
Layers, New Raster Layer
Activate your Selection Tool and use the Custom Selection with the following settings:
Activate the image you minimized earlier and copy it
Back to our main image
Edit, Paste, Paste Into Selection
Selections, Select None
Image, Resize and use the following settings:
Width and Height 90%, Resample using Bicubic, Lock aspect ratio checked and Resize all layers NOT checked
Effects, 3D Effects, Drop Shadow and use the following settings:
Repeat Drop Shadow but change Vertical and Horizontal to -4
Layers, New Raster Layer and move it down so its on top of the merged layer
Activate your Brush Tool, find tp_FaerieDust and use the following settings:
Apply the brush twice at the same place with your light color
Change your foreground color to #374B55
and repeat the brush twice
(Or use the brush provided in psp format and colorize it)
Layers, Merge, Merge All (Flatten)
Change your foreground color back to #896B6D
Image, add border, 3 pixels in your light color
Image, add border, 3 pixels in your dark color
Image, add border, 3 pixels in your light color
Effects, Plugins, BorderMania, Frame #2 and use the following settings:
Add your watermark and your tag is finished. I hope you have enjoyed this tutorial.