All images are the sole property of
©Designs By Astro
Do not
copy or reproduce in any manner
without prior written permission.
©2001 Designs By Astro
All images created using this tutorial or any of my
other
tutorials are YOUR
property to do with as you please.
Please take
the time to read my Terms of
Use
You can Email me if you
have any questions.
this is done to help eliminate unwanted spam.
This tutorial is intended for
intermediate to advanced PSP Users. You need
a basic working knowledge of PSP and
knowledge of how vectors work if.
This tutorial no longer offers selections, please
disregard any selections instructions.
I used a gradient as my texture color which I have provided
for you here to download.
Regrettably I
can not remember where I got it from, so if you are the creator or know who is,
if
you will let me know I will be happy to
give you credit.
If you have any problems or spot any errors please
email me and let me know.
byastro@hotmail.com
I will be using PSP7, but this tute can also
be done using 6. I used the Fur filter that is with PSP7
to do the texture on the tulip and Paint Engine to do the
texture on the leaves, but I'm sure
other
filters could be used or no filter at all, if you do not have these.
The screen shots are resized and or compressed to save on load time.
As always Remember to Save Often!!
If you want to use the gradient I provided, it
needs
to be placed in your gradient folder
in PSP. Do this before you open PSP so that it will load while opening.
Now let's get started...
Open a 300x600 transparent 16 million colors.
Background color set to the pink/white
gradient (INVERTED so that the lighter color is on the
top), foreground Null
Click on your Preset Shapes Tool set to these
settings....
Note... the line width
doesn't matter. 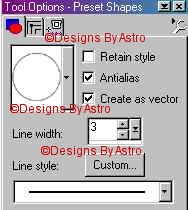
Draw out an oval in the top right of your palette.
Right click on the palette and chose Node Edit.
I added one Node to the 4 that were already there (see
placement in screen shot below). Pull up and
over to the right on the top node, using the arrows to
round it out some. Pull the bottom Node in to
the left to form sort of a curve that will be the bottom of
the petal. Use to arrow to fatten it
out
some so as not to be a sharp point. Look at the screen shot below to see how it
should look.. 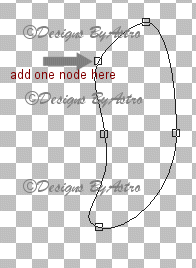
Now I left this as a vector layer so that I could
easily adjust it if needed. I didn't want my other
vectors to be on the same layer so what I did was create a
new vector layer for my next petal.
With
the same settings, draw out another long oval. I added two Nodes on each side of
the top Node.
Then pulled on each of the
two added to bring them out and down some, something like this...
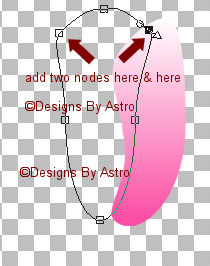
Again here I did not convert to raster I left as a vector and added a new vector layer.
As as before, Draw out and oval on the left side
of the palette. Right Click, chose Node Edit.
I added 3 Nodes on the left side of my oval. Click on the
top node that you added and pull it
down
and over, play with the end of the arrow to get a little curve to it. Then go to
the bottom
node and pull it in the right
so that it will meet up with the right petal that you have already made.
now than the first node from the bottom and pull
it back to the left some playing with the arrows
so that it rounds it out somewhat. Now do the same thing
with the middle node and the other
node
you added until you get something that looks like this... 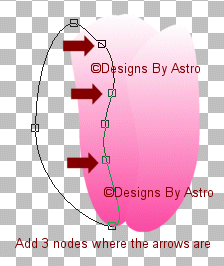
Now is where it comes in of not converting to
raster as we went along. You can click back on
each petal layer and adjust if you need to. When you are
happy with the look then convert to raster
naming petals as you go to right, middle and left.
Shadowing
Make the right Layer your
active Layer. Go to Selections, Select All, Selections Float.
Go to Effects, Texture
Effects, Fur. Apply using these settings... 
With your right petal still
selected, add a new layer. Go to Effects, 3D Effects, Cutout and
apply
using
these settings.... 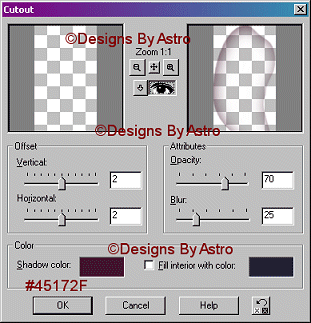
This setting will be the same for the
right and left petal but not the middle petal.
Deselect..
Hide all layers except right petal and
cutout layer and merge visible, rename to right.
Now make your left petal
active, select and float, then apply the fur effect, add new layer
and
apply the
same cutout as above. Deselect.. Hide all layers but left and cutout and merge
visible, rename to left.
Now make your middle layer
active, select and float, apply the fur effect. Add a new layer, go to
Effects,
3D
effects, Cutout and apply these settings... 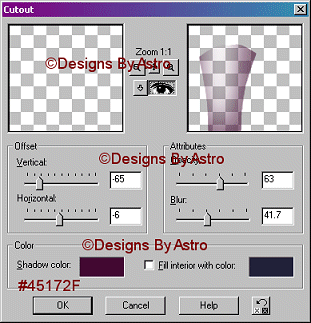
Deselect. Hide all layers except back,
and cutout and merge visible.
How's it looking so far? More like a tulip?
With you back petal as your
active layer, go to Selections, Select All, Selections Float,
Selection,
Modify, Contract by 20. Add a New layer and apply a cutout with
these settings.. 
Deselect
Switch to your Retouch tool with these
settings.... 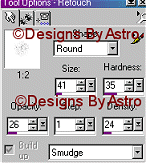
Smudge the area of the cutout
at the top to blend it more into the back petal. You mainly want
the
dark area
to show though at the bottom between the two side petals.
Hide all layers except the back petal and the cutout and merge visible, rename to back.
Once again with your back
petal the active layer, go to Selection, Select All, Selection,
Float.
Add a
New Layer. Change your foreground color to Black. Click on your Airbrush
tool
with these
settings... 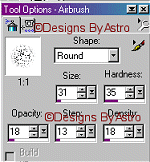
Spray an area at the bottom of the
petal that would look like the inside black area of a tulip,
something like
this... 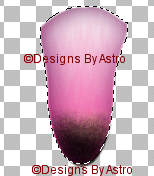
Now switch your foreground
color to #FFFF80, make a couple clicks with the yellow
close to the top of where the black. Go
to Effects, Blur, Gaussian Blur with a radius of 2
Hide all layers except the back petal
layer and the Airbush layer, merge Visible, rename to Back.
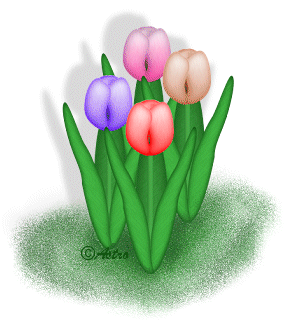
We are now through with our
tulip bloom. At this point you can save unmerged as a psp so that you
can
later use
the colorizer and make others in different colors like I did on the banner at
the top of the
page.
Now on to making the stem and leaves!
Now on with Part 2...
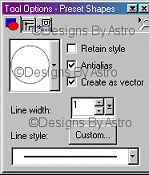
With Color #51C151 as your
background color, click on your preset shapes.
With these settings draw out a long
rectangle to make your stem. It should
go underneath your tulip
bloom.... 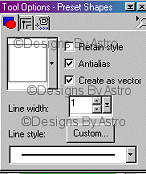
Convert to New Raster
Layer.
With #51C151 as your
background color, click on your preset shapes again with
these settings...
Draw out a tall oval
that extends to behind your tulip bloom.
(look at back leaf on image
banner)
I did
not convert to raster layer until I had finished my second leaf so that I
could
adjust if
I need to. Add a New Vector layer instead.
With the same settings as for
the first leaf. Draw out another oval about the same
size as the first. Rotate it slightly
to the right. Right click on your palette and
select Node Edit. I placed 4 extra
nodes and played with them until I got something
that looked like a leaf. Take a look at
the screenshot below to see how mine looks.. 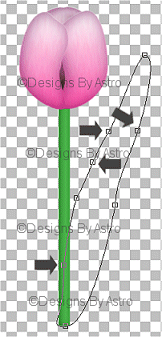
Do whatever adjusting on these
two leaves as needed, then convert both to Raster Layers
naming as back leaf and right
leaf.
Arrange the stem layer so that
it is on top of the back leaf layer.
With back leaf as your active layer,
using the magic wand, tolerance set to 0,
click on the leaf to make the marching
ants be around your leaf.
If you have Paint Engine apply these settings to your
leaf.... 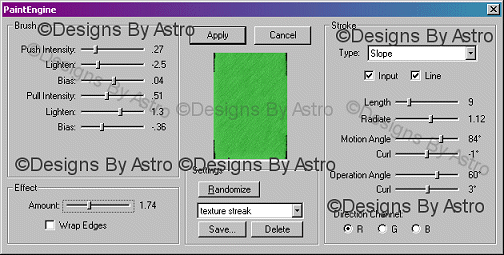
I got a look similar to this
using the Fur Effect like used for the tulip bloom in Part 1
if you do not have Paint
Engine.
Do not
deselect.
Add a
New Layer, go to Effects, 3D Effects, Cutout and apply a cutout using
these
settings... 
Deselect, Hide all layers except back
leaf and the cutout layer, merge visible, rename to Back
Leaf.
Make your right leaf layer
active. Select using your wand set same as for back leaf.
Apply the same Paint Engine
settings. Add a New Layer, go to Effects, 3D Effects, Cutout
with these
settings.... 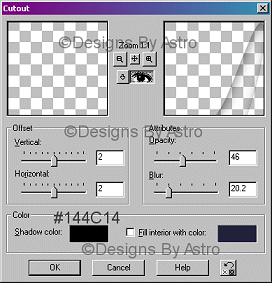
Add a New Layer and apply the same
cutout except minus 2 for both Vertical and Horizontal.
Hide all layers except right leaf, and
both cutout layers and merge visible,
rename to Right Leaf. Go to Layers
Duplicate, Image, Mirror, rename to left leaf, move into
position on the left side of your
palette.
Make the stem layer your
active Layer. Using the Wand select it. Add a New layer and apply
a cutout using these
settings... 
Hide all layers except stem layer and
cutout, merge visible, rename to Stem.
You can now merge all layers visible, resize if you wish, export as a tube.
Hope you have enjoyed this
tutorial. Have fun! Until next time,
God Bless,
Connie
Tutorial Index Designs By Astro
All images are
the sole property of ©Designs By Astro
Do not copy or reproduce
in any manner
without prior written
permission.
©2001 Designs By
Astro