|
WHAT YOU WILL
NEED

Filters Unlimited 2
My File - HERE
Before you start, open both Tubes and
minimize until needed
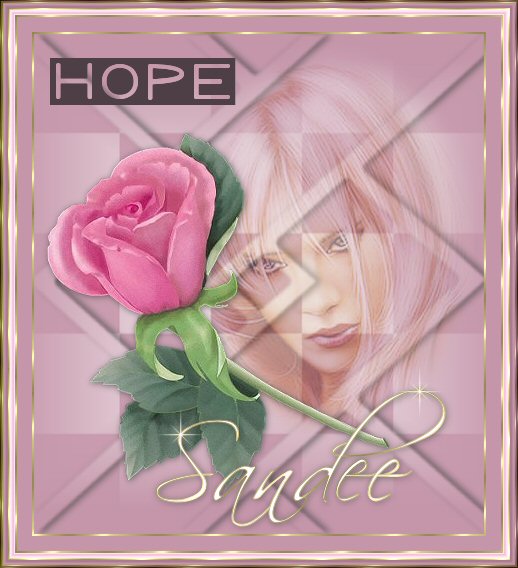
1. Open up a new image 450 x 500 and
flood fill with #C596AA
2. Add a new Raster Layer
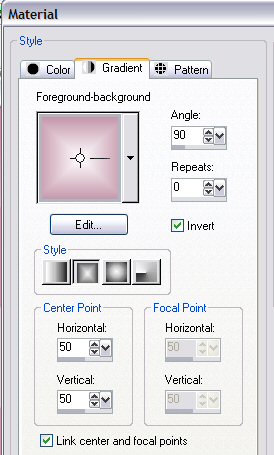
3. Keep your foreground colour as
#C596AA and set your background colour to White ---> go to the
Materials box and select Gradient, find the foreground/background
gradient, set the angle at 90, Repeats 0 and the Style is the second
box
4. Layers - Load/Save Mask - Load Mask
from disk - find and apply the AV-04 mask
5. Highlight the Raster 2 layer which
will be below the Mask Layer and flood fill with the
gradient
6. Highlight the Mask layer and
delete
7. Highlight the Group Raster Layer -
Right Click and Merge Visible
8. Add a new Raster Layer
9. Layers - Load/Save Mask - Load Mask
from disk - find and apply the AV-05 mask
10. Repeat steps 5 and 6
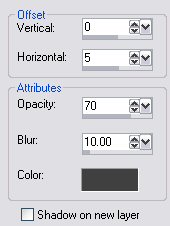
11. Apply the following Drop
Shadow
12. Highlight the Group Raster Layer -
Right Click and Merge Visible
13. Copy and Paste the Pink Lady Tube
as a new layer and lower the opacity to around 44
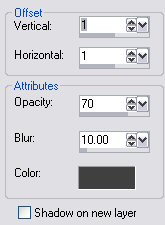
14. Copy and paste the Rose Tube as a
new layer, apply the following Drop Shadow then lower the opacity to
around 95
15. Position both Tubes where you want
them to be, cross off your Background layer and Merge the two tube
layers visible
16. Take the X off your background
layer, reposition your tube towards the top, not much just a little
off centre
17. Add a new Raster Layer
18. Change your foreground colour to
#4E3E46 then click on your brush tool, find the KJC Grunge - Hope
Brush and apply once, using your mover tool
19. On your layer palette you should
have 3 layers, starting at the bottom is the merged masks, next is
the merged tubes and lastly is the brush layer. Position all
your layers to where your happy for them be then merge all layers
visible
20. At this point if you want to add
your name or some other text now's the time to do it or you can just
leave it as it
21. Add a 2px border, select and flood
fill with the gold pattern
22. Add a 15px border using
#C596AA
23. Repeat step 21
24. Add a 5px border using
#C596AA
25. Repeat step 21
25. Repeat step 24
26. Add a 1px border - select and flood
fill with the gold pattern
27. Add a 1px border using
#C596AA
28. Repeat step 26
27. Selections - Select All -
Selections - Modify - Contract 15 - Selections - Invert
28. While selected apply Filters
Unlimited 2 - Buttons & Frames - Glass Frame 2 changing the top
setting to 15
29. Select none
And your all done !
Hope you enjoyed this one
*s*

All tutorials on this site are
written and created by Sandee and copyrighted to Sandee's
Place.
You may not remove any
images, HTML or zip files for the purpose of reproducing these tutorials in any
way.
You may not store or archive
these pages in any Yahoo Groups files,
or any mailing list
sites. These pages may not be sent through any email
groups.
These tutorials may not be
translated and placed on any site without written permission by
Sandee's Place
PSP groups are welcome to give
a text link only to any of my tutorials.
© Sandee's Place 2000 -
2004. "All rights reserved".
No portion of this site may be
reproduced or redistributed in any form.
|