|


This tutorial was
inspired by the beautiful Deco Ladies created by FlyByNight- D. J.
Walker. She has posted two tutorials of her designs that you can go
and see by clicking on the links. Please try them out and I assure
you, you will have fun doing them.
The
Deco Lady
The
Deco Lady II
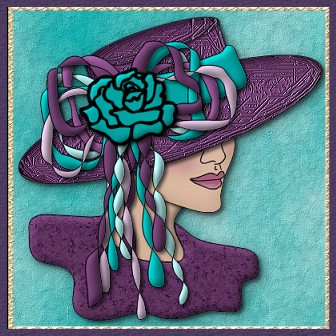
I have named my creation "Emily" in honour
of my lovely niece. I hope you enjoy bringing her to life and I will
not be offended when your image is finished, if you wish to rename
her. Make any changes you wish. Your image is yours to do with as
you see fit - I place absolutely NO restrictions on what you do with
her. Just have fun!

This
tutorial was completed using PSP7 but can easily be done in PSP6.
The only change you will have to make is the texture I applied to
her hat.
What You Will Need:
Paint Shop Pro:
download a trial version here
Fantastic Machines: from opening page, click on the plugin
downloads to take you to the page: click here
Zip of my
selection files: you can download it here
Zip
of colour chart, innerbevel setting, borg setting: you can download
it here
Let
Me Say Just Before We Begin
This is the third tutorial
"screenshot free". I did each item on a separate layer, except for a
few colourings on the face details.
I gave each layer (except the
face details and the very top of the hat) a drop shadow. I did them
all the end but if you prefer, you can do them as the last thing on
each layer before you proceed to the next new layer. It is your
choice. If you wish to do it as you go - I used vertical and
horizontal of 3, opacity 60, blur 6, colour-black.
In applying
the inner bevel to many of the layers, I used the preset "Pillow".
If you don't have this setting, there is an image of the settings
needed in the zip file.
The beginning steps of each layer are
almost identical - load the selection, flood fill with black,
contract the selection by 1, flood fill with the given colour. To
cut down I will use the following shortforms
"ff-bl" for
floodfill black.........."c1" for contract by 1
PLEASE save your
work often!! I did it after every layer. It is better to be safe
than sorry.
Open a new image 400 x 500, 16 mil colours,
transparent background. You can also open the colour chart.
(a) Create a new layer and load selection
"1-neck.sel"
ff-bl; c1; floodfill with #DCBAA3 (or any skin
colour of your choosing); apply the pillow inner bevel with the
ambience moved to +40; apply the standard drop shadow now or wait
until the end. I won't repeat this reminder.
(b) Create a new
layer and load selection "2-dress.sel"
ff-bl; c1; floodfill
#764577; apply the "pillow" inner bevel but move the ambience back
to +25. I then applied FM- Paint Engine - setting "borg" but you can
apply another or make any changes you wish.
(c) Create a new
layer and load selection "3-head.sel"
ff-bl; c1; floodfill with
#DCBAA3 (or any skin colour of your choosing); keeping it selected,
create a new layer and apply a cut out using the following settings:
V and H...3 Opacity...45 Blur...40 Colour...black
(d) Create
a new layer and load selection "4-facedetails.sel"
Flood fill
with black
(e) Create a new layer and go to layers - move
down, so it is below the face details you added in the previous
layer.
Use #A45C7B to add lipsitck.
(f) Create a new
layer(below the face details again) Using the same colour as the
lipstick, and the spray can size 35, hardness 20 and opacity 40,
spray on some blush. I applied a gaussian blur of 9.00 If you want
to remove the excess that extends off the face, load the head
selection again, go to selections invert then hit the scissors. I
also lowered the layer opacity to about 65.
(g) Create a new
layer, send it to the top and load selection
"5-hatbrim.sel"
ff-bl; c1; floodfill with #764577; go to effects-
texture - straw wall - and apply the "default" setting.
(h)
Create a new layer and load selection "6-hathead.sel"
ff-bl; c1;
floodfill with #764577; go to effects- texture - straw wall - and
apply the "default" setting.
(i) Create a new layer and load
selection "7-hattop.sel"
ff-bl; c1; floodfill with #764577; go to
effects- texture - straw wall - and apply the "default"
setting.
(j) Create a new layer and Load selection
"8-mainhatribbon.sel"
ff-bl; c1; floodfill with #00C8C6; apply
the pillow inner bevel with ambience at +20
(k) Create a new
layer and load selection "9-turqbows.sel"
ff-bl; c1; flood fill
with #C0FFFF Apply the inner bevel and leave ambience at +20 for
this and the rest of the ribbons.
(l) Create a new layer and
load selection "10-medmauvebows.sel"
ff-bl; c1; floodfill
#A260A4. Apply the "pillow" inner bevel.
(m) Create a new
layer and load selection "11-medturqbows.sel"
ff-bl; c1;
floodfill #00C8C6 ; apply inner bevel.
(n) Create a new
layer and load selection "12-palemauvebows.sel"
ff-bl; c1;
floodfill #DBC0DC; apply inner bevel.
(o) Create a new layer
and load selection "13-purpbows.sel"
ff-bl; c1; floodfill
#764577; apply inner bevel.
(p) Create a new layer and load
selection "14-ribbonsA.sel"
ff-bl; c1; floodfill #DBC0DC; apply
inner bevel.
(q) Create a new layer and load selection
"15-ribbonsB.sel"
ff-bl; c1; floodfill #764577; apply inner
bevel.
(r) Create a new layer and load selection
"16-ribbonsC.sel"
ff-bl; c1; floodfill #00C8C6; apply inner
bevel.
(s) Create a new layer and load selection
"17-ribbonsD.sel"
ff-bl; c1; floodfill #DBC0DC; apply inner
bevel.
(t) Create a new layer and load selection
"18-ribbonsE.sel"
ff-bl; c1; floodfill #C0FFFF; apply inner
bevel.
(u) Create a new layer and load selection
"19-ribbonsF.sel"
ff-bl; c1; floodfill #764577; apply inner
bevel.
(v) Create a new layer and load selection
"20-underrose.sel"
Skip the black floodfill and go right to
ff-#00A4A2; apply inner bevel.
(w) Create a new layer and
load selection "21-rose.sel"
Floodfill with black
(x) Now
is the time to go and give almost all layers a drop shadow. The head
shape was given a shadow but none of the face detail layers were
given a drop shadow. I also omitted a drop shadow on the very top of
the hat. If you did it as you went along...SKIP this step. If you
haven't, the settings once again are:
vertical and horizontal of
3, opacity 60, blur 6, colour-black
My suggestion is to
save this image, as is, in PSP format with all the layers intact.
This will make it easier if you wish to go back and colourize the
layers to make a totally new look for Emily.
To carry on
with her in this outfit, shift D to make a duplicate and close your
original. Now you can merge all the visible layers. You can make her
into a tube now too. Give her a nice backdrop and then you can
resize her and then frame her if you wish
I hope you have enjoyed
bringing Emily to life. Make changes in patterns, colours, etc.
Enjoy your new creation as much as I did. If you have any problems
or need further explanations, please feel free to email me here
MAIN
TUTORIAL LIST
This
tutorial was posted at the site of "P. Ann's Place" May 28,2002 and
written by Pat Sherman. All I ask is that you do not claim it as
your
own.
| |