|

Have you ever seen a
gorgeous house and thought to yourself, "I'd love to have a look
inside that one to see how they've decorated it!" Well, here is your
chance. I can promise you that there is no one at home and you can
peek inside with no fear of anyone catching you.
Of course, what
you see, will be entirely up to your imagination. Have fun!
I
will let my imagination run free LATER because many have written and
said how much they are enjoying these and asking if I'll be creating
any more soon. So here is another one up as soon as I finished it
and I'll add my version at another time.
I place absolutely
NO restrictions on the use of this tutorial or your finished image.
This tutorial was completed using PSP7 but can easily be
done in PSP6.
What You Will Need:
Paint Shop Pro:
download a trial version here
Zip of my little door: you can download it here
Zip
of my selections: you can download it here
Zip
of the bladepro "cutout": you can download it here
I
want to give special thanks to Mardi from Web Graphics on a
Budget for being kind enough to grant me permission to include
her Bladepro setting in my zip downloads here. It is called "cutout"
and one I have used constantly and just love what it does. If you
click here,
this leads you to her page to read about the cutout effect.
Thank you again, Mardi, for your generosity.
I have
recently discovered that if you use Super Bladepro, you can open
this setting in your version, but then you have to resave it for
your previews to show up. I use this setting constantly for titles
and making easy bevels. I used it in the title above for this
tutorial.
PLEASE save your work often!! I did it after
every layer. It is better to be safe than sorry. I also want to
apologize for making this one as large as I did. I didn't really
take notice when I started so it is a bit bigger than I normally do.
When it comes time for you to decorate, you can cut down on the
layers but combining all the window and outside wall layers at the
end, and that should save you some memory space.
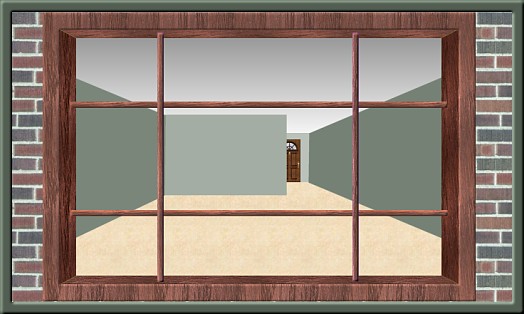
(1)
Open a new image 702 x 408, 16 mil colours, transparent
background.
(2) Create a new layer and load selection
"1-ceiling.sel"
set your foreground to white and your background
to grey #808080
choose a linear gradient- foreground to
background, angle zero, repeats 0
(grey shade should be on top
and white on bottom in preview window)
floodfill
(3)
Create a new layer and load selection "2-carpet.sel"
The fill I
used is the one called "old paper" that came with the
programme
set it to size 50 angle 0 and floodfill
you can
colourize or use a different fill if you wish to change the
colour
(4) Create a new layer and load selection
"3-backdoorwall.sel"
floodfill with colour #BAC2BA
at this
point open the small door image from the zip file, copy and paste in
place lining up the bottoms
**if you prefer to use something else
instead of a door or think you might, skip this part until you are
ready to decorate your room
(5) Create a new layer and load
selection "4-directwall.sel"
floodfill the area with colour
#A3ADA3
(6) Create a new layer and and load selection
"5-leftsidewall.sel"
floodfill the area with colour
#7A867A
(7) Create a new layer and load selection
"6-rightsidewall.sel"
floodfill the area with colour
#758175
(8) Create a new layer and load selection
"7-leftrightinners.sel"
we will use the pattern that came with
the programme called "Finished Wood"
(make sure it is the darkest
one; there is a finished wood 2 as well but that one was too light
for my liking)
set it to size 50, angle 90 and then floodfill the
two areas
go to colours, adjust the brightness only and make it
"minus 15"
(9) Create a new layer and load selection
"8-upperlowerinners.sel"
using the same wood, size 50, change the
angle to 0 before filling
go to colours, and adjust brightness
only to " plus 10"
(10) Create a new layer and load selection
"9-leftrightslats.sel"
floodfill with wood, size 50, angle 0, and
change the brightness to "plus 25"
open the blade pro setting
"cutout" but change the height from minus 100 to plus 100 before
applying
(11) Create a new layer and load selection
"10-updownslats.sel"
floodfill with wood, size 50, change the
angle back to 90, then change the brightness to "plus 25"
open
the blade pro setting "cutout" keep the height at plus 100, then
apply
(12) Create a new layer and load selection
"11-outsidewall.sel"
using the brick fill that came with the
programme, fill using it at size 80
(13) Create a new layer
and load selection "12-outsidewindow.sel"
using the same wood
fill as in the other steps, adjust it to size 60 rather than 50,
angle 90 and then floodfill
go to colours and adjust the
brightness only to "plus 25"
apply the blade pro setting "cutout"
but move the height slider back from where you had it at plus 100 to
plus 60 then apply
You are finished the basics.
Remember you can fill the selection pieces with any colour
you want to or you can even fill with a pattern to simulate
wallpaper. It is totally your choice. Have fun and I hope I have
given you another room alternative to have fun
decorating.
Remember, if you want to merge some layers before
you decorate, to save on memory size, you can merge the window parts
and outside wall areas. You could also merge the other areas into
one and just add layers in between as you decorate with your fine
collectables. This is totally up to you. You might also want to work
on a duplicate copy so you can keep the original in case you get the
urge to peek in another window and want to make colour or furniture
changes. That way you don't have to do the whole image from scratch
but can colourize or make little changes as desired.
If
you have any problems or need further explanations, please feel free
to email me here
TUTORIAL
PAGE ONE
TUTORIAL
PAGE TWO
This tutorial
was posted at the site of "P. Ann's Place" March 29, 2003 and
written by Pat Sherman. All I ask is that you do not claim it as
your own. You do not have to write me to ask permission to post a
link to this tutorial. You are welcome to post a link to any of the
tutorials that you or your group might find helpful.
  
| |