I'd like to acknowledge two people for
helping me set up this Webpage, a lovely lady
called Ronnee for giving up her time to help me
whenever I send out an s.o.s and for testing my
tutorials and to the Script Master Mr
Edgar Poirier for writing this wonderful
snow script and giving freely of his time to
make it work for my tutorial.......thank you
both *s*
WHAT
YOU WILL NEED
Super
Blade Pro - HERE
Preset
used in Super Blade Pro - HERE
Gregs
Factory Output V2 - HERE
CPK
Designs - HERE
Unplugged Effects - HERE
 This file
containing the Red and Dark Green Gradient,
unzip into your Gradient folder in PSP and my
Christmas Tree corner
This file
containing the Red and Dark Green Gradient,
unzip into your Gradient folder in PSP and my
Christmas Tree corner
1. Open
up your image ---> Image ---> Add Borders
and add a white border size 2
2.
Select the border with your magic wand and go
---> Effects ---> Plugins ---> Super
Blade Pro ---> find and apply the
sanco_knottygold preset
3.
Select none
4.
Using your eye dropper tool select a colour from
your image and use it as your background colour
I used #A20427
5. Add
a border size 15
6.
Select the border with your wand ---> Effects
---> Noise ---> Add 15 Uniform
7. Keep
selected ---> Effects ---> Plugins --->
Gregs Factory Output 2 ---> Pool Shadow at
the default settings
8.
Select none
9.
Repeat steps 1 and 2, keep selected then go
---> Selections ---> Invert --->
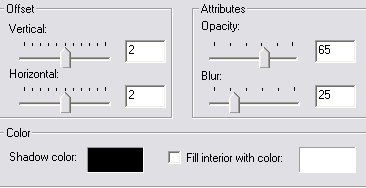
Effects ---> 3D Effects ---> Cut-out and
apply the following setting
Vertical & Horizontal 2 Opacity 65
Blur 25
10.
Keep selected and repeat the cutout only this
time change the Vertical and Horizontal to minus
2
11.
Select none
12.
Have your background set to white and add a
border size 30
13.
Select the border with your wand and once you
have the ants marching around set your Styles
box to Gradient, find and apply the Red Dark
Green Gradient with the following
settings

14.
Keep selected ---> Effects ---> Plugins
---> CPK Designs ---> Stars ---> use
the following setting
Ray
Length 68 / Spikes 46
Depending on the size of your image you
may need to play around a bit
15.
Select none
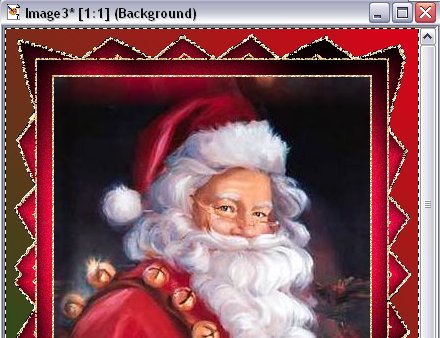
16.
Using your magic wand, Tolerance set on 25 and
holding down the shift key, select all around
the outside of the spike border you just made as
in the image below
17.
Once you have that outside bit selected go
---> Effects ---> Plug-ins --->
Unplugged Effects ---> Snow - I set mine on
10 but feel free to change it
18.
Select none
19.
Repeat steps 1, 2 and 3
20.
With your background colour set to White add a
border size 35
21.
Select the border with your wand and flood fill
it with the same Red Dark Green Gradient you
used in step 13
22.
Keep selected ---> Effects ---> Texture
Effects ---> Blinds ---> Width
10 Opacity 30 and a tick in
Light from top box
23.
Still selected ---> Effects ---> 3D
Effects ---> Inner Bevel and apply this
setting
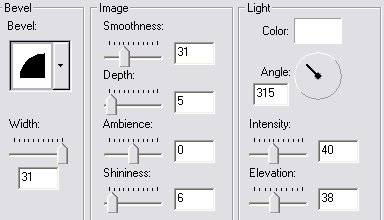
24.
Background colour set on white add a border size
5
25.
Select the border with your wand and apply the
sanco knotty gold preset as used in step
2
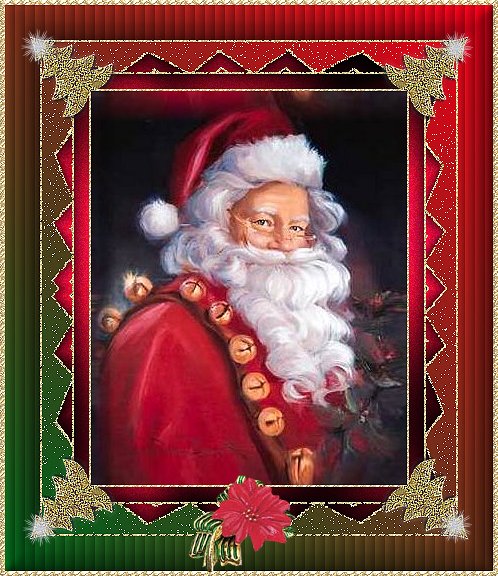
All
you need to now is dress it up, I've included
the Christmas Tree corners I made so your
welcome to use them.........hope you enjoyed
this one
*s*