
Tutorial written November 25, 2003 - resemblance
to
any other is purely coincidental.
Created in PSP8 but there
should be no problem using
other versions.
Supplies
Paint Shop Pro
Stylize Filter - Here
Font
- Here
Tube
- Here
**Unzip
the tube and open in PSP - minimize the font
in the taskbar for
later**
**Put the filter in your Plugins Folder**
If you have
PSP open, it will have to be closed to
recognize the new filter
Okay, I think we are ready now *S*
1. Open the tube
you are going to use
Duplicate and close the original for later
use
2. Image - Canvas size - 500 x 500
This will be
resized when we are done
3. On your layer palette, duplicate
the layer
Rename the bottom layer Tiles - rename the copy
Tube
Hide the Tube layer for the time being
4. Highlite
the Tiles layer
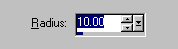
Effects - Blur - Gaussian Blur
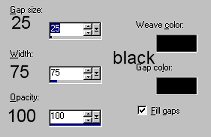
5. Effects - Texture Effects - Weave
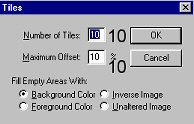
6. Set your background to black or choose a dark
color from your tube
Effects - Plugins - Stylize - Tiles
7.
Effects - 3D Effects - Drop Shadow
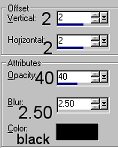
If the drop shadow seems too dark then this step
can be omitted completely
8. Unhide the tube layer
Image
- Resize - 85% - Resample - Bicubic
Place your tube down slightly
left of the tiles layer
or position where you would like
It is
your tag after all *S*
9. Effects - 3d Effects - Drop
Shadow
Apply the same settings as in Step 7 but change the
Horizontal to 7
10. Layers - New Raster Layer
Add your
text
Here are the settings I used - Stroke Null - Fill - #000000

Effects - 3D Effects - Drop
Shadow
Apply same settings as previous
Thanks for
trying this tutorial - I hope you have enjoyed it

Here is another one I did - I added
an extra layer of text in a
contrasting color

Home
Tutorial Copyright Marlie© 2003
Graphics and Page Design
Copyright Marlie's Place© 2003
| |