

Please read my **TERMS OF USE** before doing
this tutorial.
Thanks! Auntie Em
This
tutorial assumes you have a basic knowledge of the workings of Paint Shop Pro.
Made with PSP
version 6.0.
If you have not worked with vectors before,
you should visit
"Spike" to learn all about
this feature of PSP.
My ole pal, Astro called upon my
"expertise" one fine day a while back.
Seems as though she was asked by
friends to make an image for a cap of a friend's father.
I won't go into too
much detail but it involved a cowboy boot and the stuff you see all over cow
pastures.
At the end of our e-mail conversation concerning how she should
go about creating this work of art,
both of us were laughing, coughing,
spewing and about to fall out of our chairs.
Because she did such a good job
making that boot, she was begged by her friends
at FlyByNight Graphics group to write
a tutorial for that beautiful boot she made!
Next thing I knew, she and I
were exchanging graphics of a cowboy hat! *LOL*
She said she didn't have
enough time to do the tute for the hat but then again, neither did
I.
Okay, so I made time. *g*
Always remember to save your work as
you go!
*ahem*...Astro knows I didn't practice what I preach on her boot
tute... *looks ashamed*
Y'all please save those vector shapes right quick.
I'd hate for you to work that hard
and lose that nice hat you slaved
over.
Open a new image, transparent background, 400 X 400 pixels.
Set your
foreground color to #AAAA9E or a color of your own choice.
Go to preset
shapes tool.
Shape = ellipse.
Style = filled
Line width =
1
Antialias = checked.
Create as vector = checked.
Draw a vector
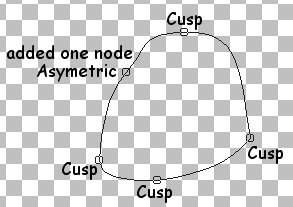
ellipse and use the node edit function to shape it.
A hint about nodes...you
can make each handle move independently
by holding your cursor over the node,
right clicking and selecting "cusp" for the type.
Just select whatever type
of node you need at the moment when you're working on the node edit.
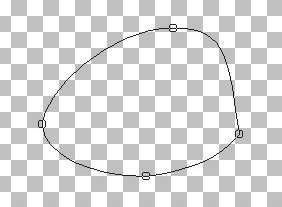
In my
first screenshot, I show you the beginning of the shape you want.
In the
second screenshot, I show the shape and the types of nodes I used.
Layers >
Convert to Raster
You really don't have to do much fiddling with the nodes to
get the crown or the brim shape,
and if I mess up, I just start over. I find
that if I get carried away,
I start to get some nasty sharp points on those
smooth forms.
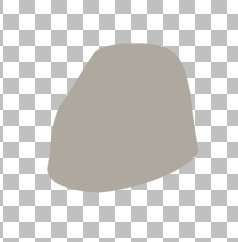
Below you will see the finished crown shape and the shape you
need to give the brim.
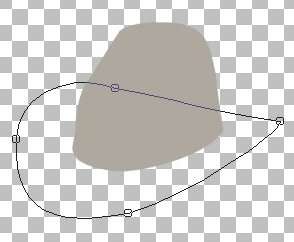
To begin the brim, just make layer one active and make
another vector ellipse.
It's formed into roughly a sideways teardrop
shape.
Again, very little shaping needed and I didn't have to add any
nodes.
Now, you know to add nodes if you feel happier using more than I
do.
Once more: Layers > Convert to Raster
The brim
will now be on the layer below the crown of the hat.
It's hard to see where
they are, but we'll take care of that in a minute.
Now, remember to hit that
*save* and go grab a mug of sarsaparilla.
I need one myself, cuz my DH just
strolled by and said:
"Can you make the brim wider? A hat like that would
have a larger brim."
Geeeesh! I have all my screenshots done for the
brim.
Y'all know you can make it bigger, don't you? *ROTFL*
Are you
remembering to save your work often?
Time to add the shading and make it look
like felt.
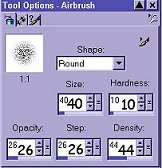
Change your foreground color to #544747. Use these settings on
your airbrush tool.
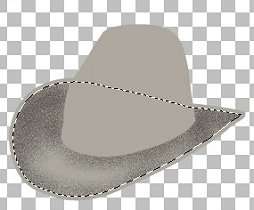
Make the brim layer active. Surround it with a selection rectangle
and click on the brim.
Selections > Modify > Contract by 3
pixels.
This will leave that little unshaded edge on the rim.
Add a new
raster layer. Begin to spray an area of shading around the
brim,
concentrating the spray where the darker areas would be on it.
Image
> Blur > Gaussian Blur > 5
Image > Noise > add 10%
uniform
Image > Blur Gaussian Blur > 5
Selections > Select
none
Select the crown in the same manner and do not modify the selection this
time.
Add a new raster layer. Again, spray some shading around the bottom
edge of the crown of the hat.
Use the same blur, noise and then blur on that
layer of shading. Keep your layers separate for now. Deselect.

Make the crown layer
active again and with the selection tool set to freehand or point to
point,
antialias checked, select an area that will be the top crease of your
hat.
You can see the shape I made in my screenshot. Add a new raster
layer.
Spray just a little shading in that crease. Blur, noise and blur as
before. Deselect.
The next crease is on the side of the hat. Make the crown
layer active and add a layer.
Select an ellipse shape as I show in the
screenshot.
Carefully spray some shading just at the top left edge of the
ellipse selection.
Blur, noise and blur again. If the blur goes a bit outside
the crown, we will fix that later. Deselect.


Let's put a little edge
on that brim with a vector ellipse using the same color as the hat.
Rotate
the ellipse and using the node edit, draw it out into a long narrow shape,
tapering at the front edge of the hat.
I used "cusp" nodes for this, but use
whatever works for you.
 Select the edge we just made as we did to the other shapes
before and add a new layer.
Select the edge we just made as we did to the other shapes
before and add a new layer.
Image > Effects > Cutout
Fill interior
unchecked
Interior color = the darker color you used for shading
Opacity =
50
Blur = 6.5
Vertical and Horizontal = -2 (negative two)
While that
layer is still selected, add a drop shadow using the same color.
Image >
Effects > Drop Shadow
Opacity = 50
Blur =11.8
Vertical = -4
(negative four)
Horizontal = 1
Deselect
This is a good time to get
rid of any blur or shadows that extend beyond the hat itself.
Make the brim
layer active and select it as we have been doing.
You might have to turn off
a shading layer to get just the brim selected. Selections > Invert
Make
the shading layer active and Edit > Cut.
Select the crown layer, invert,
make the each of the three shading layers
for the crown active, cutting each
as you go.
Select the edge layer, invert, make that shading layer active and
cut.
These steps should eliminate any shading that "escaped" around the hat.
Deselect.
You still saving your work?
Have the top layer on your layer
palette active.
Make a hatband by choosing a nice color for it and making a
vector ellipse.
Enlarge the image so you can see what you're doing with the
band.
Node edit. You will probably have to add three or four nodes to get
that nice curve.
I added "cusp" nodes on the ends of the band to get those
nice sharp corners.
Remember to make the band more narrow at the back edge of
the hat.
Layers > Convert to Raster


I added a drop shadow to my
band, changing the Blur to 5.9, the Vertical to -2 (negative two)
and the
Horizontal to -1 (negative one).
You can decorate the band any way you
choose. I added gold "buttons" by adding a layer,
making a pre-formed circle
in white the size I needed at the front middle of the band.
I applied a Blade
Pro gold to it and added an inner bevel and a drop shadow.
I then copied and
pasted as new layers along the side of the band.
As the buttons needed to be
smaller, I used the deformation tool to make them fit the band.
At this
point I Shift-D to make a copy and save the original as a PSP image.
Merge
visible layers on the copy, copy and paste as a new image and export it as a
picture tube.
You can add a drop shadow when you use the tube.
Trust
me, folks, your hat is going to look different from this one. *LOL*
It
happens when you make a tutorial anyway,
but as I did this one several times
for my screenshots,
I noticed that this cowboy hat changed along with the
weather...just like a real one!
Enjoy the differences in your creation and
maybe try some different shapes for the crown or brim.
This one happened to
be the "Gus" style that my hubby likes so well.
The "Cattleman" style is
pretty kewl looking too. *g*
I hope I've been
clear enough with my instructions, I didn't give you as much
information
about using the node edit function as I usually do,
but I trust you've used
it before and could follow along with me.
Home
tutorial and graphics © Auntie Em
2001-2007