|
Classic Frame
(PSP 7, 8, 9 & 10 -no filters)
A tutorial by Mar ©
2004.

Image: © Eileen Fong
What you need:
PSP
8. Download a
30 day trial
here.
ZIP with materials: Download
here.
Unzip the masks and gold pattern and open in
PSP.
A nice picture with soft and
light colors.
I used a image
from Eileen Fong - Chickadee
(in ZIP).
Save often
Let's get started....... Good
Luck!
1. Make sure your image is not to
large because the frame will
be very heavy. Open your image. Not
bigger as 300.
So as a Portrait > height 300 or Landscape >
width 300.
Shift D and close the original.
The repeat steps,
stop at the 3 stars ***.
2. Select 2 light colors from your
image.
I used for my foreground color: #B4B390.
As my
background color I picked: #DED3B7.
3. Open the gold pattern in
PSP.
Set your foreground to pattern for now.
Look for the gold
pattern:
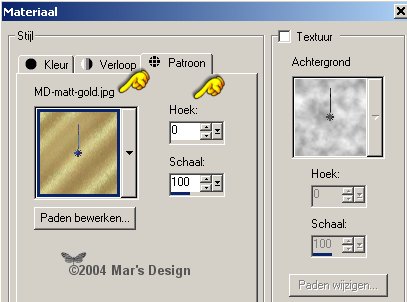
4. Image > Add borders > 5
Pixels > Symmetric > Yellow.
.jpg)
5. Select  the
yellow border (feather 0). the
yellow border (feather 0).
6. Fill with the gold pattern.
7. Effects > 3D-effects > Inner
bevel > Color #D3D0C8.

8. Effects > 3D-effects > Drop
shadow.
(You may want to do it again with -2 H & V !!)

9. Next step:
When repeating = step
1 (beige):
Image > Add borders > 5 Pixels > Symmetric > Yellow.
Select the
yellow border (feather 0) with your magic wand.
Fill with
right mouse button = #DED3B7.***
10. Next step:
When repeating = step
2 (gold):
Image > Add borders > 5
Pixels > Symmetric >
Yellow.
Select the yellow border (feather 0) with
your magic wand.
Fill with gold pattern.
(Do the inner bevel!!!)
Repeat the drop shadow at 2 en - 2.***
(You can do step 1 again before continuing!!!)
11. Next step:
When repeating = step
3 (mask):
Image > Add borders > 25 Pixels > Symmetric > Yellow.
Select the
yellow border (feather 0) with your magic wand.
Fill with
right mouse button = #DED3B7.
Layers > New layer.
Fill with
gold pattern.***
This step stops here
because you are going
to use 2 different masks at the
time.
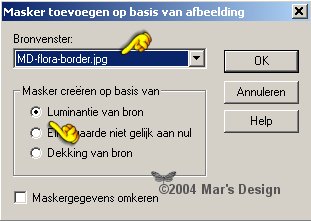
12. Open the MD-flora-border.jpg from
the ZIP.
Layers > New mask layer > From image.

13. Look for the MD-flora-border.jpg
and click OK.
14. This is a nice part! Because you are going
to add a border
you don't have to delete the mask. PSP will do it
for you.
Just confirm the merging of the layers.
15. Do the repeat step 2 (gold) as
showed above.
16. Image > Add borders > 15
Pixels > Symmetric >
Yellow.
Select the yellow border (feather 0) with
your magic wand.
17. Put your foreground color at
#B4B390 and fill.
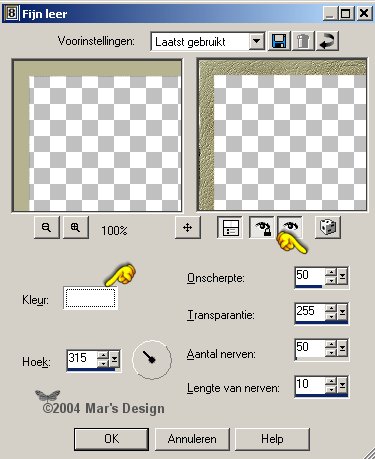
18. Effects > Texture effects >
Fine leather.
19. Do the repeat step 2 (gold) as
showed above.
20. Do the repeat step 3 (mask) as
showed above.
21. Open the MD-flora-corners.jpg from
the ZIP.
22. Layers > New mask layer >
From image.

23. Again, you don't have to remove
your mask.
24. Do the repeat step 2 (gold) as
showed above.
25. Do the repeat step 1 (beige) as
showed above.
26. Do the repeat step 2 (gold) as
showed above.
27. I have reduced the size of my frame
with 80%.
Image > Change size > 80% > All layers
checked.
Adjust > Sharpen > Sharpen.
Your Classic Frame is done.
I
hope you liked it.
Thanks for using my tutorials.
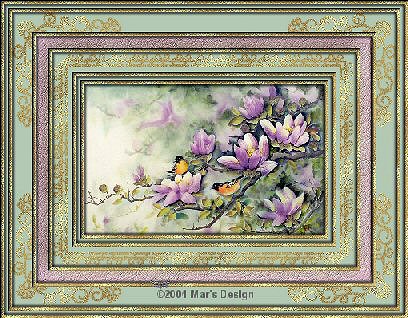
Image: © Eileen Fong
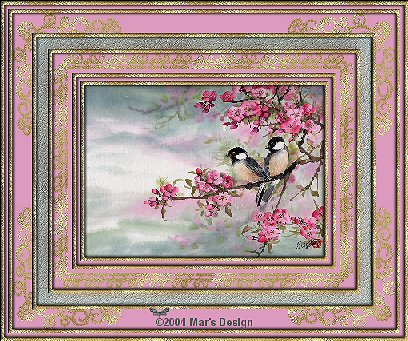
Image: © Eileen Fong
This tutorial is written and
designed by Mar and therefore her property.
This tutorial may not be
downloaded for any purpose other
than to follow the tutorial. If
you're a Moderator of a group,
please e-mail me
before adding this tutorial to any lessons,
etc.
When you do have my permission..... only a text link is
allowed.
My tutorials are never ever to
be sent over any mailing list or to leave my
site.
Translation into English
with help of my best friends, Trudie.
Thanks sweetie! Couldn't do
it without you.

Since
06-29-2004:
|