|


Materials
Fantastic Machines Paint
Engine
Super Blade Pro
VM Tools or
Toolbox
Supplies
Includes
the mask and the corner
The mask is named
QS043
I wish I could remember where I got it
from but I lost it
If anyone knows who QS is
please let me know so I can give proper
credit.
Graphic of choice or a tube as I have
used and placed on a background.
1.
Choose a color from your graphic and set as your
foreground color.
I used
#C77A85.
Set your background to
white.
2.
Open your graphic and resize to a workable
size.
Effects - Sharpen - Sharpen.
3.
Layers - New Raster Layer
4.
Masks - Load From Disk.
Choose QS043.
It
may appear as though there is nothing there but
there is.
5.
Flood fill with white.
Masks -
Delete.
Answer yes to "Do you wish to merge
into current layer"
6.
Selections - Select All
Selections -
Float
7.
Effects - Plugins - Super Blade Pro.
Apply
the preset of your choice,
8.
Layers - Merge - Merge All Flatten
9.
Add 2px border - select with magic
wand
10.
Effects - Plugins - Super Blade Pro - use the
same preset as used on the mask.
Keep
selected
11.
Selections - Invert. Effects - 3D Effects
- Cutout.
Apply cutout again V & H
-2.
Select none.

12.
Add 15px border - select with magic
wand.
13.
Flood fill with foreground color.
14.
Effects - Plugins - Fantastic Machines - Paint
Engine.
Use the following settings.
Keep
selected.
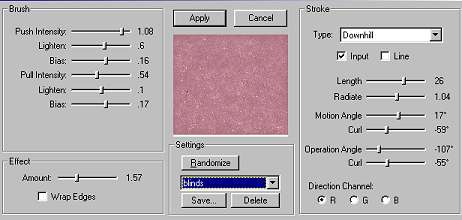
15.
Effects - Texture Effects - Blinds.
Select
none.
16.
Add 2px border - select with magic
wand.
Effects - Plugins - Super Blade Pro -
apply the same preset as before.
Select
none.
17.
Add 2px border - select with magic
wand.
Flood fill with foreground
color.
Select none.
18.
Add 2px border - select with magic
wand.
Effects - Plugins - Super Blade Pro -
apply the same preset as before.
Select
none.
**Note: If you are using a light
colored Super Blade Pro preset, you may wish to
toggle your foreground and background colors by
clicking on the 2 arrowed line, as you may pick
up pixels from your previous border when you
select with the magic wand.

19. Add 20px border - select with
magic wand.
Flood fill with foreground
color.
Keep selected.
20.
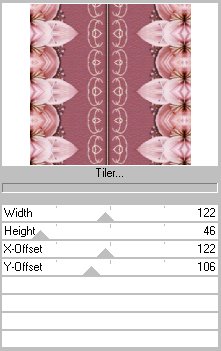
Effects - Plugins - VM Toolbox - Tiler.
Keep
selected.
21.
Effects - Plugins - Simple - Pizza Slice
Mirror.
Select none.
22.
Repeat Steps 16 - 18
23.
Add 25px border - select with magic
wand.
Food fill with foreground
color.
Keep selected.
24. Effects - Plugins - Fantastic
Machines - Paint Engine.
Apply the Blinds
settings as before.
Effects - Texture Effects
- Blinds - same settings as before.
Select
none.
25.
Add 2px border - select with magic
wand.
Effects - Plugins - Super Blade Pro -
same preset as before.
26.
Selections - Invert.
Effects - 3D Effects -
Cutout.
Apply the same settings as
before.
Re-apply V & H -2.
27.
Select none.
At this point you can add your
corners or other embellishments.
Here
is another image I did.

Thank
you for doing this tutorial.
I hope you have
enjoyed it.

Tutorial © Marlie
2002 |