|
Blue Pearl Frame
(PSP 8, 9 & 10 -- no
filters)
A
tutorial by Mar © 2004.
What you need:
PSP
8. Download a
30 day trial
here.
ZIP with materials: download
here.
Open all materials in
PSP.
The Fairy tube I use in this
tutorial, I bought at
BJ Heaven site. She gave me the
permission to use these
tubes in my tutorials. Do you like them
and want them?
You can buy on her site, they're really
cheap.
You can get them for less than 5 dollar for a hole set of
tubes.

Even though I did buy these tubes, the
copyrights
remain with BJ and you cannot share, sell or
distribute the
Fairy or the Ornament I made using the
tube.
Let's go.....
Good
luck!!
1. Open a new image 500 X 500
transparent.
Foreground style to
pattern.
Find MD-redpat.jpg, it was in the zip.
Texture >
unchecked (see blue hand).

2. Background style on
pattern.
Find MD-bluepat.jpg.

Fill your image with the red pattern (=foreground).
3. Selections > All.
Selections
> Modify > Contract > 50 Pixels.
Selections > Invert.

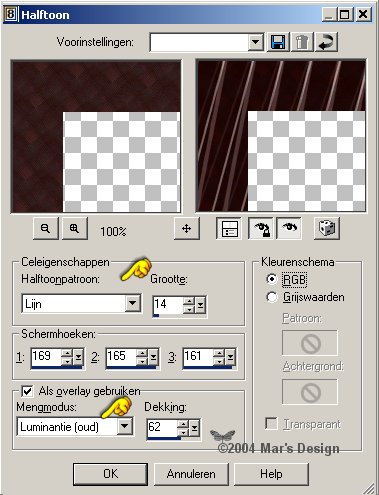
4. Effects > Artistic Effects
> Halftone.
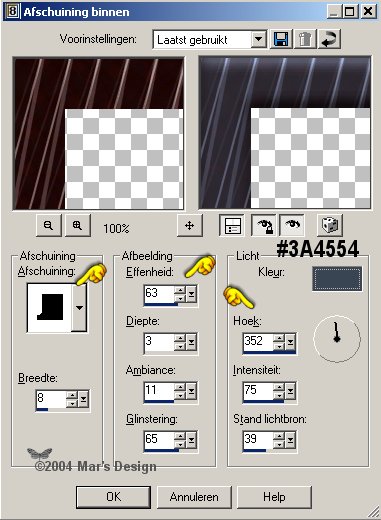
5. Effects > 3D-effects > Inner
bevel > Color: #3A4554.
6. Effects > 3D-effects > Drop
shadow

Repeat but Horiz. and Vert. at - 6.
7. Repeat the inner bevel.
Selections > Invert.
8. Selections > Modify >
Contract > 35 Pixels.
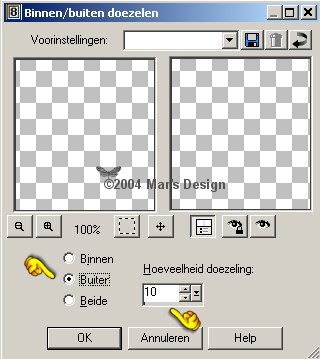
Selections > Inside-outside feather.
9. Layer > New rasterlayer.
Fill your image with your background pattern.
10. Effects > Texture-effects >
Weave.
Color 1: #3F4D69 - Color 2: #390001.
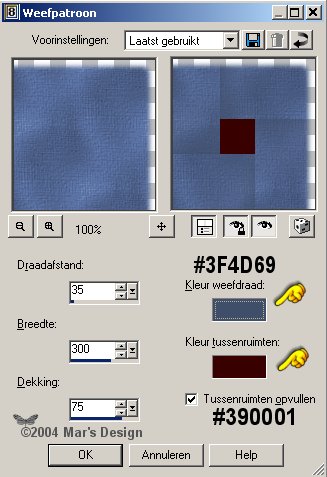
11. Repeat but change: Gap size
to 25 and width to 350.
You must have this now:

12. Select the square like on the
screenshot below (feather 0).
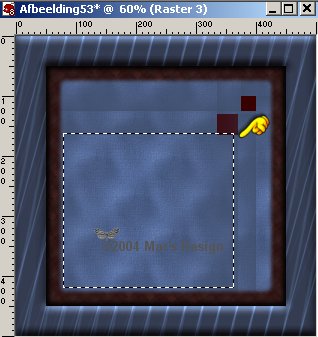
13. Selections > Modify >
Contract 30 Pixels.
14. Layer > New raster layer.
Fill your selection with the red pattern.
15. Effects > Artistic Effects >
Halftone as before.
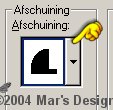
16. Effects > inner bevel but use
this shape:
17. Effects > 3D-effects > Drop
shadow.

18. Repeat the inner bevel.
Selections > None.
19. Open the BJ-Fairy.psp
and copy.
Paste as a new layer.
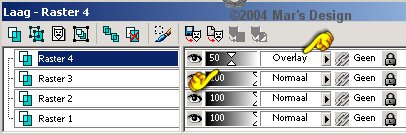
In your
layer palette, change the blend mode
to "Overlay" and the
opacity to 50.
20. Paste BJ-Fairy.psp again.
With  place a little to the left with her toe on your border.
21. Repeat same drop shadow.
22. Open BJ-Ornament PSP and
copy.
Edit > Paste > Paste as a new
layer.
With move
to the corner where the red squares are.

23. Repeat same drop shadow.
24. Layers > merge > Merge all
flatten.
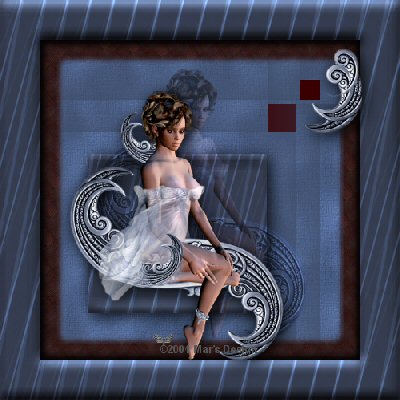
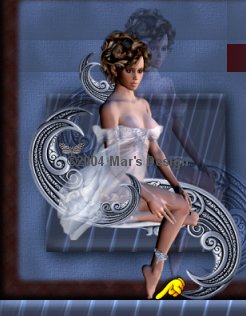
Your Blue Pearl Frame is
done.
I hope you did like it.
Thanks for doing my
tutorials.
All tubes used in the below samples
are by BJ Heaven.

This tutorial is written and
designed by Mar and therefore her property.
This tutorial may not be
downloaded for any purpose other
than to follow the tutorial. If
you're a Moderator of a group,
please e-mail me
before adding this tutorial to any lessons,
etc.
When you do have my permission..... only a text link is
allowed.
My tutorials are never ever to
be sent over any mailing list or to leave my
site.
Translation into English
with help of my best friends, Trudie.
Thanks sweetie! Couldn't do
it without you.

Since
05-01-2004:
|