Animated Nesting
Santas

Please read my Terms of Use if you have
any questions.
The
layout of this tutorial is set for 1024 x 768
All images are the sole
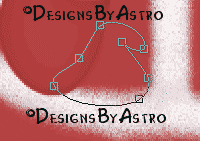
property of © Designs By Astro
Do not copy, reproduce or
send through email
without my prior written permission. A link
is
always welcomes and appreciated though!!
All rights
reserved.
The image/images
you make using this tutorial
is your property to do
with as you wish.
If you have any
questions or need further help you can
Email
me
This is my version of the Russian nesting dolls. I have made other types that
are not of a Christmas nature such as a
snowman and cute children but for
this lesson we will be learning how to make the Santa. Once you learn how you
can make other types using the same basic steps as the Santa is made.
All screenshots are at 100% unless otherwise
noted.
This tutorial will teach how to make the Santa and
how to animate him.
I assume you have a good working knowledge of PSP
and some experience using Animation Shop.
I will be using PSP 7.04 but other versions should work as
well as long as you are familiar with the tool locations.
Remember to Save often, I will
not remind you in this tutorial!!
Let's get started.
1.) Open a 300 x 450 transparent. Note you may wish to flood fill layer 1
with a color so that you can see better, it
can be removed later.
Set
your background color to a pretty Santa suit red. I'm using #B64040 . Foreground
should be turned off.
2.) Let's do a little vectoring *L* Preset Shapes set to Ellipse, create as a
vector and antialias both checked, solid
line.
Draw out a fat oval close to the bottom of your canvas. Object Selector,
right click on your canvas, chose Node Edit.
Pull up slightly on the top
node to create an egg shape something like this...
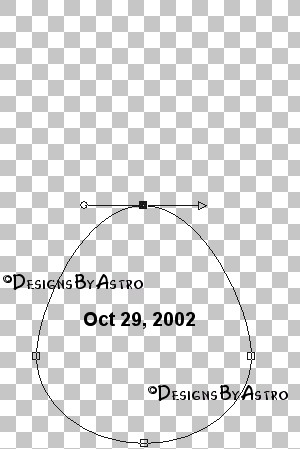
Convert
to Raster, rename to santa body.
3.) Change your background color to a skin tone. I'm using #EFDEC3.
Same
Preset Shapes, draw out Santa a circle head. *L*
Convert to Raster, rename
to head.
4.) Now before we make Santa a hat let's do his face and some of the other
detail work.
Add a new layer naming it face. Set your foreground color to
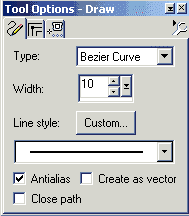
white and close your background color. Draw Tool set to
Bezier Curve, line
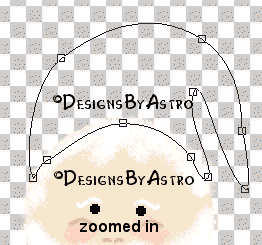
width 2 or 3, solid line, antialias checked. Zoom in on your face. About where
you think Santa's brow
would be for the left side, draw out a line, pull
upwards on the left side handle and down on the right side handle.
You
should have something that looks like the ~ on your
keyboard. Now move this ~ to the right side. (if were to leave
it on the
left it would make santa look angry and we don't want an angry Santa.) Duplicate
the layer and move into position
on the left side.
5.) Set your foreground color to black, add a new layer naming it eyes. With
your Paint Brush tool set to round, size 5,
Hardness, Opacity, and Density
all set to 100, Step set to 25... dot Santa a couple of eyes just under his
brows. You
should have something like this now...

6.) Now let's make Santa a cute nose. Add a new layer (as you can see I like
to add all my things on a separate layer
so that I can move them around
later if needed. *L*)
For his nose I decided to use the draw tool set to
Bezier Curve, line width 1, Antialias checked, color set to a slightly
darker color than my skin tone. #E9CEB3 I drew out one nostril by pulling up
on the two bezier handles. I then copied
and pasted the nostril as a new
selection to the other side.
7.) I also added a new layer and used the same settings for the nose to make
him some cheekbones.
8.) I then added a new layer and moved it under my cheekbones and switched to
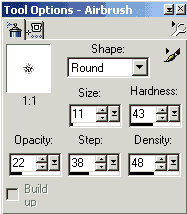
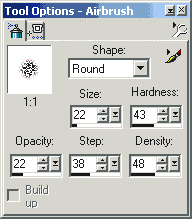
a nice rosy pink color ( #FFC0C0 )
for my foreground. I used the Airbrush
set to the settings below to spray a little color under his cheeks....
You can use Gaussian Blur if you feel you need to, but I didn't. This is
what my face looks like...
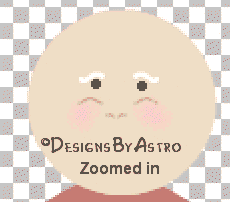
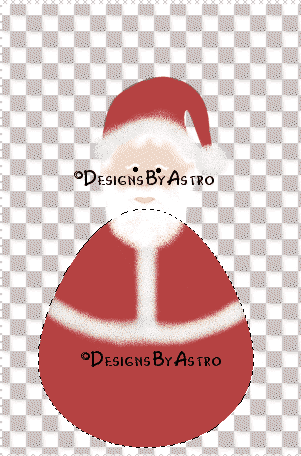
9.) Add a new layer, (now you know you can name these layers but I have
to admit I'm bad about not naming my layers *L*).
Set your foreground color
to White. Airbrush Tool to the setting used for the blush on the cheeks. Spray a
beard and some
hair on your Santa's face. This is what I have now...
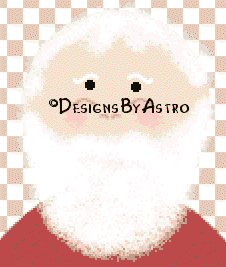 Zoomed in on this screenshot.
10.) Set your background color to the skin tone you used on the face. Preset
Shapes set to the same settings as before
except use the Preset Heart
1 shape and make Santa's mouth something like this...

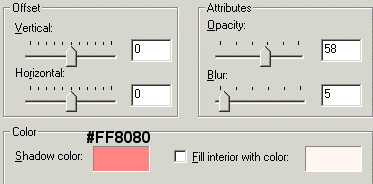
Select
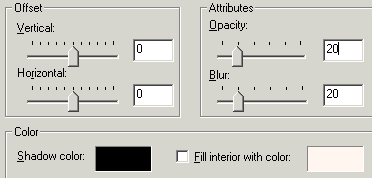
and Float your mouth, apply a cutout using these settings with this shadow color
#FF8080 ....
11.) You can now do any adjusments you want to Santa's face so that you have
him looking like the sweet lovable old
man we all know. Feel free to add
more detail to his face giving him wrinkles or whatever you would like to do.
Once
you're happy Hide Layer 1 and your body layer, merge your face layers
visible, rename to face.
12.) The Santa hat comes next. Change your background color to the lovely red
we used for his body. #B64040
Preset Shapes same as before set to Ellipse.
Draw out an oval on the top of Santa's head and start shaping it to that
familiar Santa hat. Here is the way I set my nodes...
Convert
to Raster once you're happy, rename to hat.
13.) Set your foreground color to a light gray. I'm using #DDDDDD
Airbrush Tool to these settings...
Add a
new layer, start spraying an area to make the trim around the hat. Once you've
put a nice coat of the
light gray on change the color to white and add a
couple quick sprays on top of the gray. Once again I didn't blur
mine. Look
at the screenshot below to help you.
14.)Add a new layer. With the Airbrush set to the above settings except
change the size to 35. Foreground color back
to the gray, spray a circle of
color for the ball on his hat. Change to white and add some highlights to it as
well.
15.) Make your body layer your active layer. Select and float it, add a new
layer. With the Airbrush set to the settings above,
foreground color set to
the gray, spray a long area down the middle of Santa's body to about half way
(where you would visualize
Santa's coat stopping.) Now change your color to
white and spray some highlights on the gray. This is what I have now...
16.) Change your background color to the body red, foreground turned off.
Preset Shape to the settings used to make the
body. Draw out a long oval, we
will make the arms with this. Use Node Editing to shape the arm around Santa's
body
something like this...

Convert
to Raster, rename to left arm.
17.) Select and Float the arm and apply a cutout using these settings...
18.) Copy, paste as new selection, mirror and move the arm into position on
the other side.
19.) Add a new layer. Set your foreground color to the gray we used for the
coat and hat trim. Use the Airbrush settings
used for the hat and coat to
spray the arm trim. Change to the white and add a couple sprays just like you
did for the
coat and hat.
20.) Make your arm layer your active layer. Set your background color
to white. Preset Shapes same as for the arm.
Draw out a circle, use Node
Edit to shape the circle into a mitten for Santa's hand. This is the way mine
looks...
Convert to Raster, copy, paste and mirror to the other
side. Move this layer below your arm layer, rename to mittens.
21.) Make your hat layer your active layer, Select and Float it. Now apply
the same cutout to your hat as you did for the arm.
Deselect it.
22.) All we have left now to do is to make Santa's belt. Set your foreground
color to black, background color off.
Set your draw tool to these
settings....
Add a
new layer and draw a line across the belly of your Santa making it overlap the
edges a little. Pull down on the handles
to create a slight curve that sort
of follows the curve of the fur on Santa's coat. Select and Float your body
layer, Invert the
selection, make your belt layer active and hit the delete
key on your keyboard to remove the overlapping edges on your
belt. Select
none.
23.) Foreground color should be black. Preset Shapes to these settings...
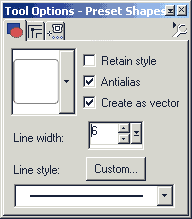
Draw out a rounded rectangle for Santa's buckle. Convert to Raster,
this is what you should now have...

24.) Merge all layers visible. Use the crop tool to remove some of the unused
area around your Santa. Export as a tube.
You can close out the original
now. This tube can be used in lots of ways, one way I've used it besides
animating it
of course is to add a nice string and use it as a tree or
wreath ornament. I bet you can think of lots of other ways to use
it also.
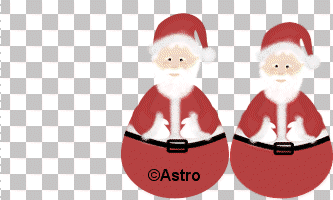
Ready now for putting the Santa together to animate him? *L* This will be the
hardest part of the entire tutorial so let me
recommend if you've worked
straight through to this point that you take at least a short break before
continuing, it can get
a little confusing from this point on.
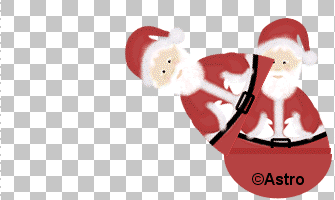
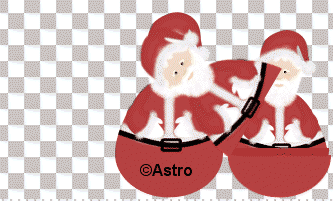
Follow the next steps very carefully in order to have your Santa look as if
the head flips up and the smaller Santa pops out!!
First I'm going to show you what each finished layer should look like. Take
the screenshots into PSP with you as you
work on each layer if you'd like.
This is the finished layer palette screenshot....
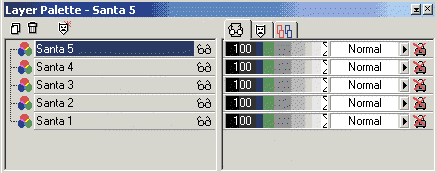
The next 5 screenshots are resized by 80%.
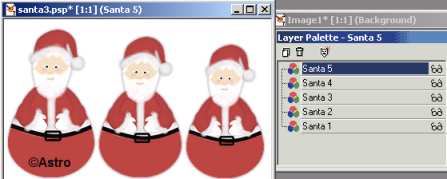
Let's look at what is on the
layer named Santa 5 first because it is the first layer we will be working to
make...
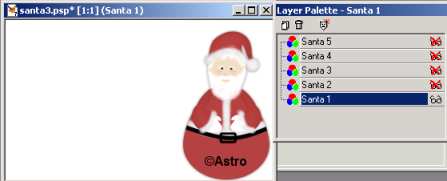
The next layer we work on will be Santa 1. This is a screenshot of what the
finished Santa 1 layer should look like...
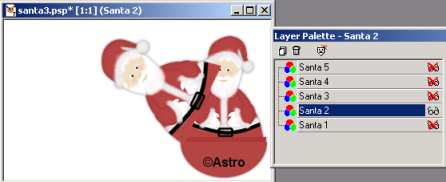
Next is Santa 2 layer and what should be on it when finished...
Moving now to Santa 3 Layer...
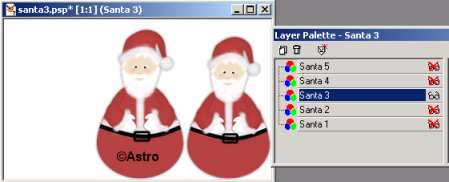
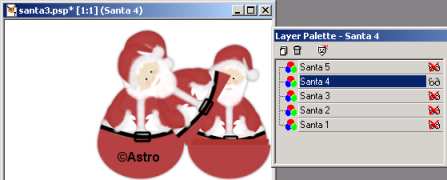
Last is Santa 4 Layer...
Now let's move on to making the layers.
25.) We will be working with 3 different sizes of our Santa. Open a 400 X 200
transparent, add a new layer, Flood fill this
layer with the color
background you wish to use, I'm using white. Add another new layer naming it
Santa 5.
Open your Tubes and find your Santa you made, scale the size of
your Santa so that it fits the height of your new canvas. I was
able to size
my to 50% but you might need to go larger or smaller depending on the original
size of your Santa. Place this
Santa to the far left of your canvas leaving
a tiny space to the left, top and bottom.
26.) Copy and paste as a new selection the first Santa. While still selected,
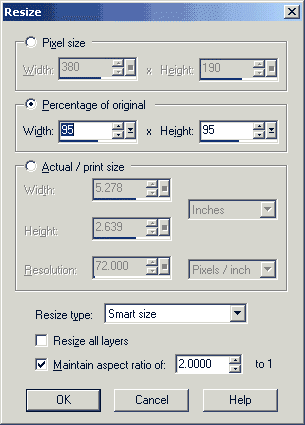
Go to Image, Resize with these settings...
Sharpen
if needed, move into position on the right of the first Santa aligning it as
best you can. Deselect.
27.) Paste one more time the first Santa which should already be on your
clipboard. Resize it with the settings above
except set the percentage of
the original to 90. Sharpen and move into positions.
This layer helps us set how much room we need for our finished animation but
this will actually need to be our top layer
on the finished image to be
animated.
28.) Use your Crop Tool to remove the unused area that is to the right of
your Santa 5. Hide Layer1 and merge the
background and Santa 5 layer
visible, rename to Santa 5. Hide this layer for now.
29.) Make Layer 1 your active layer. Add a new layer, flood fill this layer
with your background color. Add a new layer
named Santa 1. Bring up your
Santa tube again scaling it to the same size as your largest Santa. (mine was at
50%)
Click to place the Santa on the far right of your canvas. Watch
your top, bottom and side spacing. Go to Layers,
Duplicate, rename
this layer to Santa 2, hide this this layer and layer 1.
Go back to Santa 1
layer, merge this layer and the background layer visible, rename to Santa 1.
Hide it for now.
Zoom in when you need to!!
29.) Add a new Layer, flood filling it with your background color. Make Santa
2 layer your activelayer. Click on your
Selections Tool set to Rectangle,
Feather 0, antialias UNchecked.
Draw the selections box around your Santa
down to just below his belt so that all you have UNselected is the bottom
red area only.
Copy the selected area and paste as a NEW IMAGE. We will
need this in just a few but first go back to your original
canvas to the
selected Santa. Hit the delete key on your key board, this will remove the top
half of your Santa leaving only
the bottom red portion. Select None.
30.) Use the selection tool, same settings as above, select the top portion
of your bottom like this....
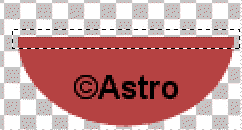
Copy
and Paste as a new selection. Leave selected, click on the Deformation Tool,
bring in the sides just a little.
Set the Deformation by clicking on your
Mover Tool. While still selected go to Colors, Adjust, Brightness/Contrast, set
the Brightness to -10 and the contrast to 0. Select None. This will give you
a small lip area so that it will look as if your
Santa head would have fit
down over it like a top.
31.) Make your background layer your active layer. Add a New Layer, no
need to name it really we will merge it with the
other layers in just a few.
Bring up your Santa tube, set the size to your largest Santa size (50% is mine)
Place the Santa
tube on the canvas so that you can clearly see it. Go to
Image, Resize, set the size to 95% (like you did for your middle
sized
Santa). Sharpen the Santa once. Position this Santa so that he looks like he is
sitting inside the bottom half of the
Santa you chopped the head off of. *L*
32.) Now remember the head of the Santa we chopped off and set aside?
Activate that window, copy it, now activate
your Santa 2 layer, paste the
head as a new layer, click on your Deformation Tool and rotate the head to the
left so that it
looks like it is flipped over. Move into position so that it
is touching the corner of the bottom of the Santa on your other layer.
Set
the deformation by clicking on the Mover Tool. Sharpen once. This is what you
should now have....
33.) With all layers hidden except Santa 2 layer, background layer and the
nestled Santa layer, merge them visible and
rename to Santa 2. Hide the
Santa 2 layer.
34.) Add a new Layer, flood fill with your background color. Add another
layer naming it Santa 3. Using the Santa tube
scaled at the largest Santa
size (50% was mine) click to place your Santa on the canvas. Close to the middle
is fine.
Copy this layer and paste as a new selection. While still selected
Resize it to 95 %, then sharpen once. Move the two
Santas around so that
they are on the far right side about equal distance apart. Deselect, you should
have something
like this...
Duplicate this layer, rename to Santa 4, hide this layer for now. Go back to
Santa 3 and merge it visible with your
background layer, rename to Santa 3.
.
35.) Add a new layer, flood fill with your background color. Make Santa 4
layer active, click on your Selection
Tool, same settings as we've used. I
want you to use the selection tool to select the head of the smaller Santa (the
one on
the far right ) just like you did in Step 29 above. Make sure you
only select the one Santa, don't let the selection wander
off onto the other
Santa at all.
Copy and paste this chopped off head as a New Image like we
did the other one. (Note you can close without saving
the first chopped off
head so you won't get them confused when we go to paste the head back on).
Deselect the
area, then reselect just the top portion of the bottom of the
Santa like we did in Step 30 above. Copy and paste
this selection as a new
selection. Leave selected and use the Deformation Tool to move it in slightly
like you did
before to make the lip on the bottom part of the Santa. Apply
the brightness setting used in Step 30. Deselect.
37.) Your chopped off head should still be on your clipboard but if it's not
make that window active, go to Edit, Copy.
Go back to Santa 4 layer and
paste this head as a new selection. Keep selected and use the Deformation Tool
to rotate the head, place it where it touches the side edge of your bottom.
Deselect.
36.) Add a new layer, move this layer below your Santa 4 layer. Use the Santa
tube to place a Santa on this layer
(same size as we've been using for our
tubed Santa). Resize this Santa to 90% (this is our smallest size Santa we
are using). Sharpen once after resizing, move this Santa so it appears to be
nestled inside the bottom of the chopped off
Santa, it should be behind the
rotated Santa head. This is what you should have...
Hide
layers Santa 1, Santa 2, Santa 3, Santa 4, do not hide layer 1 this time. Merge
visible the rest of your layers.
rename to Santa 4. Your Layer Palette
should now look like mine did above and the screenshots of what each of my
5
layers looked like above.
37.) Save as a PSP file naming it Santa.
38.) Now open Animation Shop. Go to File, Animation Wizard. The next
screenshots and text will show what the animation
boxes should be set on.
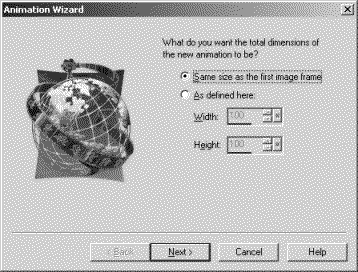
Next window set to opaque.
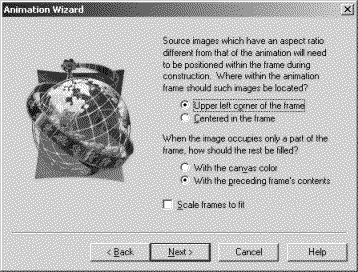
Next window...
Next window "repeat animation indefinitely" should be selected.
Set frame
display to 40.
Next window. Click on Add Image. Find the Santa.psp you saved.
Click next on the next window.
You should now be back in Animation shop. Go to View, Animation. This will
show you what your animation will look
like.
40.) Last step is to save the animation. Go to File, Save As. Name your
animation and click next, set "Quality" to
best, click next on the two boxes
until you get to the size box showing what your animation will be. Make sure the
Optimized file size is below 100k. Mine is 76k. If yours is larger than 100k
you can go back and set the Quality down
some so that you will have a
smaller file size.
That's it, you now have an animated Nesting Santa!! *LOL* This was a
difficult tutorial to follow but I tried to make it as
painless and clear as
possible. Give yourself a big pat on the back if you toughed it out and made it
through!!
Until next time, God Bless.
Connie
Designs By
Astro Index of
Tutorials
Tutorial written
October 22, 2002
© Copyright 2002 Designs By
Astro
All rights reserved.