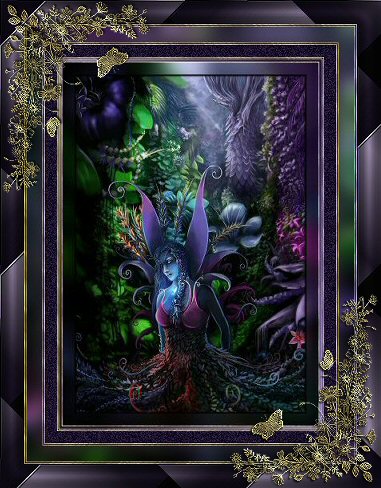

When I received this graphic in a
graphics group, my next framing tutorial was
forming
itself in my head
I am unsure of who
the artist is on this picture and if anyone knows,
please let me know
so I can give credit and
contact them
The tutorial was written June
22, 2004 and created in PSP8
I am sure it can
be easily worked up using other versions of
PSP
Resemblance to any other tutorial is purely
coincidental
Supplies
Paint Shop Pro
FM Tile Tools
VM
Natural
My Zip File - Here
I am not going to supply links for the
filters I use in my tutorials any longer
The
sites disappear and the links then don't work
I
don't have time to update my pages all the time to
reflect all the changes
A quick search on
Google will lead you to many resources out there
1. Open your image, duplicate it twice
and close the original
Choose 2 colors from the
graphic - set the darker color as the
foreground
I chose #1b0b2c for my dark color
and #9780b6 for the light color
Open the
supplied gold pattern, minimize it on the
workspace
Set your foreground pattern to the
gold
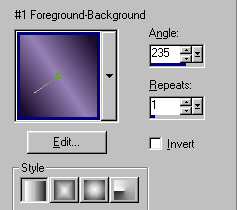
Set the background gradient to
foreground-background
2. Selections - Select
All
Selections - Modify - Contract
15
Selections - Invert
Adjust - Blur -
Gaussian Blur - Radius 10
Selections -
Invert
Effects - 3d Effects -
Cutout
Vertical and Horizontal -
2
Opacity - 100
Blur - 3
Repeat the
Cutout - Vertical and Horizontal -2
Select none
3. Add 1px border
Select with the magic
wand
Flood fill with the gold pattern
Select
none
4. Add 3px border
Select with the
magic wand
Flood fill with the background
gradient (see Step 1)
Select none
5.
Add 1px border
Select with the magic
wand
Flood fill with the gold pattern
Select
none
6. Add 1px border
Select with the
magic wand
Flood fill with the dark
color
Select none
7. Add 1px
border
Select with the magic wand
Flood fill
with the gold pattern
Select none
8.
Add 15px border
Select with the magic
wand
Flood fill with the dark color
Adjust -
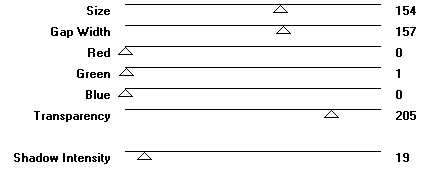
Noise - Add Noise - 25%
Select none
9. Add 1px
border
Select with the magic wand
Flood fill
with the gold pattern
Select none
10.
Add 1px border
Select with the magic
wand
Flood fill with the dark color
Select
none
11. Add 1px border
Select with the
magic wand
Flood fill with the gold
pattern
Select none
12. Set your
background pattern to the second copy of your
graphic

13. Add 20px border
Select
with the magic wand
Flood fill with the
background pattern
Adjust - Blur - Gaussian
Blur - Radius - 10 Select none
14. Add 1px
border
Select with the magic wand
Flood fill
with the gold pattern
Select none
15.
Add 1px border
Select with the magic
wand
Flood fill with the dark color
Select
none
16. Add 1px border
Select with the
magic wand
Flood fill with the gold
pattern
Select none
17. Add 30px
border
Select with the magic wand
Flood fill
with the dark color
Effects - Plugins - VM
Natural - Cross Weave
Effects - Plugins - FM
Tile Tools - Blend Emboss
Apply the default
settings - Twice
Effects - 3d Effects -
Inner Bevel

Select none
18. Add 1px
border
Select with the magic wand
Flood fill
with the gold pattern
Select none
Add the corners supplied, some of
your own or none at all!
The frame is yours to
do as you wish with
I have written a tutorial
on adding corners if you need help to do
this
You can find it Here
I hope you have enjoyed this
tutorial
Please feel free to Email me if
you have any questions

©Marlie's Place
2004 | | | | |