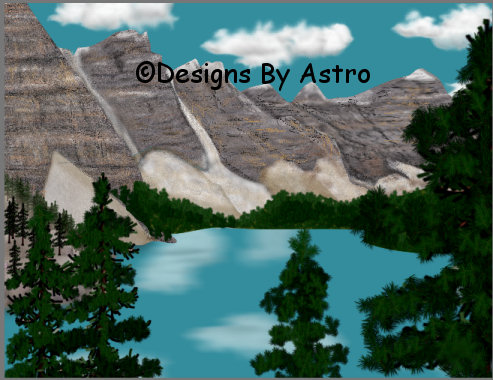
"Moraine Lake"
This tutorial is best
viewed at 1024x768.
Please read my Terms of Use if you have any questions.
At this
time I am not allowing my tutorials to be translated.
All images are the
sole property of © Designs By Astro
Do not copy, place on CD, make into
Scripts or send
through email without my prior written permission.
A
link is always welcomed and appreciated though!!
All rights reserved.
The image/images you make using this tutorial
is your property to do
with as you wish.
If you have any questions or need further help you can
Email Me
Tutorial written July 10, 2007
A dear friend of mine, Gina, of "Bits of Gina", took a photo of Moraine Lake a while
back that blew me away. I asked her if I could use the photo as a reference to do a
PSP painting of the lake. This tutorial explains the steps that I took to do the painting.It is written using PSP X but can be done in all version. I do assume you have
experience working with vectors, layers and the painting tools in PSP. No outside filters
are used. Some of the screenshots are enlarged to show node placement better and some
have been reduced to save on load time.You will need to download this pattern to use for your mountains. I've also include my
Pine Tree tube. You can use it or one of your own.
Sharron Austin has a great tutorial to make your own if you prefer.
MoraineLake.zip
Open the pattern in PSP and set it aside for later.
Place the Pine Tree in your Tubes Folder.
You will also need a cloud tube or you can make your own.
We will start by making the mountains.
Note... when shaping your mountains, you may see a lot of nodes together in my screenshots,
it is hard to show the detail in a screenshot of those but they are to make jagged edges on
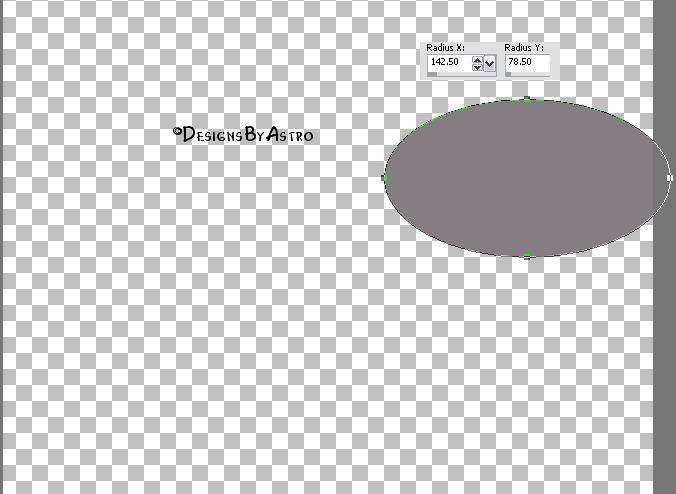
the mountains.1. Open a 650 x 500 transparent canvas.
2. Set your background color to #857d82 foreground should be off.
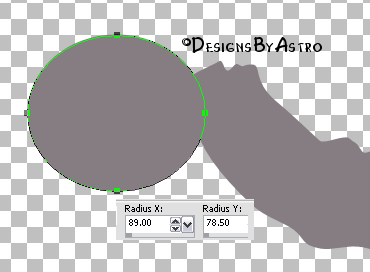
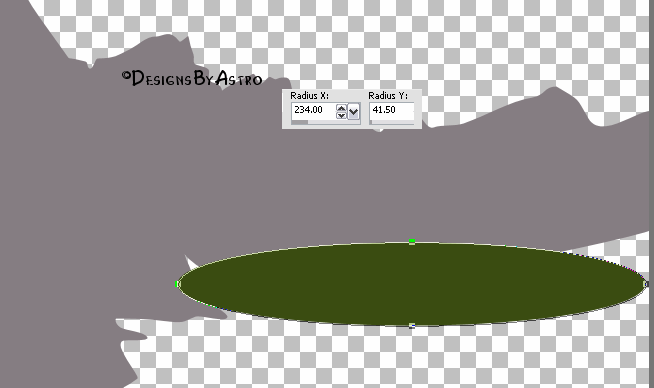
3. Preset Shapes set to Ellipse with these settings...
4. Add a New Vector Layer naming it Mountain1. On the right side of your canvas draw an oval...
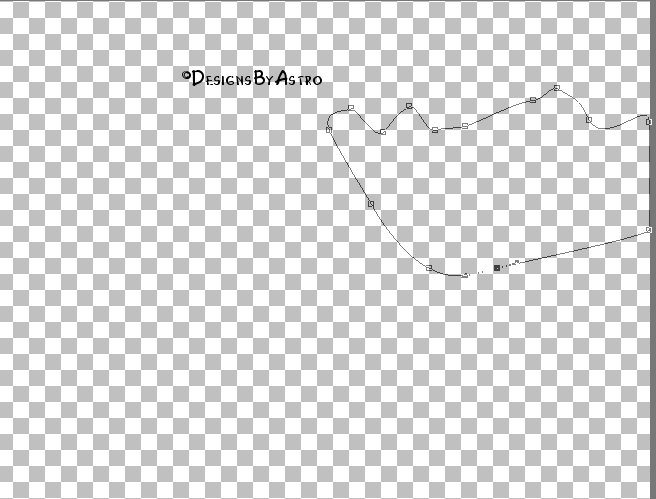
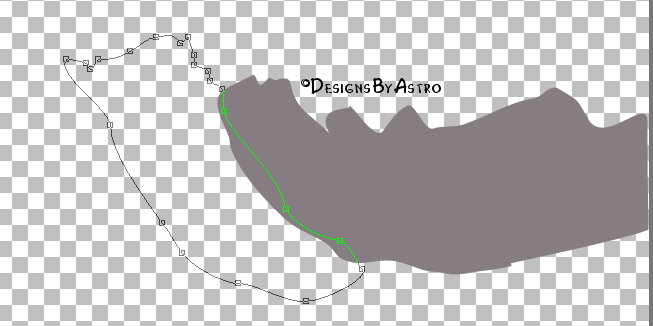
5. Right click, Convert to path, click on the Pen Tool.
6. Add nodes, changing to Cusp where needed to shape the first Mountain something like this....
7. Convert the Layer to Raster.
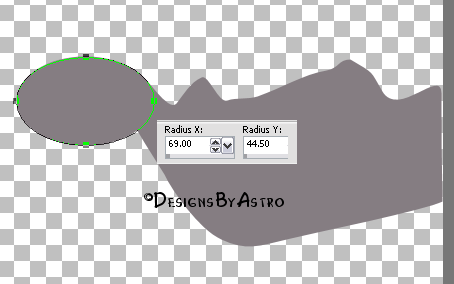
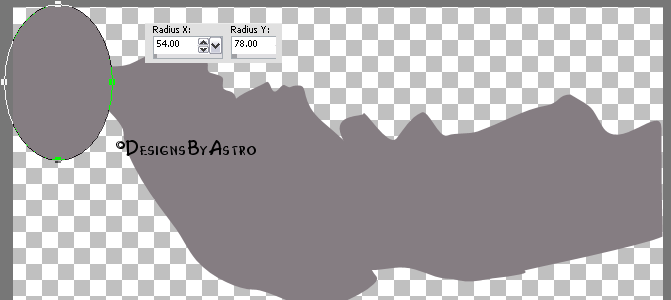
8. Add a New Vector Layer naming it Mountain 2. Draw another oval to the left of the
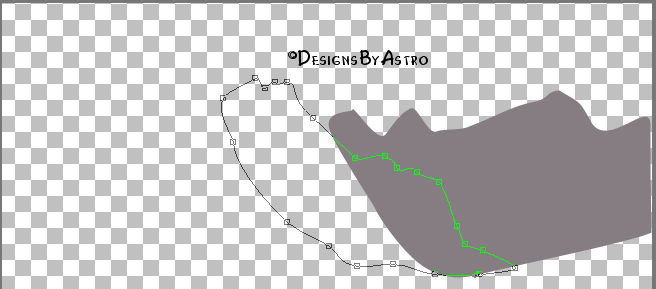
first mountain....9. Right click, Convert to Path, click on the Pen Tool.
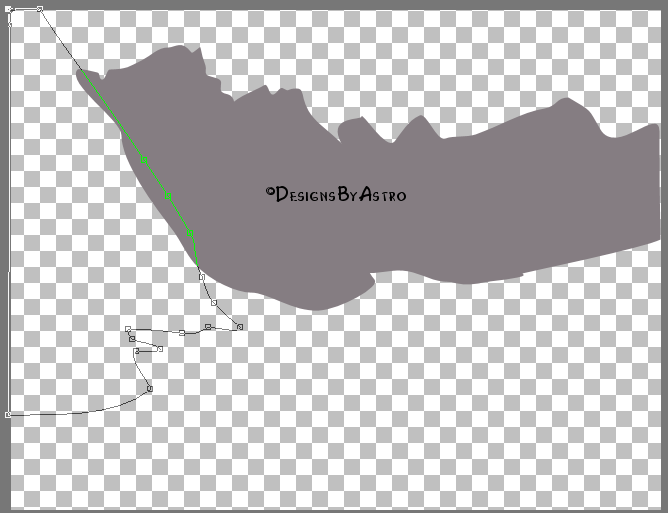
10. Add nodes, changing to Cusp where needed to shape the second mountain something like this...
11. Convert to raster.
12. Add a New Vector Layer naming it Mountain 3. Draw an oval to the left of the second
mountain.....13. Right click, Convert to Path, click on the Pen Tool.
14. Add nodes and shape something like this....
15. Convert to Raster.
16. Add a New Vector Layer naming it Mountain 4. Draw an oval to the left of the 3rd mountain...
17. Right click, Convert to Path. Click on the Pen Tool.
18. Add nodes and shape like so....
19. Convert to Raster.
That is your mountain Range. Next we will be laying out our far off tree line.
20. Set your background color to #3b4d13
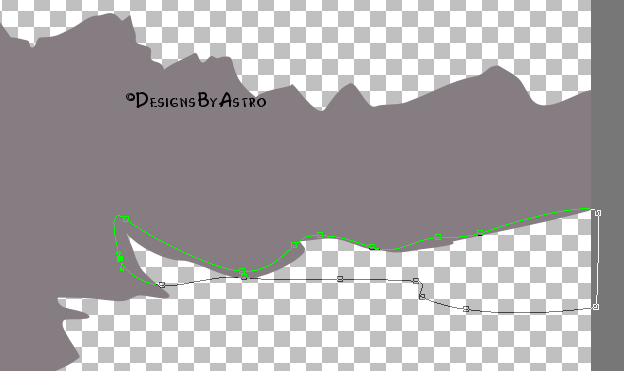
21. Preset Ellipse setting used for the mountains. Add a New Vector Layer naming it tree line.
22. Draw out an oval just below mountains 1, 2 and 3....
23. Right click, Convert to Path. Click on the Pen Tool.
24. Add nodes and shape something like this....
Note, this does not have to be perfect, you just want to lay out a rough grassy tree line area.25. Convert to Raster.
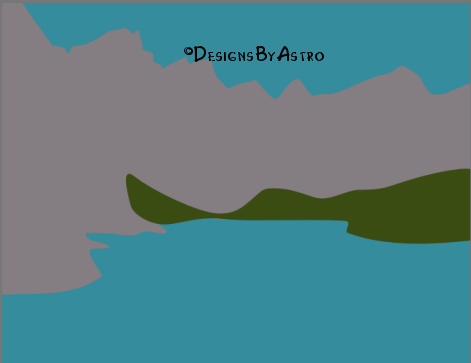
26. Make Raster 1 Layer your active layer. Set you foreground color to #348d9d
Flood fill the layer with the color.....This is our basic painting. From this we will start adding shadows and shading to bring the
painting to life.27. Make Mountain 1 your active layer. Select and Float the layer. Set your foreground
Color to Patterns. Set your pattern to the Mountain Pattern I provided.
Angle set to 0
Scale = 100
28. Flood Fill your selection with the pattern.
29. Keep selected. Go to Effects, Distortion Effects, Wave and apply these settings...
Color set to #e5e5e5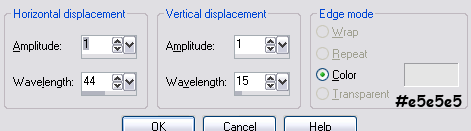
30. Activate your Paintbrush with these settings...
Round +05 then set to.......
Raise the size on your paintbrush as needed.Colors used....
#f2eeec
Black
#8d5e49
White
#b28c5cSmudge Tool settings....
31. Use the paint and smudge tool settings to paint your mountain something like this...
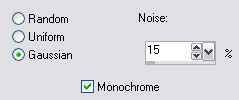
32. Go to Adjust, Add/Remove Noise, Add Noise and apply these settings...
32. Deselect Mountain 1 when you're happy with your shading.
33. Select and float Mountain 2.
Apply the same pattern fill, apply the Wave settings
Use the same Paint and Smudge Tool settings
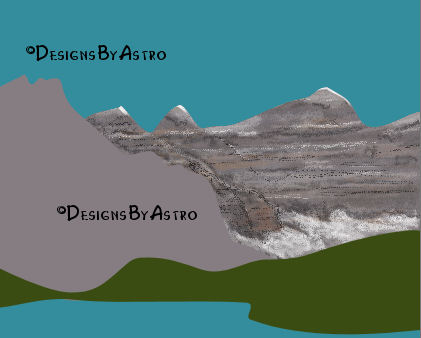
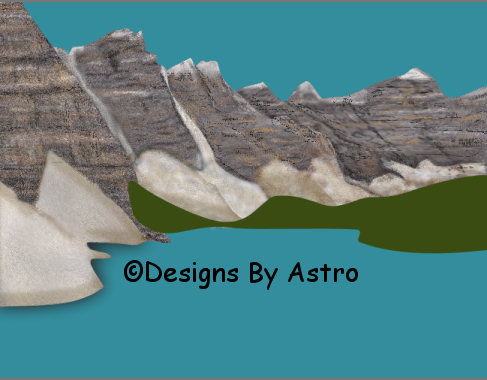
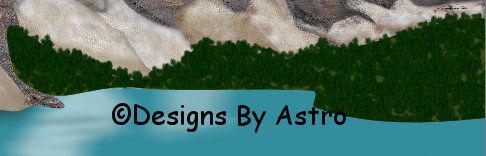
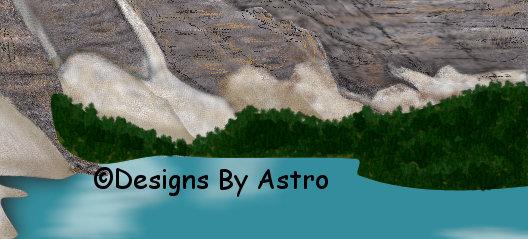
to paint Mountain 2. Apply the Noise setting. Deselect when you're happy.34. Take the same steps for Mountain 3 and 4. Except on Mountain 4 do not apply the
wave setting.
You should have something like this when you're finished....35. Make your background layer your active layer. Add a New Raster Layer naming it
Clouds.36. Click on your Tubes and find your Cloud tube. Set it to size 30. Lay out some clouds
across your sky.....37. Duplicate your cloud layer by going to Layers, Duplicate, then to Image, Flip.
Move the clouds so they are a reflection in the water.38. Add a couple more clouds where needed.
39. Go to Adjust, Blur, Motion Blur and apply these settings...
Angle set to 270, Strength set to 6540. In your Layers Palette, lower the Opacity on the layer to around 55.
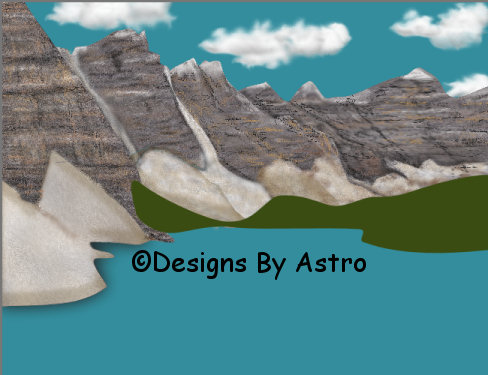
41. Make your green area your active layer. Select and Float it. Add a New Raster Layer
naming it Trees.42. Open your tree tube.
43. With your green area selected and your tree tube set to a very small size, mine was set
to 10, lay out a tree area.....44. Deselect. Add a New Raster Layer, with the same tree tube set to the same size,
go back and add some tree tops along your tree area....45. Adjust the Brightness/Contrast on this layer. Set the Brightness to around 15 and the
Contrast to around 4.46. Add a New Raster Layer. Lay out more trees to make a darker tree area. Adjust the
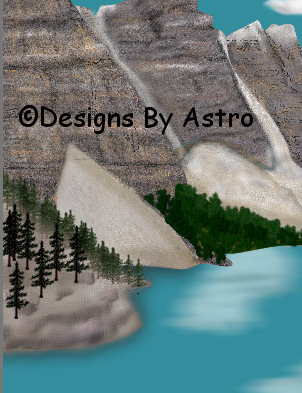
Brightness and Contrast so that the trees are darker... around -9 worked for mine....47. Add a New Raster Layer. Lay out more trees on the left slope. Adjust the
Brightness to make them darker....48. Add a New Raster Layer, increase the size of your tree tube and add more trees to
the left slope. Add New Layers as you go to, adjust the brightness/darkness and use the
Pick Tool to elongate some of the trees. You should ended up with something like this....Note...I used a Rock tube that I had and the smudge tool to get the rocky area by my
trees. This step really isn't necessary because your next layer of trees will hide the
area anyway.49. Add a New Raster Layer, increase your tree size and add 2 more trees to the left.
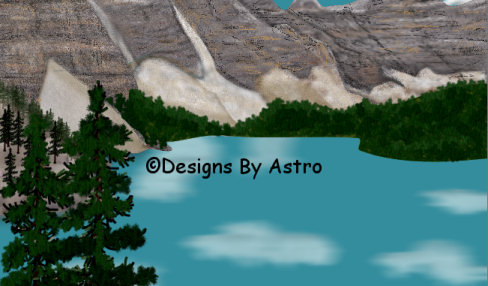
Use the Pick Tool to elongate the tree. Adjust the brightness to darken the tree if needed....50. Add a New Raster Layer. Add one smaller tree and one large tree to this layer.
Use the Pick Tool to elongate the tree. Adjust the brightness to darken if needed....51. Make any adjustments to your layers you want. Add shadows to your water, use
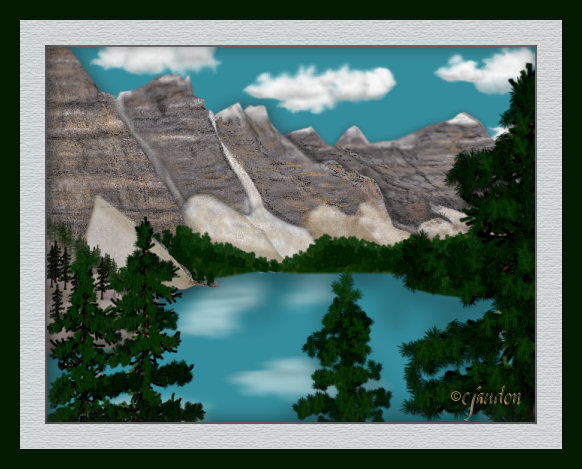
the soften tool to soften the waterline, add a drop shadow behind your mountains,
anything you'd like.Sign, mat and frame your painting! You're done!
I hope you've enjoyed and learned from this tutorial.
Until next time... God Bless!
Connie
Designs By
Astro Index of Tutorials
Tutorial written July 2007
© Copyright
2007 Designs By Astro
All rights reserved.