This frame tutorial was made with PSP7
but can be created in earlier versions too ... Earlier versions may not have
the fine leather effect used in this tutorial but the frame can be
accomplished without it ...
This page is graphic intense so please be patient while this
page loads ...
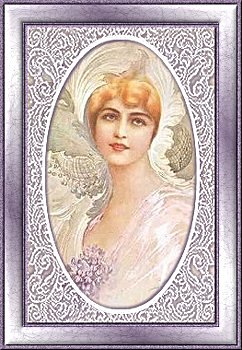
Here is an example of the frame that we will be making ~
~ What You Will Need ~
Jasc Paint Shop Pro You can download a fully functional 30
day trial version ... Here
Woman Image I used You can download the image ... Here Unzip
and then open in PSP
PSP Mask You can download the mask ... Here The
mask is a .jpg so just unzip and open in PSP
Plug-in Filter / DSB Flux You can download the filter ... Here Unzip
and install into your PSP Plug-in Filter folder
~ Instructions ~
1. Open Image and Mask up in PSP ... Minimize Mask
2. Set Foreground color to White ... #FFFFFF Set Background
color to a dark color from your image ... I used #816F89
3. On your main image go to Layers / New Raster Layer Flood
Fill....with
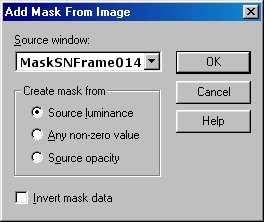
white Masks / New / From Image with the following settings:
4. Masks / Delete When it asks "Would you like this mask
merged into the current layer?" Answer Yes Effects / Sharpen /
Sharpen Effects / Sharpen / Sharpen again
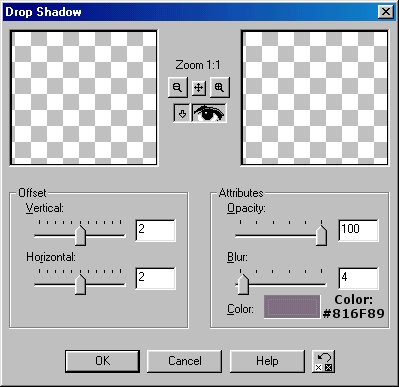
5. Effects / 3D Effects / Drop Shadow with the following
settings:
6. Repeat the Drop Shadow effect except this time use Vertical
-2 / Horizontal -2
7. Layers / Merge / Merge All (Flatten)
8. Image / Add Borders / Symmetric Checked / 5 (This border
should be your dark color) With the Magic Wand....click on the new border Effects / Plug-in Effects / dsb flux /
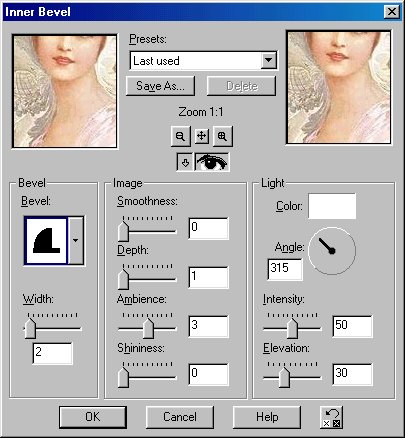
Bright Noise Intensity: 35 ~ Direction: Mix Effects / 3D Effects / Inner
Bevel with the following settings:
9. Image / Add Borders / Symmetric Checked / 20 To make sure
you get a clean selection go to Selections / Select All Selections /
Modify / Contract / 20 Selections / Invert
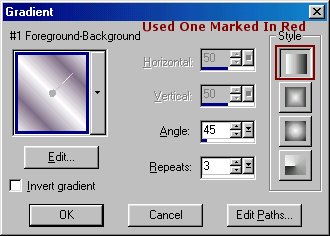
10. Now set your Foreground Styles box to Gradient with the
following settings:
11. Flood Fill....with the
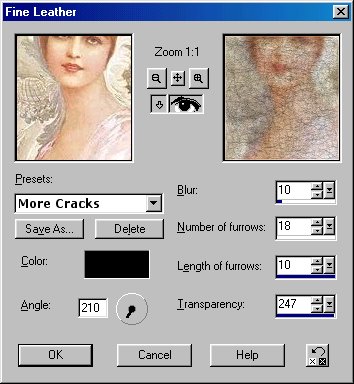
Gradient Effects / Texture Effects / Fine Leather with the following
settings:
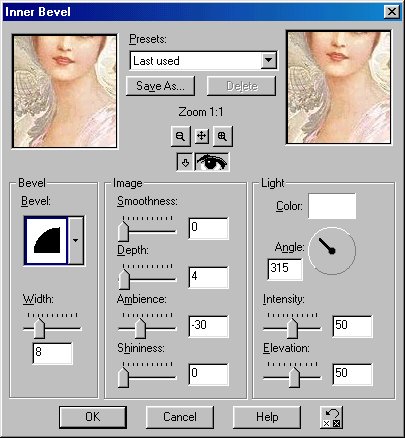
12. Effects / 3D Effects / Inner Bevel with the following
settings:
13. Image / Add Borders / Symmetric Checked / 5 (This border
should be your dark color) With the Magic Wand....click on the new border Effects / Plug-in Effects / dsb flux /
Bright Noise Intensity: 35 ~ Direction: Mix Effects / 3D Effects / Inner
Bevel with the same settings as in Step 12
14. Selections / Select None and we're all done :-)
If you have any questions or need additional info, please
feel free to email me ...