|

WHAT YOU
WILL NEED
PSP
9
RCS Filter
Pak 1.0
Screenworks
Supplies
1. Open up a
new image 700 x 550
2. Flood
fill the image with the team 085 Gradient -
Angle and Repeats set on zero - put a check in
the Invert box
3. Add a new
layer - fill this layer with the teom 133
gradient - Angle & Repeats zero - UNCHECK
the Invert box
4. Layers -
Load/Save mask - Load mask from disk - find and
apply the Squares mask using the following
settings
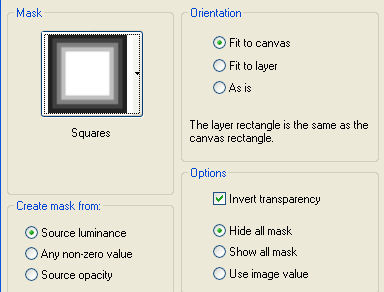
5. Layers -
delete - Layers - merge group
6. Still
working on the same layer - Effects - 3D Effects
- Drop Shadow - apply the following
settings
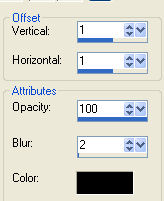
7. Re-apply
the drop shadow but change the Vertical &
Horizontal settings to minus 1
8. Still
working on your top layer - using the magic wand
click the white part in the center - now on your
layer palette move your highlight to the bottom
layer and hit the delete key
9.
Merge visible
10. Apply
RCS Filter Pak 1.0 - Negative Image Creator
using the default settings
11. Using
the Magic Wand - select the empty middle section
and flood fill with mqc berry gradient - Angle
and Repeats set on zero - Invert box
unchecked
12. Copy and
paste the tube of forever as a new layer -
position to the left inside the second center
square - lower the opacity to between 14-18 -
merge visible

13.
Selections - Load selection from disk - find and
apply the forever1 selection
14. While
selected apply RCS Filter Pak 1.0 - Triple
Exposure at the default settings
15. Still
selected apply FM Tile Tools Blend Emboss -
select none
16.
Selections - Load selection from disk - find and
apply the forever2 selection
17.
Invert and apply Screenworks - Point
Array
18. Keep
selected and apply the same drop shadow as in
steps 6 & 7
19. Select
none
20. Adjust -
Brightness & Contrast - Clarify 5
21. Copy and
paste the forever tube again as a new layer -
lower the opacity to 36 and apply the same drop
shadow as in step 6 - do not apply step
7
22. Open up
the tube of the words - copy and paste as a new
layer - position right bottom side
23. Copy and
paste the heart tube as a new layer - position
to top left side - resize 85% - sharpen a couple
of times
24. Layers
merge visible
25. Open up
the frame tube and paste as a new
image
26. Copy and
paste your finished image as a new layer onto
your Frame
27. Layers
merge all flatten
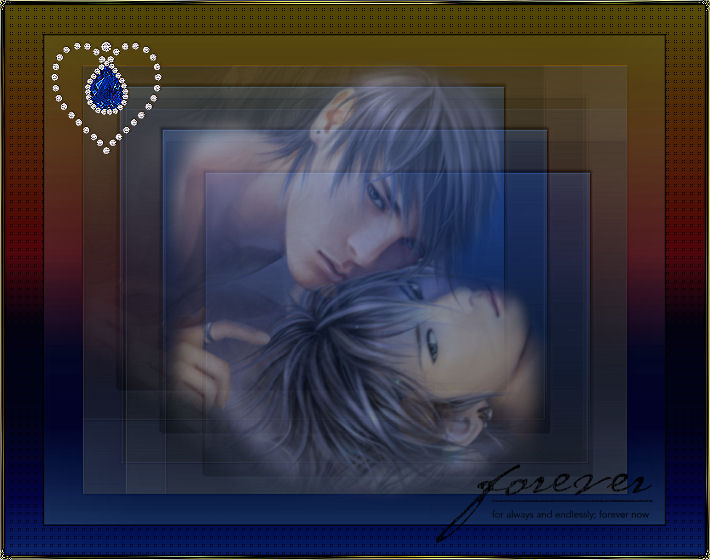
And your all
done !
hope you
enjoyed this one
*S*

Tutorial
Copyright ©Designs by Sandee 2006
|