|
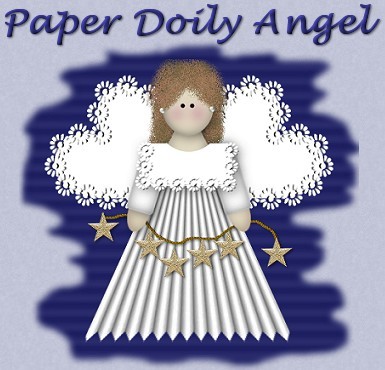
The inspiration for
this Angel came from childhood crafting days, but not mine. If you
have read "About Me", you will already know that I was an elementary
school teacher for 34 years. On our classroom supply order sheet, we
used to be able to order paper doilies by the hundreds for just
pennies. Of course they were always in plentiful supply at
Valentine's Day, but we also used them to make these angels. Heart
ones for the wings, square ones for the arms and top, and just white
paper folded like a paper fan, eventually turned into a lovely
little lady (simple but very effective looking). I also used to make
large ones out of experience chart paper and we used those, holding
song books, to decorate the gym for the Holiday Sing-a-Long.
What You Will Need to Start
...PSP 6
or 7 (this was done in 6)...
Visit JASC to download a free
trial
...Redfield's Jama 3D that you can download here...
...my zip file
of a psp file of the heart shape, pspfile of the daisy petal shape
and the bladepro setting that you can download here...
I
want to give special thanks to Mardi from Web Graphics on a
Budget for being kind enough to grant me permission to include
her setting in my zip download here. It is called "cutout" and one I
have used constantly and just love what it does. If you click here,
this leads you to her page to read about the cutout effect.
Thank you again, Mardi, for your generosity.
Start by unzipping and installing your bladepro
"cutout" so it will be ready for use.
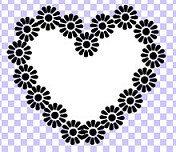
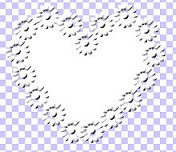
We are going to start
on the wings first, so open the heart shape file, duplicate it, then
close the original for future use.
Create a new raster layer
on the heart image. Open the daisy petal shape. You need to copy it
and then we will be pasting it around the heart shape. Please leave
it black and we will take care of that later. Start in the top
centre of the heart and paste one daisy. I judged the placement by
putting the centre circle of the daisy half on and half off the
heart. (That is why the black is being used now to help make
placement easier to see.) Work your way around both sides of the
heart. If they don't meet exactly at the bottom, don't worry because
that part will be hidden.
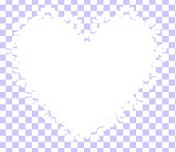
When all daisies are in place, go
to "colours - negative" and your black daisies will turn into white
ones. Using the selection tool, set to rectangle, surround your
daisies, then click inside so the marching ants appear around each
little daisy. Then go to Bladepro and find the "cutout". When you
have selected it, you need to do one step before applying the effect
to your daisies. On the settings at the left, look up to the second
from the top - "Height". Right now the setting is at -100 (minus
100). This is what you would normally use for a cutout effect. We
need to change that so move the height slider all the way to the
right until it reaches +100. This gives you a puffed up look and
personally, I use this effect a lot on lettering rather than an
inner bevel. Now you can apply the effect and your daisies will
hopefully look like the decorations around the outside of a real
paper doily. Finish off here by going to "layers - merge visible".
Hide this at the bottom of your screen until later. You can also
save it as "wing.psp" just in case anything happens and you lose
it.
We need to open a new image, 400 by 400,
transparent, 16 mil colours. Give it a name and save it as psp
before you start. Then remember to save often. Set your colours to
the two listed below for the skin colour and shadowing or any
colours of your own choosing as a skin colour.
   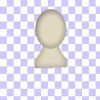
Create a new raster layer called "head". Using the
shape tool set to ellipse, draw a head shape near the top of the
image. Leave room for just a bit of hair. Select your shape to have
ants appear surrounding it, then go to "selections - invert" and
apply a drop shadow using the darker brown and settings of -
Opacity.....40 Blur.....20 V and H.....4. Then repeat switching V
and H to minus 4. Deselect.
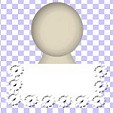
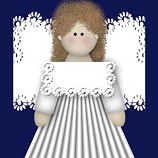
Create a new raster layer called
"neck". The explanation that follows is how I did the neck. There
may be easier ways, but this is my way. Draw a rectangle, your flesh
colour, anywhere, because we will be moving it. Using the selection
tool set to ellipse, try and have the bottom of the ellipse overlap
part of your rectangle. Then hit the delete key or the scissors to
remove this area. See the third image above. Select this shape, then
copy and paste on the same layer, and then image-mirror. Overlap the
two until you get a nice neck shape. Select this new neck shape, go
to selections - invert and apply the same drop shadow as you did to
the head. Then arrange this layer down behind the head and move it
into the correct place. See the last image above.
 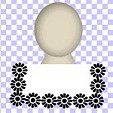  
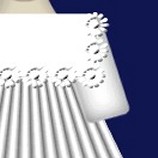
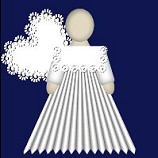
Create a new raster layer named "collar" and move
to the top. Using the shape tool, draw a white rounded rectangle to
act as the collar. See first image above. Create a new raster layer
and follow the exact steps we did for the heart wings. Add the black
daisies reduced to 75% of the original, colour negative, select, add
bladepro "cutout" effect. At this point you can hide all the other
layers except these two and merge - visible and rename
"collar".
We are now going to open another new image, 300 by
300, 16 mil colours, transparent. We are going to make the skirt.
Add a new raster layer and floodfill with white. Go to effects -
Jama 3D. Set it up as per the settings below then apply.
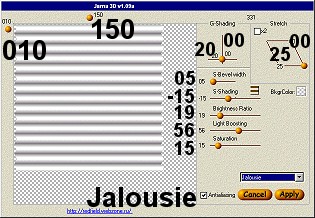 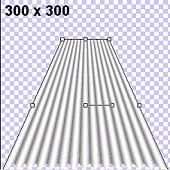
The folds are going in the wrong direction, so go
to image- rotate -right - 90 degrees. Click on the deformation tool.
Check the picture above right. Hold down the control key then drag
either the upper right or left box inwards towards the centre but
not all the way so they meet. Then release the control key, grab the
top middle box and pull downwards a little. Apply the deformation
then go to image - sharpen - sharpen. Copy the image, then return to
the main image and paste as a new layer. Name it "skirt". Move it
down under the collar layer.
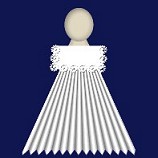
In my next illustrations, I have
added a blue background to make it easier for viewing.
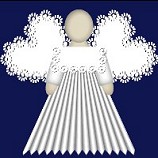
Create a new raster layer called "right arm". Using
the shape tool, draw a white rounded rectangle to represent an arm.
Select it, then go to selections - invert and add a drop shadow
using... black... Opacity...40, Blur 10..... V and H...2, then
repeat using V and H...minus 2. Make sure this layer is above the
skirt layer and below the collar layer. To make turning it easier, I
always use the deformation tool to twist and move. Check the image
above for the arm placement. When happy with it, duplicate this
layer and then image - mirror. You might have to adjust the left arm
because we did not start our image exactly in the centre. Name this
layer "left arm".
Create a new raster layer called "right hand", and
using the shape tool and your flesh colour, draw a small ellipse
that will represent a hand. Select it, go to selections - invert and
apply the same drop shadows as you did for the arm. Then move the
layer down until it is just under the arm. Rotate it a little to
match up with the tilt of the arm. Then duplicate this layer and
then image - mirror for the other hand. Adjust if you have to. Call
this layer "left hand".
On your layer list, click on the very
bottom one, then add a new raster layer called "left wing". Open up
your heart wing that has been waiting at the bottom of your screen.
Copy the image, then paste as a selection on your newly created
layer. Click on the deformation tool or image - rotate area and
adjust the wing to the left and move it under the body. Check the
last image above. When satisfied, duplicate the layer and image -
mirror for the other wing and adjust the placement if needed. Name
this layer "right wing".
I left the drop shadows until this
point and that is why you have not been told to merge layers. You
will need to add drop shadows to several layers now. These have been
applied to the hand layers, arm layers, collar, and head. On each
layer mentioned, apply a drop shadow using black, opacity 40, blur
10. Looking at the image, apply to the left hand, left arm, collar,
and head... a vertical and horizontal of 4. Using the same opacity
and blur, apply a drop shadow switching the vertical and horizontal
to -4 on the right arm and right hand. At this point I felt that the
collar looked a little funny with the drop shadow added, so I made
an adjustment to the neckline. You can leave yours as is, if you
wish. If you also wish to switch it, go to the collar layer. Choose
the selection tool set to ellipse, and starting above the collar,
pull out the ellipse shape until it makes a little round neckline,
then hit the scissors or the delete key. This is the same step you
did to form the neck at the beginning.
 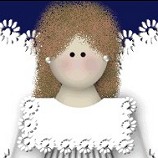
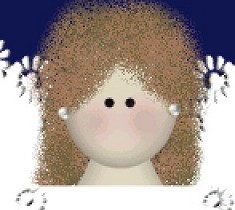
I
will admit that I am not good on faces or hair. What I did here, was
use the spray can set to size 50, opacity 100, density 50, and using
two shades of brown, I created a new layer just above the wings
called "back hair" and sprayed short bursts to represent hair coming
down behind her back. Then I created a new layer called "front hair"
on top of the face layer and sprayed down from the centre to the
left then right just to about the ear level. Then I added a pearl
tube for earrings. I will not be offended if you want to change her
hair and face to what is your liking. For the face, I created a new
layer on top and just added two small black circles for eyes, then
created another new layer "blush" and sprayed a pretty pink using
the same settings as for the hair, then applied a gaussian blur of
5.00 for her cheeks.
The last step is to create another new layer called
"wire" just below both the hand layers. I used the rope tube set to
15 and drew a squiggly line then added tube stars. Here again, you
have the option of adding to the wire anything you would
like.
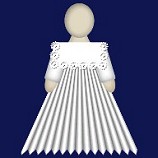
Your angel is now completed. You can merge visible
layers and tube or save in layers as a psp file in case you want to
make her a Valentine angel holding hearts, or an Easter angel
holding eggs, or a St. Patrick's angel holding shamrocks.
If
you have any problems or need further explanations, please feel free
to email me here
MAIN
TUTORIAL LIST
This
tutorial was posted at the site of "P. Ann's Place" Dec. 17, 2001
and written by Pat Sherman. All I ask is that you do not claim it as
your
own.
| |