

Supplies
Paint Shop
Pro
Super Blade Pro
Filter Factory
A
Super Blade Pro Preset of your choice
I
used the Perfect Gold preset from Dee's site
which appears to now be down
Zip
I
have had this mask for a long time and am not
sure where I got it.
If anyone knows, please
let me know so I can give proper
credit.
1. Unzip the zip file and place the mask
in your mask folder.
Open the pattern fill
and minimize on the workspace.
Set
foreground to pattern and background to
white.
2.
Add 3px border - select with magic
wand.
3.
Effects - Plugins - Super Blade Pro.
Apply
preset of your choice.
I used the D_perfect
gold.q9q which I got from Dee's site.
|
Change the shape to the 6th Shape
down.

4.
Selections - Invert. Effects - 3D Effects -
Cutout.
Repeat Cutout, this time V & H
-3.
Select none.

5.
Add 10px border - select with magic
wand.
6.
Flood fill with pattern.
Select
none.
7.
Add 3px border - select with magic
wand.
8.
Repeat Step 3.
9.
Choose a colour from your graphic and set as
background colour.
I used
#994D3F.
10.
Add 30px border - select with magic
wand.
11.
Effects - Plugins - Filter Factory A - Pool
Shadow.
Keep selected.

12.
Effects - Noise - Add 5% Uniform.
Keep
selected.
13.
Change your background colour back to
white.
Layers - New Raster
Layer.
14.
Masks - Load From Disk.
Browse to where you
saved the gardenia.msk - Open.
You won't see
anything but the mask is there.
15.
Flood fill the border with white - there is the
mask! Masks - Delete - Answer yes to merge into
current layer.
Select none.
16.
Selections - Select All.
Selections - Float.
Effects - Plugins - Super Blade Pro - apply
your preset.
Keep selected.
17.
Effects - 3D Effects -
Dropshadow.
Select none.

18.
Layers - Merge - Merge All
19.
Add 3px border - select with magic
wand.
20.
Repeat Step 3.
21.
Add 10px border - select with magic
wand.
22.
Flood fill with pattern (your foreground should
still be set to pattern).
Keep
selected.
23.
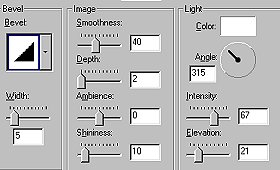
Effects - 3D Effects - Inner Bevel.
Select
none.
24.
Add 3px border - select with magic wand.
25.
Repeat Step 3.
Select none.
Thanks for trying this tutorial.
I
hope you have enjoyed it.

Tutorial Copyright Marlie©
2002