|

It is always fun to try and invent new ways of
framing your images. I came up with this the other night while
looking over my "Blast Frame" tutorial. If there is anything else
similar on the web, then I am unaware of it and any similarities are
purely coincidental. This is my idea and I would never dream of
copying or stealing ideas from any other site. I have called it the
"Gear Frame" because of the filter I used.
This tutorial was completed using PSP6.02 but
can easily be done in PSP7 or any version that will support these
plugins.
What You Will Need:
Paint Shop Pro:
download a trial version here
DSB Flux Plugin: you can download it here
(this link
leads to the introductory page, enter the site and then check the
drop down menu in the upper right for the plugins page)
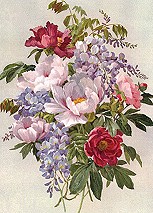
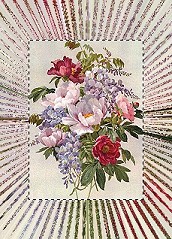
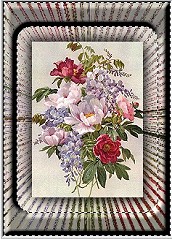
You
can use any image you wish but if you would like to follow the
tutorial using my image, right click on it and save it to your hard
drive. It is from one of my graphic cd's.
Open your image in PSP. Press the shift key and the
letter D to make a duplicate of your image.
On one of the
images, go to "Image - resize". We are going to increase the size,
so in the "Percentage of Original", fill in the number 150. Make
sure the "maintain aspect ratio" near the bottom is checked (should
be 1 to 1).
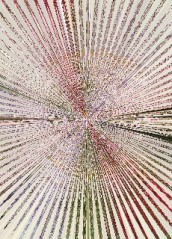
Staying with this enlarged image, go to
"Image Effects - filters - DSB Flux - gears".
Change the
number of gears to 75 and the strength to 85.
Go
back to your other image and click on it to make it the active
image. Press the "control" key and the letter "C" to copy the image.
You can hide that image now at the bottom because you won't be using
it again. Then return to the enlarged image and click on it to
activate it. Press the "control" key and the letter "L" and this
will paste your image on a new layer. Doing it this way also ensures
that your original sized image is in the exact centre of the larger
image.
There may be different or better ways to do the
following steps, but this is how I do it.
Using the selection
tool set to rectangle, draw a large rectangle around your smaller
image, then click inside. This will make the "marching ants"
surround the smaller image.
Go to "Selections - save to an alpha channel".
Don't worry about naming it and just click OK on the next two
screens to return you to your working area. While your image is
still selected, go to "Image Effects - drop shadow" and apply these
settings
Shadow colour..... black
Strength.....
70
Blur..... 20
Vertican and Horizontal..... 6
Deselect
your image.
We are going to apply another drop shadow but we
don't want to include the previous shadow. Go to "Selections - Load
from an alpha channel" and click on "OK" when you find the shape we
saved there previously. This will return the marching ants to
surround only the original image. Apply the same drop shadow as
above but this time change the Horizontal and Vertical to -6 (minus
6) then deselect again.
Make
your background layer the active one. We are going to start making
the frame. Once again, go to "Selections - load from an alpha
channel" and have the selection reappear. (It will look as if it is
surrounding the upper image on the other layer).
Go to
"Selections - modify - expand" Fill in the number 20 and then click
OK.
Then go to "Selections - invert".
Go to "Image Effects - inner bevel" and apply the
following settings.
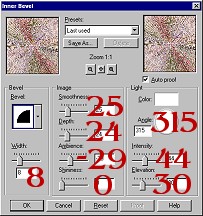 
Keep
your frame selected and then go to "Selections - invert" The
finishing steps are to add the last 2 "cutout" effects and we are
going to do this on two separate layers. Go to "Layer - create a new
raster". Don't worry about naming it and just click OK. Go to "Image
Effects - cutout" and apply the settings below using the first
Horizontal and vertical numbers of 6.
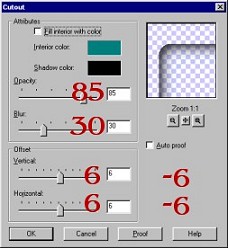
Keep the area selected, and then go to "Layers -
add a new raster". Then go to "Effects - cutout" again using the
same settings as above but change the Horizontal and vertical this
time to the -6 (minus 6) numbers.
All you have to do now is
deselect, merge all the layers, and save it in your chosen
format.
You are finished!
Notes About Using Other
Images
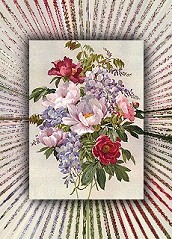
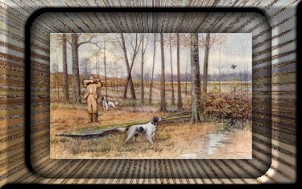
This first sample is an image that is still
rectangular but wider. You will notice the sides on this frame are
larger than the top and bottom. This is the exact opposite of the
flower image above. On this one I also had to change the section
"Selections - modify - expand". Above we used 20 but on this one I
had to use 25.
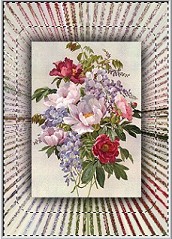
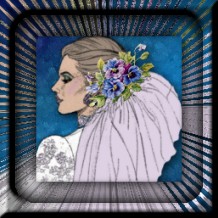
This
second sample was a square image and all sides of the frame are
equal. I also used expand 25.
On
this final sample, I got as far as the gears and I tried the inner
bevel part and realized it looked awful. It was way too bright and
bold and the centre image was totally overpowered by the frame. I
undid all the steps on the background layer. Added a new raster
layer and floodfilled it white. Then I lowered the opacity to about
35 and then merged those two layers only. I also had to change the
expand 20 to expand 30 on this image. You will have to see what
appears to be best for the image you have chosen.

If you have any problems or need further
explanations, please feel free to email me here
MAIN
TUTORIAL LIST
This
tutorial was posted at the site of "P. Ann's Place" April 7,2002 and
written by Pat Sherman. All I ask is that you do not claim it as
your
own.
| |