|

WHAT YOU WILL
NEED
PSP 9
Supplies
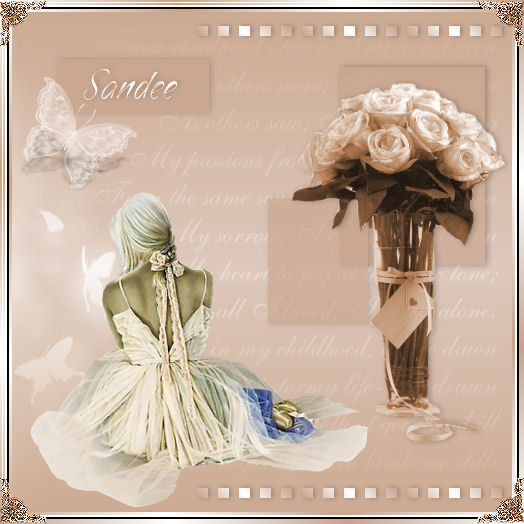
1. Open up
a new image 500 x 500
2. Set your
foreground to #D3B69C and your background to
#c6a28b
3. On your
Materials box select Gradient and find the
forewhitfore gradient, angle and repeats set on
zero ---> flood fill your new layer with this
gradient
4. Add a new layer
---> flood fill this layer with
#c6a28b
5. Layers --->
load/save mask ---> load mask from disk
---> find and apply LN_kaithy mask making
sure that the Invert Transparency box is
unchecked
5. On your layer
palette, right click on the mask layer and
delete ---> Layers ---> merge group
---> on your layer palette set the opacity of
this layer to 60
6. Layers - Merge
Visible
7. Add a new layer
- Selections ---> load/save selections - load
selection from disk - find and apply
sde_butterflies_1 selection
8. Flood fill the
selection with #c6a28b - keep selected and apply
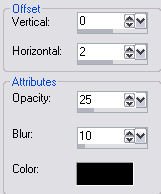
the following drop shadow TWICE
9. Select none and
lower the opacity of this layer to 62
10. Add a new layer
- Selections - load/save selections - load
selection from disk - apply sde_butterflies_2
selection
11. Flood fill this
selection with #c6a28b and while still selected
apply the same drop shadow as in step 8 but this
time only apply it once - select none and lower
the opacity to 62
12. Add a new layer
- keep your materials box on Gradient, change
the Angle to 45 and repeats to 2 - have your
foreground colour set to #c6a28b and your
background colour set to White
13. Selections -
load/save selections - load selections from disk
- apply sde_butterflies_3 selection - flood fill
this selection with the gradient - keep selected
and apply the same drop shadow as in step 8 only
this time change the Blur setting to 8 - Select
none
14. Add a new layer
and repeat step 13 only this time apply
sde_butterflies_4 selection
15. Layers - Merge
- merge visible
16. Open up the
Lady tube - copy and paste as a new layer onto
your working image - position her to the bottom
left of your image
17. Open up the
Flowers tube - copy and paste as a new layer
onto your image - position this to the right of
your image - apply the same drop shadow as in
step 13
18. Layers - Merge
- merge visible
19. Add a new layer
- Selections - load/save selections - load
selection from disk - apply sde_butterflies_5
selection ---> Flood fill this selection with
#c6a28b and while still selected apply the same
drop shadow as in step 8 but this time only
apply it once - select none and lower the
opacity to 70
20. Add a new layer
- X off your foreground colour and have your
background colour set on White
21. Select your
text tool - find Sandy Text Bold - size 28 and
type in your name or any word you
like
22. Keep selected
and apply the same drop shadow as in step 8 but
change the Blur setting to 8 - Adjust -
Sharpness - Sharpen - select none
23. Open up the
butterfly tube - copy and paste as a new layer -
position this under your text - Layers - Merge -
merge visible
24. Add a 10px
border and select - set your foreground colour
to White - your background to #c6a28b and your
Materials box to the forwhitfore gradient -
angle 45 ---> repeats 2 ---> flood fill
your border with the gradient
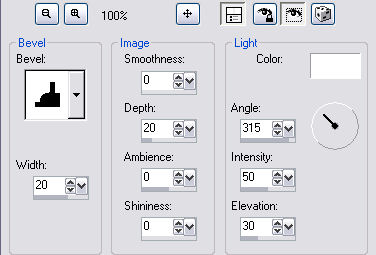
25. Keep selected
and apply the following Inner Bevel
26. Add a 2px
border - select and fill with the same gradient
- select none
Add your corners
and your all done !
Hope you enjoyed
this one
*S*

Tutorial
& Web Design ©Sandee's Place
2000 - 2005
|