

|
|
|
|
| For this tutorial you will
need: ULead PhotoImpact - available for purchase here or Adobe Photoshop - available for purchase here or Adobe Photoshop Elements - available for purchase here or Jasc Paint Shop Pro - available for purchase here This tutorial will work in any of these programs. Filters needed Funhouse filters - Reverb - available free here - also included are old Funhouse filters you can't get any more Simple filters - Diamonds - available free here My plugin windows may look different from yours as I use Filters Unlimited 2 to manage my plugins - available for purchase here. I am assuming you know the basics of your graphics program and where the tools can be located. |
|
Let's get started! |
| 1. Create a new canvas 200 X 200. Pick two colors to make a gradient with. |
| 2. Fill with
gradient. In PSP, click on your color palette and choose Gradient. Left click on the thumbnail and it will open the window to choose a gradient. Choose Foreground-Background, it should be right at the top. Angle 45, repeats 0. In PhotoImpact, pick the two colors, then go to Edit>Fill>Gradient tab and choose the diagonal style, in the two little color boxes, right click on each and choose the two colors you picked. Make sure transparency is at 0 and apply the gradient. In Photoshop and
Photoshop Elements, choose the two colors you want to use, now
click on the gradient tool. |
|
Gradient
Toolbar for Photoshop/Photoshop Elements |
3. Filter (or
Effect)>Funhouse>Reverb at default, settings reverb 4, rest at
zero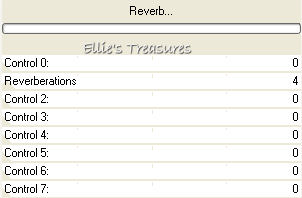  |
| 4. Filter (or
Effect)>Simple-Diamonds. You're done, save as a jpg.
|
| 5. Reduce opacity for a lighter
effect In PI go to Edit>Fill, white at 50-75% transparency In PSP, right click in layer palette>new raster layer. Fill with fill tool, white, reduce opacity in layer to 40. In Photoshop/Photoshop Elements: Layer>New>Layer, then using the Paint Bucket tool, fill with white, go to the layer palette and reduce opacity to 40%
|
|
Some
alternative tiles |
|
If you have any questions or suggestions, click on the email button below to contact me. Have a wonderful day! |
|
|
|
|