
This tutorial was created in PSP8,
November 30, 2003
Resemblance to any other tutorial is purely
coincidental
I have to give thanks to all the fantastic
tubers out there
I really appreciate your work
I wouldn't be
able to write my tutorials if it wasn't for your creations
I
have written a version of this tutorial which uses only one Plugin
that is free
I am calling it No Deform - No Dream and you can
find it Here
Supplies
Paint Shop Pro
Auto Fx
Dreamsuite 2
Filters Unlimited
Tube - Here
**Open
on your workspace**
Font - Here
**Open
and minimize in your taskbar**
1. Open the tube you
are going to use, duplicate and close the original
2. Image
- Canvas Size - 500 x 500
We will resize after we are done - more
space is a good thing *g*
3. Duplicate the tube layer - hide
the copied layer
4. Effects - Plugins - Filters Unlimited -
Distortion - Deformer

5. Effects - Plugins - Auto FX -
Dreamsuite - 4 x 5 Frame

Select the last preset
Apply
the default settings
Effects - 3D Effects
- Drop Shadow
6. Unhide the tube
layer
Place tube in position
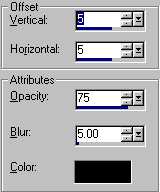
Effects - 3D Effects - Drop
Shadow
Apply the same settings as in the previous
step
7. Layers - New Raster
Layer
Add your text - I have my
settings as follows
I used color #0e0e0e with no
stroke

Add a drop shadow to the
text - use the same settings
as in Step 6
8. Layers - Merge All -
Merge All (Flatten)
Image - Resize 75%, Bicubic
Resample
I hope you have enjoyed
this tutorial
If you have any questions, please feel free to Email me.

Tutorial Copyright Marlie©
2003
Graphics and Page Design Copyright Marlie's Web Design©
2003 |