|
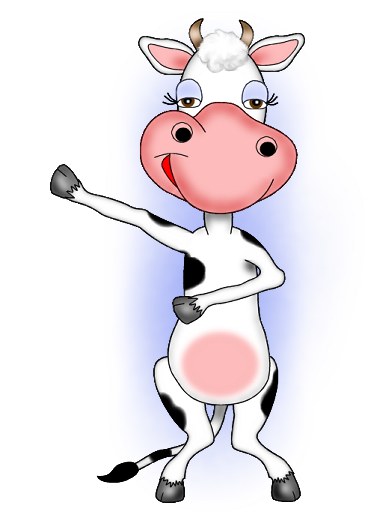
Your Basic Cow |
 |
|
©By Mary aka CowLady...March 1,
2003 |
|
|
| 4. |
Shading the Head |
|
Open your layer palette and find the layer
we labeled "head". Right Click and select Convert to Raster
Layer. Note: Due to the way that the body parts are layered
one on top of the other it is now necessary to kind of skip
around. I hope you labeled all of your individual layers and
don't have too much trouble following my slightly unorganized
way of doing things.
In your
Selections menu click on "Select All"
Selections/Float
Effects/3D
Effects/Cutout using the settings in the illustration
below.
Deselect

Highlight the "muzzle" layer,
Right Click and choose Convert to Raster Layer.
Selections/Select All
Selections/Float
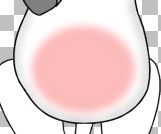
New Raster Layer name it "m1 shading"
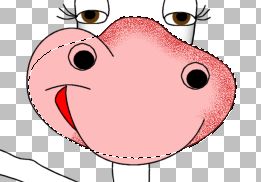
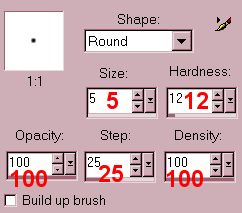
Airbrush Tool: See setting below.
Foreground Color: Red #C60506
Spray a moderate amount around
the entire edge of the muzzle. See example below. Don't worry
about the part that is not visible.
Effects/Blur/Gaussian Blur: Radius
4.00
Deselect
In the layer palette select the "muzzle2" layer. Right
Click and Convert to Raster Layer.
Selections/Select All
Selections/Float
New Raster
Layer name it "m2 shading"
Airbrush
Tool...same color and settings as before.
Spray along the outer edge along the black line.
Effects/Blur/Gaussian Blur: Radius
4.00
Deselect
In the layer palette select the "muzzle3" layer. Right
Click and Convert to Raster Layer.
Selections/Select All
Selections/Float
New Raster
Layer name it "m3 shading"
Airbrush
Tool...same color and settings as before.
Spray along the outer edge along the black line.
Effects/Blur/Gaussian Blur: Radius
4.00
Deselect
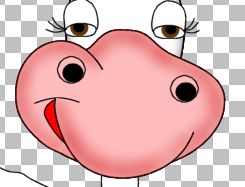
Ahhhh...she looks so much better with a bit more color
in her cheeks. *smile*
Click on the "left eyelid" layer to
select. Right Click and Convert To Raster Layer.
Selections/Select All
Selections/Float
New Raster
Layer name it "left eyeshadow"
Airbrush Tool...change the Foreground Color to Blue
#8E9EF6 and use the same settings as before.
Spray lightly over entire eyelid.
Effects/Blur/Gaussian Blur: Radius 4.00
Deselect
If you
think you got it too dark you can turn down the layer opacity
to suit your taste. Please remember to save your work!
Click on the "right eyelid" layer to
select. Right Click and Convert To Raster Layer.
Selections/Select All
Selections/Float
New Raster
Layer name it "right eyeshadow"
Airbrush Tool...same color Blue #8E9EF6 and
settings.
Spray lightly over entire
eyelid.
Effects/Blur/Gaussian Blur:
Radius 4.00
Deselect
Convert the left and the right eyes to raster
layer.
Using the Paint Brush and
these settings.
Foreground Color: White #FFFFFF
Place a small dot in the center of each pupil.
Okay...time to go hunting again.
Find the layer named "left ear" and Convert to Raster
Layer.
In your Selections menu click
on "Select All"
Selections/Float
Effects/3D
Effects/Cutout...using the same settings as before except
change the blur to 10.
Do Not
Deselect
New Raster Layer name it
"left ear shading".
Airbrush
Tool...change the brush size to 20.
Foreground Color: Red #C60506
Spray
a small amount of red in the pink area right next to the head.
See illustration below.
Effects/Blur/Gaussian Blur: Radius 4.00
Deselect

Click on the layer named "right ear" and
Convert to Raster Layer.
In your
Selections menu click on "Select All"
Selections/Float
Effects/3D
Effects/Cutout...and use the same settings as for the left
ear.
Do Not Deselect
New Raster Layer name it "right ear
shading".
Airbrush Tool...brush size
still 20.
Foreground Color: Red
#C60506
Spray a small amount of red in the
pink area right next to the head.
Effects/Blur/Gaussian Blur: Radius 4.00
Deselect
Click
on the layer named "left horn"...Right Click and Convert to
Raster Layer.
Airbrush
Tool...brush size still 20.
Foreground Color: Black #000000
Background Color: White #FFFFFF
Selections/Select All
Selections/Float
New Raster
Layer
Spray a touch of Black at the
base and at the tip of the horn.
Click on the double ended arrow between the color
boxes and switch from Black to White. Lightly spray a dab of
White in the center of the horn for a highlight.
See illustration above.
Effects/Blur/Gaussian Blur: Radius 4.00
Deselect
Switch
the Foreground Color back to Black and follow the same
procedure for the "right horn".
|
| 5. |
Shading the Body |
|
Find the "neck" layer...Right Click and
Convert to Raster Layer.
Selections/Select All
Selections/Float
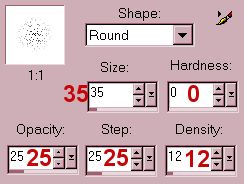
Airbrush
Tool: Same settings: Size 20, Hardness 0, Opacity 25, Step 25,
Density 12.
Foreground Color: Black
#000000
New Raster Layer
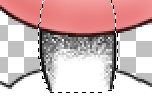
Spray the sides of the neck very lightly, but wider
and heavier right under the chin. See the close up
below.
Effects/Blur/Gaussian Blur...Radius:
4.00
Deselect.
Find the "left arm" layer and Convert to Raster
Layer.
Selections/Select All
Selections/Float
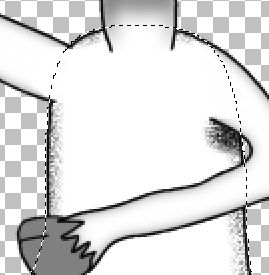
New Raster layer...name it "left arm shading".
Effects/3D Effects/Cutout using the same
settings as before with the blur set to 10.
Eraser Tool: Size 5, Hardness 0,
Opacity 75, Step 12, Density 75.
Erase the black line created by the "Cutout" at the
point where the arm joins the body. Taper the shadow at the
shoulder as shown in the close-up below.
Deselect.
Find the "right arm" layer...Convert to
Raster Layer and follow the same procedure as for the "left
arm".
Click on the "body"
layer...Convert to Raster Layer
Selections/Select all>
Selections/Float.
Add a
Raster Layer...name it "body shading.
Foreground Color: Black #000000
Airbrush Tool: same settings.
Lightly spray around the body...avoid spraying where
the arms are. Emphasize just a bit under the right arm for a
shadow.
Effects/Blur/Gaussian
Blur...Radius: 4.00
Deselect.
Add a Raster Layer and
name it "bag".
Foreground Color: Pink
#FDBBBC.
Background Color: Null
Selection Tool: Ellipse, Feather 0,
Antialiase Checked.
On the lower abdomen
draw out a nearly round ellipse and Flood Fill with the
pink.
Deselect
Effects/Blur/Gaussian Blur...Radius: 4.00
The bag should resemble the figure below.
You can add details to the bag if you wish. I didn't cause in
all of my examples this area is pretty much covered. She is a
modest Cow!
Select your "left leg" layer. Convert to
Raster Layer.
Selections/Select
all>
Selections/Float.
Effects/3D Effects/Cutout still using the
same settings with the blur set to 10
Deselect
Select the
"right leg" layer Convert to Raster Layer and follow the same
procedure as for the left leg.
Select the layer named "tail". Convert to Raster
Layer.
Selections/Select
all>
Selections/Float.
Effects/3D Effects/Cutout again using the
same settings with the blur set to 10
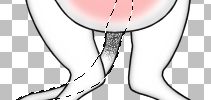
With the tail still selected...add a new Raster
Layer.
Airbrush Tool
Foreground Color: Black #000000
Where the tail joins the body spray moderately. See
illustration below.
Effects/Blur/Gaussian Blur...Radius: 4.00
Deselect
Find the "left foot" layer and Convert
to Raster Layer.
Selections/Select
all>
Selections/Float.
Airbrush Tool : reset size to 10.
Foreground Color: Black #000000
Background Color: White #FFFFFF
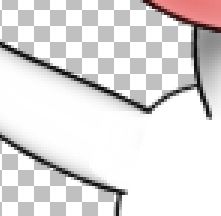
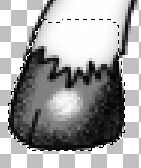
Add
a new Raster Layer name it "left foot shading".
Spray with Black around the outer edge of
the hoof. Click on the double arrow between the color boxes to
switch them and add a touch of white for highlight. See
enlarged example below.
Effects/Blur/Gaussian Blur...Radius: 4.00
Deselect.
Repeat this same procedure for the "right
foot" layer.
Okay...we will do
the front hooves/hands differently. Place your cursor on the
"left front hoof" and add a Vector Layer. Click on the plus
sign in front of your left front hoof layer and move the top
"freehand" up and into the new Vector Layer. Now convert both
to Raster Layers. Rename the new layer "left front
hoof2".
Airbrush Tool : set to
10.
Foreground Color: Black #000000
Background Color: White #FFFFFF
Again on the "left front hoof" layer...
Selections/Select all>
Selections/Float.
Add a new
Raster layer... Name it shading 1.
With the black...spray along the outer edge.
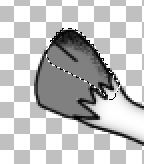
Effects/Blur/Gaussian
Blur...Radius: 4.00
Select the
second half..."left front hoof2"
Selections/Select all>
Selections/Float.
Add a new
Raster Layer...Name it shading2
Spray along
the outer edge with the black then switch to the white and add
a bit of a highlight.
Effects/Blur/Gaussian
Blur...Radius: 4.00
Wonderful...now she can hold on to objects. Follow the
same procedure for the "right front hoof".
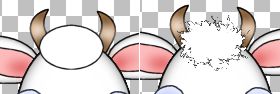
Mercy Me...I nearly forgot her
hair.
Foreground: Black
#000000
Background: White
#FFFFFF
Preset: Ellipse
Antialias:Checked
Create as Vector: Checked
Line Width: 1
This portion is
for those of you who have EyeCandy 4000, but I think EC3 would
work as well. Draw a small ellipse on the top of her head.
Similar to the one shown below.
As
soon as you get it positioned then you can Covert it to a
Raster Layer and rename it "hair"
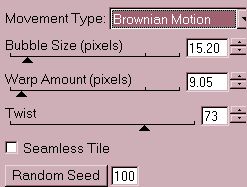
Open up your EyeCandy plugin and choose Jiggle the
settings I used are shown in the illustration below.
At this point you can leave the hair as is
or choose, as I did, to use the Smudge tool. The settings I
used were size 7, hardness 0, opacity 75, step 3, density 50.
Now I'm going to have you seeing
SPOTS!
Foreground Color: Black
#000000
Airbrush Tool : size 20, hardness 0,
opacity 100, step 25, density 100.
Spray a few irregular spots anywhere on the body that
you think looks good. She is, of course, supposed to be a
Holstein.
Convert any stray
vector layers to raster layers and you'll be all DONE with
your basic cow. Marvelous job...Now it is up to you either to
clothe her, find something for her to do or just leave her
plain. I'd like to see some creativity. Remember there are
examples at the beginning of this lesson. I do appreciate your
doing my tutorial and I surely hope you enjoyed yourself. Hugs
to all!
| |
|
|