This frame tutorial was made with PSP7 but can be created in earlier versions too ...

This page is graphic intense so please be patient while this page loads ...

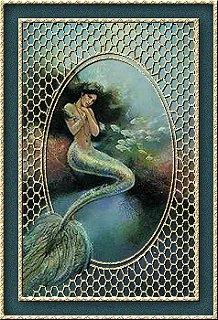
Here is an example of the frame that we will be making ...

Gradient Weave Frame Example

~ What You Will Need ~

Jasc Paint Shop Pro
You can download a fully functional 30 day trial version ... Here

Plug-In Filter / Flaming Pear ~ BladePro
You can purchase this filter ... Here

BladePro Preset / sanco knotty gold
You can download the preset ... Here
Unzip and place in your BladePro enviromentals and textures folder
This preset was made by my friends Sandy Moore and Connie
Thank you so much ladies for letting me use this preset :-)

My PSP Mask ... SN Frame 33
You can download the mask ... Here
Unzip and place in your PSP mask folder

Mermaid image ...
You can download the image ... Here
Unzip and then open in PSP

~ Instructions ~

1. Set Foreground & Background colors to White #FFFFFF

2. Layers / New Raster Layer to the mermaid image

3. Flood Fill..Flood Fill Tool..this new layer with white

4. Now go to Masks / Load From Disk
Browse for SNFrame33.msk then click open

5. Masks / Delete ... When it asks if you would like this mask merged
into the current layer ... answer Yes

6. Effects / Sharpen / Sharpen

7. Effects / Plug-in Filters / BladePro / sanco knotty gold preset

8. Effects / Sharpen / Sharpen

9. Effects / 3D Effects / Drop Shadow with the following settings:

Drop Shadow Settings

10. Open the Layer Palette by clicking once on the icon in the toolbar Layer Palette Icon

11. Lower the opacity on Layer 1 to about 28

Layer Palette

12. Click on your Eraser tool Eraser Tool Icon ... and set as follows:

Eraser Settings

13. Now carefully start erasing the webbing over the mermaid's tail

14. When you are done erasing go back to the layer palette
and increase the opacity on Layer 1 to 100

15. Layers / Merge / Merge All (Flatten)

16. Image / Add Borders / Symmetric Checked / 5
With the Magic Wand..Magic Wand Tool..click on the new border

17. Effects / Plug-in Filters / BladePro / sanco knotty gold preset

18. Effects / Sharpen / Sharpen

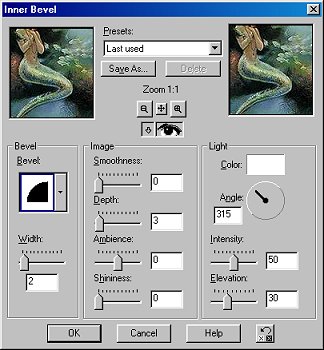
19. Effects / 3D Effects / Inner Bevel with the following settings:

Inner Bevel Settings

20. Choose a dark color from the image & set as your background color ... I used #3A5E64
Image / Add Borders / Symmetric Checked / 15
With the Magic Wand..Magic Wand Tool..click on the new border

21. Effects / Noise / Add / 15 / Uniform
Effects / Sharpen / Sharpen

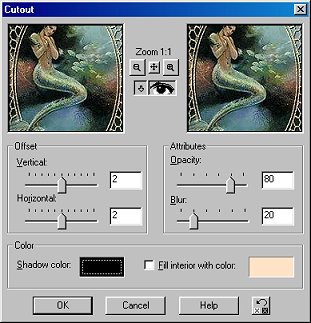
22. Effects / 3D Effects / Cutout with the following settings:

Cutout Settings

23. Reverse Foreground & Background colors at the top
Image / Add Borders / Symmetric Checked / 5
(This border should be white)
With the Magic Wand..Magic Wand Tool..click on the new border

24. Effects / Plug-in Filters / BladePro / sanco knotty gold preset

25. Effects / Sharpen / Sharpen

26. Effects / 3D Effects / Inner Bevel using the same settings as Step #19

27. Selections / Select None ... Resize and sharpen image if necessary

If you have any questions or need additional
info, please feel free to email me ...

Email Me

~ PSP Tutorial Index ~ PSP Masks ~ PSP Frames ~ OE Stationery Index ~
~ Tiled Backgrounds ~ Home Page ~ Awards ~ Webrings ~

... PSP Tutorial ~ Golden Filigree Frame © 2002 Gardendale Designs ...

Website Design & Graphics by ~
Gardendale Designs ... © 1999 - 2005
All Rights Reserved