Christmas Cactus??
*L*
This tutorial is rated 8-9 due
to
the use of
vectors.

Please read my Terms of Use if you have any
questions.
The layout
of this tutorial is set for 1024 x 768
All images are the sole
property of Designs By Astro
Do not copy, reproduce or send through email
without my prior written
permission.
Feel free to LINK to any of my
tutorials.
All
rights reserved.
The image/images you make using this tutorial
is your property to do with
as you wish.
©2001 Designs By Astro
If you have any questions or need
further help you can
Email
me
I know it's not a real Christmas cactus! I looked
at doing one of those, but them suckers
are hard!! *L* To many little petals to do! We'll just call
this a Christmas Tree Cactus! *L*
All I
need to do now is a West Texas tumbleweed tree and I'll be all set for a western
holiday!
*LOL* No kidding they actually
decorate them things in West TX.
This tut uses filters that are in both PSP6 &7
except for one filter called sandstone, but Auntie
Em came up with a way to get about the same look which I
will explain later in the tut. Thanks Em!
Also PSP6 doesn't have the teardrop preset so I have made a
teardrop for you to use. Just dl, unzip
and export as a tube. Then you can size, select it and
floodfill with whatever color you want.
For PSP 5 & 6 Users Teardrop
zip
I'm using 7, so directions to the locations of
tools and filters for 6 users will be different.
Screenshots are resized and or the resolution has been
lowered to save on load time.
As always remember to SAVE!
1.) First off let's open a 400x500
transparent.
Set your background color to
a cactus green. I'm using #5C923E
But who
knows it may turn out to be a totally different color by the time I get
through
with it *LOL*
Oh yeah for PSP7 users, foreground should be null.
6 users, you should set to fill.
2.) Preset Tools!! Dont'cha just love it when I
spring them vectors on ya right from the start??*L*
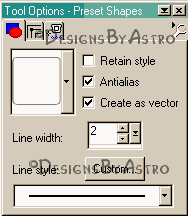
Rounded Rectangle
Antialias and Create as a Vector both checked.

Draw out a rounded rectangle on
your canvas, leaving enough room on both sides, top and bottom
so that we can have arms on our cactus and enough room to
resize for the top if we need to.
Do you remember how to change
the node styles? Right click on a node, chose node
type, then you'll see Asymmetric,
Symmetric, & Cusp. Sometimes the Cusp is unselectable,
at those times you need to
select Symmectric or Asymmetric then go back and Cusp can
be
selected.
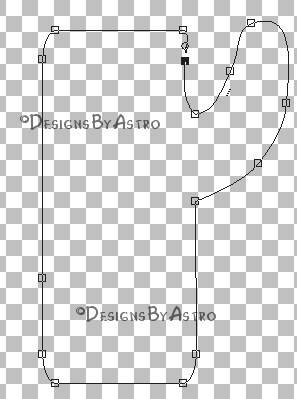
3.) Click on the Object Selector, right click on
canvas and select Node Edit.
Working on
your right side, add nodes and change them to cusp (note symmetric may
work
just as well as Cusp) to form an arm
something like this....

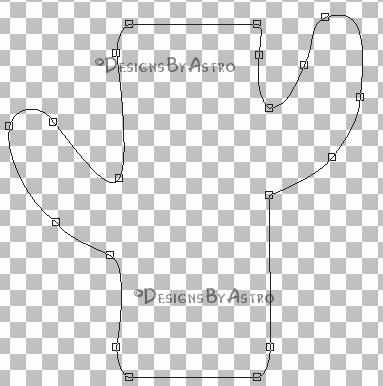
4.) Now working from the left side let's make
another arm but lower toward the bottom
like this...

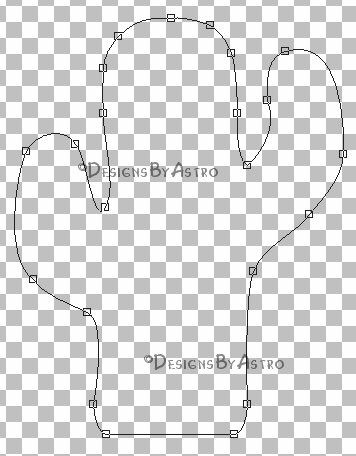
5.) Let's work on the top now. We want to round it
out. So add as many nodes as you need and
change them to Cusp until you have something that looks
like this....

6.) Play with your arms, top and bottom until
you're happy with them. I decided to leave
my bottom as it was but I did pull it down to make it
longer since I wanted to place mine in
a
pot.
When you're happy convert to raster
and rename as base cactus.
SAVE!!
7.) Go to Selections, Select
all, Selections, Float.
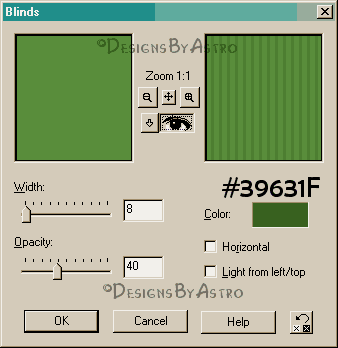
Go to Effects, Texture Effects, Blinds and apply these
settings..
Color used #39631F

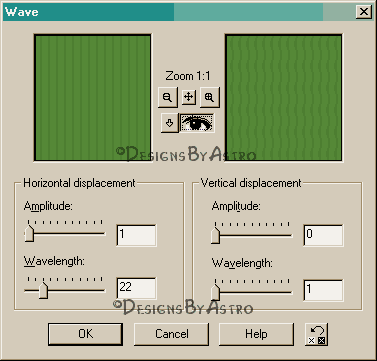
8.) Leave selected and apply the Wave filter
(Effects, Geometric Effects) using these
settings...

Don't ya just love playing with different filters?
Auntie Em and I really did some playing
with filters on that Tuscany Glass Pitcher of mine. We
waved, twirled, rippled until we
couldn't
ripple anymore! *L*
7
User go to step 9, skip step 9a
9a.) PSP6 Users
Only,
Select
None
6 Users
SAVE your image but leave it open.
Because 6 doesn't have the sandstone
filter here is what Em did to get the bright green stripes.
Add a new layer
Set foreground color to a
lime green #80FF80
Draw Tool,
single line
width set to 1
Antialias Checked.
Draw a line at the longest part of your
cactus, from the top all the way to the bottom.
Don't worry about going over some, we
will fix that later.
Go to Images, Deformations,
Wave
Use the
same settings as used above for the cactus body.

Now copy that line
and paste as a new selection all over your cactus, spacing them on
top
of the wave
that we added to the cactus body. Once you have 6 or so pasted on, copy
those
and
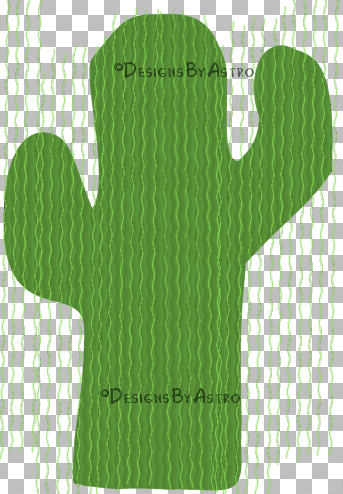
continue to paste until you have the cactus filled with lines. Like
this...

Select
none
Make your cactus body layer
your active layer, go to selection, select all, selections float,
back
to
selections, Invert. Make your line layer your active layer and hit the delete
key on your keyboard
to remove the lines outside of your cactus.
Select
None.
With your line layer your
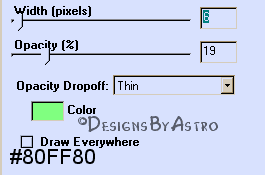
active layer go to Eye Candy Glow with these settings...
width 6
opacity 19
opacity dropoff-thin
color #80FF80

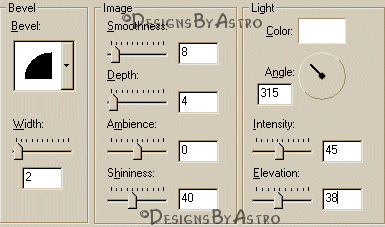
Now apply an Inner Bevel using
these settings..
color white
rounded
width 2
smoothness 8
depth 4
ambiance 0
shininess 40
angle 315
intensity 45
elevation 38

Hide layer 1 and merge the
line layer with your cactus layer. Go to Selections,
Select All, Selections, Float. Go to
step 10.
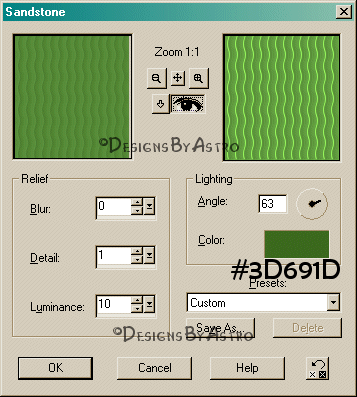
9.) Leave selected and apply the sandstone texture
(Effects, Textures Effects, Sandstone)
with these settings..

Color used #3D691D
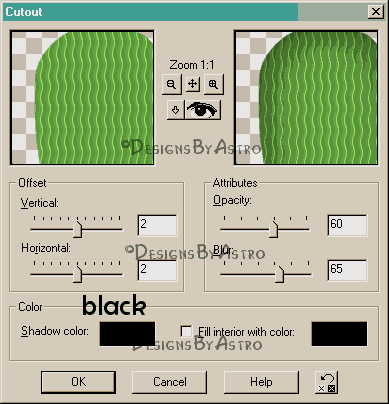
10.) Still selected, apply a cutout with these
settings...

Select None.
SAVE!
Now let's decorate this tree, um... I mean
cactus!
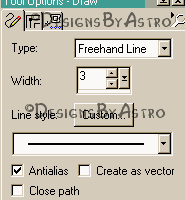
11.) Set foreground color to black, background
Null.
6 users should be stoked
Draw tool set to freehand
size 3
solid
line.
Antialias Checked

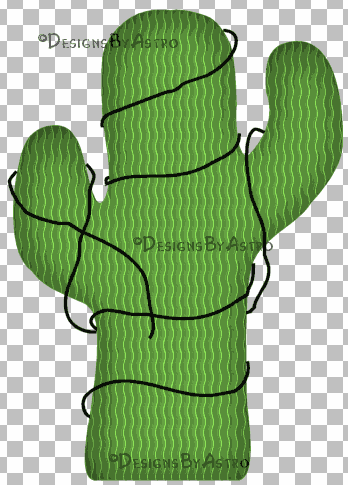
Draw some lines around your cactus,
starting and ending as if they disappear around behind
the cactus, like this..

12.) Now let's use the little trick Patti used on
her moon to put some waves in our
lines.
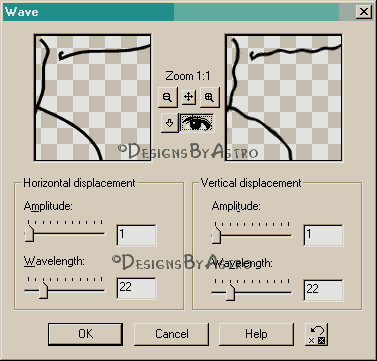
Apply the Wave Filter with these settings..

Ready to make some bulbs for our stings?
SAVE!
13.) Set background color to #C0C0C0 we will be
making the casing for our bulbs first.
Foreground Null.
6
users set to fill.
Preset shapes tool,
Rounded Rectangle.
Create as vector and
Antialias both Checked.
Draw out a rounded Rectangle (make it larger than
what you need so that you can
see better,
Zooming in will help also). Object selector, Right click on canvas.. Node
Edit.
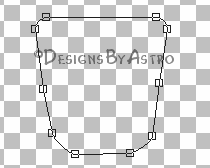
I didn't add any nodes and I didn't
move any of the ones on the top just the bottom and the
middle ones and came up with something like this...

Convert to Raster when you're
happy, rename to base bulb.
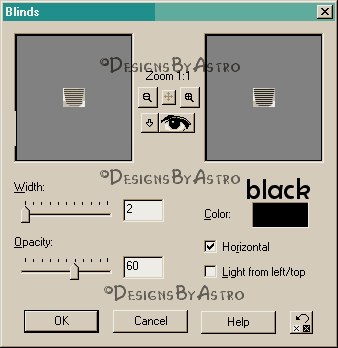
14.) Apply the Blinds filter using these
settings..

Now Save! I know we just
saved but I don't want you to lose your base.
15a.) PSP6 Users, this is
where the teardrop tube comes in. Add a new layer naming it
bulb. Find the teardrop tube,
size it to the size you need. Go to selections, select all,
selections Float, selections,
defloat. Now flood fill with the color you wish your bulb to be.
Skip to Step
16.
15.) Change your background
color to a Christmas color. I chose red #C00000 for mine.
Preset tools... Find you Tear
Drop shape. Other settings same as for the base.
Draw out a tear drop about the size you
think looks right for your base, this will be your
bulb. Convert to Raster, rename as
bulb. Move your bulb layer below your base bulb layer.
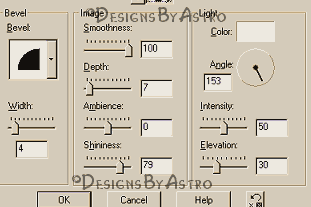
16.) Apply and Inner Bevel
using these settings..

Hide all layers except your
base bulb layer and bulb layer. Merge Visible, rename to light.
(note if you wish to have
multicolor lights, before merging use the colorizer in PSP to color
the
bulbs
different colors.)
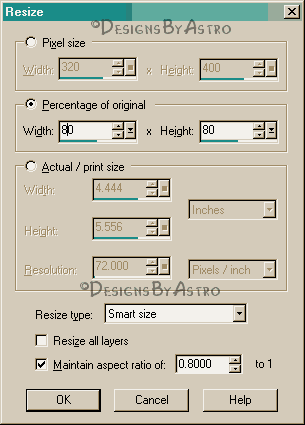
17.) Go to Images, Resize,
uses these settings as many times as you need to get your light
the
size you
need for your strings. ( make sure Resize all layers is unchecked)
Sharpen once after each
resizing...

18.) Once you have the size
you need, go to Edit, Copy, Paste as a new selection. Use the
deformation tool to turn your
lights to follow your string.
Once you have all the lights
on that you want. Hide layer 1 and merge all layers visible.
That's it, you're finished
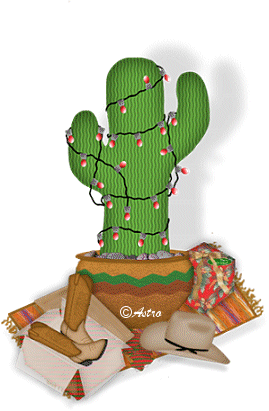
with your cactus tree! You can add other ornament or whatever
you'd like to your tree. You
can place in a pot or place rocks around the base to create a yard
scene.
I hope you've enjoyed this
tut. Have a happy and safe holiday! God Bless!
Until next time,
Connie

Designs By
Astro Index of
Tutorials
Tutorial written November 19,
2001
©
Copyright 2001-2003 Designs By Astro
All rights
reserved.

