PSP
Candle
This tutorial is rated 10+ due
to
the intense
shading, and the use
of vectors.
Please take the time to read my Terms of Use
The layout of this tutorial is set for 1024 x 768
All images are the sole property of Designs By
Astro
Do not copy, reproduce or send through
email
without my prior written permission.
Feel free to LINK to any of my
tutorials.
All rights reserved.
The image/images you make using this tutorial
is your property to do with as you wish.
©2001 Designs By Astro
If you have
any questions or need further help you can
Email me
I'd like to thank Auntie Em, &
Wolf for being my tut testers!
This tutorial was written on
Oct. 29, 2001. Auntie Em sent me the URL for some
Photo Shop tutorials because she knew I
wanted to learn how to use it. In the list of
tutorials she sent was one on how to
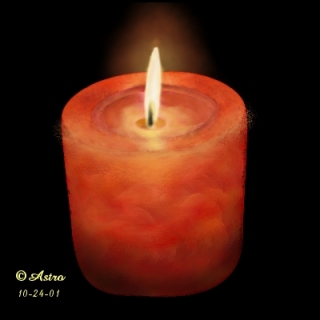
make this candle using Photo Shop. Well my
version of it in PShop was terrible *L*
So I decided to see if I could do it better in
PSP. The above image is the one I made
in PSP. I emailed the author of the Photo
Shop tutorial and asked permission to
write a tutorial for Paint Shop Pro on how I
did the candle. Phil was gracious
enough to give me permission. If you are interested
in doing this candle in Photo Shop
please stop by his site and give his tut a try!
Candle Tutorial for
Photo Shop By Phil Williams
This tutorial is written for
PSP7 but can easily be done in 6.
Here are the colors we will be using in
this tut. Right click on the swatch
choose "save as" and open in PSP both
swatches.

Swatch 1 is in order that the colors
are used.

This swatch has the color numbers on
it.
Remember to Save
often!!!
Ready to get started
now?
Okay,
let's open a 500x500 Transparent canvas.
Set your background color to
red #C00000
Foreground Null
1.) Preset Shapes, Ellipse. Both Antialias and Create as a Vector
Checked.
Draw
out an oval at the bottom center of your canvas. Click on the Object Selector,
right
click on
canvas, Choose Node Edit.
Using the top node that is already there bring it down to flatten
out the oval a little. Now
on both sides of that middle node add a node. Click on the left
node you added to activate it,
then right click and change node type
to Cusp. Use the left (inside handle of the arrow) to
round out the top, pull the handle
down. Still on the left node, use the outside handle to square
off the side. Do the same
thing to the right node you added.
You should have something that looks
like this...
When you're happy, Convert Layer
to Raster and rename to bottom.
2.) With the same settings as before let's make a top on our candle.
Using Preset Shapes
Ellipse, draw out an oval above the bottom of your candle. Use the
nodes to shape it
something like this...
Convert to Raster and rename as
top.
Note.. My
candle colors will be different so that you will be able to see the
different
sections better.
3.) Next let's set our foreground color to a lighter shade of red
#EA0C0C Background
should be Null.
Preset Shapes set to the same as before but this time make your
line width 7. Draw out
an oval in the center of your top candle. We don't have to node
edit any of this, but hold
your shift key, click and hold the top left node and bring it in
slightly so that your oval isn't
quiet so perfect. Do the same thing
with the right top node.
You want some thing that looks like this...
Convert to raster and name as
center1.
4.) Now switch the color from foreground to background. Make another
oval that will fit
inside of the outlined oval you made above.
Convert to
Raster and rename as center2
Sure hope you've been saving
every couple of steps?? If not please do so now, I wouldn't
want you to lose what you've
done so far.
5.) Not to hard on the vectors, now is it?? *S*
We need to make just a small
little circle in the center where our wax buildup is.
Make your background color a lighter
red #F85E5E
Preset Shapes, Ellipse. Draw out a semi circle/oval in the very
center of the top of your
candle. Like this...
Convert to Raster and rename as
center3.
6.) Now for a wick for our candle. Change your background color to
Black. Use the Preset
Shape Ellipse and draw out a small oval. Now click the Object
Selector and then right click
on your canvas, choose Node Edit. Zoom in if you need to. Pull the
arrows on the bottom
node out to flatten the bottom some. Bring in the two nodes in the
middle on both the right
and left side. You may even want to slightly tilt your top node to
the left ever so slightly.
You should have something like this...
Last one and we will be
finished with vectors!!
7.) We need to make our flame now. Set background color to white,
foreground Null.
Preset Shapes Ellipse. This time we need to make a long slender
oval. Extend the oval about
a quarter way over the wick. Object selector, Right Click on
canvas, choose Node Edit. On the
bottom node use the handles to bring it
out. Go to the top node and pull up on it to make the
top some what tapered in.
You should have something
that looks like this..
Convert to Raster and rename as
flame.
8.) Now Go to Layers, Duplicate.
Rename duplicate flame as bottom flame. Now move bottom
flame below your wick
layer.
I recommend saving this basic
candle as a psp file unmerged so that you can change the colors
later for a different candle
if you wish. Go to Windows Duplicate, Go file, Save as, and save as
a
psp file for
later use.
We are finished with vectors so take a break, stretch your legs,
get something to snack on before
we get into the really hard part of
shading our candle to make it look real!!
Ready to move on
now?
9.) Make bottom candle layer your active layer. Go to Selections,
Select All, Selections, Float.
You should now have the marching ants
around the bottom of your candle. Add a new Raster Layer
naming it bottom shading.
Using your Airbrush tool, set
to...
Round
Size.. 45
Hardness.. 30
Opacity.. 20
Step.. 25
Density.. 20
We will be using the Airbrush set to
these setting for most all of our shading. Only the colors used
will changed.
These are the colors we will
be using...
#D24E24
#853A19
#E8A752
#F1B195
10.) First set your foreground
color to #D24E24
Spray the color on your candle in random places, make some areas
heavier with color than others.
Change foreground to #F1B195 and spray
randomly around the candle adding heavier sprays here
and there. Now change the foreground
color to #853A19 With this color we want just touches of it
through our candle except
around the bottom and sides we want it just a tad heavier. Check
the
screenshot
below to see what I mean.
Change to #E8A752 and spray randomly, but not much with this
color. Alternate between the colors,
spray each one on top of the other to
produce layers over each other. Do this 3 times with each color.
Imagine if you will, storm
clouds with all the different shades of white, black, blue & gray mingled
together.
This
is the look we are after only in different colors.
The screenshot below is how I have
shaded mine. Notice the lighter area around the top rim. This will
become the reflected light
area in the end so make sure you have some light area on yours.
11.) Now lets change to our Retouch Tool set to these
setting...
Round
Size.. 20
hardness.. 24
Opacity.. 28
Step.. 1
Density.. 20
Smudge
12.) Using a circular motion go around blending the colors together but
not to much that you take out
the depth we worked to put in. Just lightly smooth the colors
together. Zoom in if you want so
you can see what you're doing. When you
are smoothing the light area around the top, go across it
in a back and forth motion.
Do that same motion on the sides where the darker sprays are so
you
get the
illusion that it is a round candle. If you see some spots that need extra spray,
then don't be
afraid to add more. Do this until you have something that looks
like this...
13.)
When you are happy, go to Selections, select none. Close all layers except your
bottom layer and
the shading layer and merge the two layers visible, renaming to
bottom.
14.) Now make your top the active layer. Go to Selections, Select All,
Selections, Float. Add a new
raster layer naming it top shading.
Remember the colors we used above, well
we will use those same colors with the same Airbrush settings
for this layer also. We
mainly want the spray area to be around the lip of the candle since we have
the
center2 and
center 3 that will cover the inside of the top. Do the same steps with this
layer as you did on
the bottom of the candle. Note on the screenshot below where my
reflecting light area is. When you have
finished with the retouch tool merge
the top with the shade layer and rename to top.
This is what you should have
now...
15.) Okay now let's make Center1 our active layer. Add a new raster
layer naming it shading.
We are not
going to select this center, because we want it to over lap the colors and blend
in with
our top
some. Be careful with the over spray so that not to much goes onto the top
layer. Don't
worry about the inside area it will be covered with our center2
layer.
On this
we don't need to much of the dark color. We want it to look as if it's the area
of the candle
that the melted wax has carved out. Click on your Airbrush tool,
reduce the size to 15, leave all other
settings the same. Start with the
darker color #853A19 Spray mostly in the back area behind where
your flame is. Leave some of
the red area showing. Now change to the #E8A752 Lightly and I do
mean
lightly
spray in some touches of this color. Remember to spray an area for your
reflecting light like we did
on the top layer. Now use the retouch tool and blend these colors
together. You want something that
looks kind of like
this...

When you're happy with it, hide all
layers except center1 and shading layer, merge those two layer
visible, rename to
center1.
16.) Make Center2 your active layer. We won't select this layer either
because we want them to overlap.
Now lightly, using all the colors that
we used on the top and bottom of our candle, spray around the
edges
of center
2. We want this part pretty dark and then toward the middle we want more of the
lighter color.
Look at the screenshots below to see what I mean...
Use the
retouch tool as we did before and smooth the colors together.
Once you're happy hide all
layers except those two and merge them visible, renaming to
Center2.
17.) Now for Center 3, make it your active layer. This one we
do want to select, because
we don't want it
blended much into the other top layers. We want it to stick out
more, so go to Selections, Select All,
Selections, Float.
Add a new layer naming it
shading. Using the last 3 colors on our list..
#853A19
#E8A752
#F1B195
Spray them around as we did with the
other colors. Taking care to make the back a little darker than
the
front. Use
the retouch tool as we did before and lightly blend the colors together. Make
visible your wick
layer from time to time to see how it's looking.
You should end up with
something like this...
When you're happy with the results hide
all layers except those two and merge them visible, renaming
to
Center3.
18.) Now let's make our wick layer active. Click on your retouch tool
and smudge the wick just a little
to make it not quite so
perfect.
Something like this...
Notice how blunt the bottom of my wick
is and how the light color blends in to make it look as if the
wick area that has not been
burned goes down into the candle? Notice too, I have just a tiny
spot
of dark
color off to the left of the wick to show the hint of a shadow caused by the
wick. These put
together helps with the illusion of depth. Make any adjustment you
may want on your wick now before
moving on.
19.) Now for the flame!!! This was the hardest part for me when doing
the candle because Phil's tut
had it as being yellow to start with, but I found by using white
instead it helped the flame look more realistic.
If you will remember we have 2 flame
layers. We will start first with the top flame, the one we named as
flame.
Make it
your active layer.
Zoom in once so you can see your flame better.
Click on your Erase tool set
to these settings..
Square
Size.. 8
Hardness, Opacity, Step and Density all... 25
Now dab the eraser on top of
where the wick is. Remove the area on the wick so that it shows
through
leaving
a thin layer of the white. Remove a small area around the wick leaving some of
the white showing,
like this....
Full size view..
20.) Still on the same flame layer, go to selections, select all,
selections, float.
Set foreground color to #F4CC71
Use the airbrush, (the settings needed
should already be there but
if not round, size 15, hardness 30,
opacity 20, step 25, density 20)
Do not add a new layer. Spray
right on to the flame layer some highlights up the left side through
the
middle and
a few on the right side, spray especially around the wick area that you removed
the
white from.
Now change your foreground color to #E9CA4F, reduce the airbrush size to 8 and
spray
the area
again around where you erased the white.
21.) Switch to the retouch tool size 15,
hardness 24, opacity 28, step 1, density 20, set on smudge.
Smudge the color together,
now go to selection, select none. Use the retouch tool and lightly smudge
the
area trying
not to get to much over the outline of the flame but enough to blend the areas
that the selection
left. Now go to your layer palette and reduce the opacity of this layer to 80%.
Now go to Effects, Blur, Gaussian Blur
set to a radius of 2.00.
22.) Go to the bottom flame layer and
reduce the Opacity to 70% on it. You can play around
with the
retouch tool on the two flame layers to get it to look not so
perfect if you want. I played with these layers for
over an hour to get the look that I
have. Here it is...

23.) Add a new layer if you wish and use the darker and light colors
to add any highlights to
areas you feel aren't quite like you'd like them to be. Use the
retouch tool to smudge if you do.
We are pretty much through
with our candle so if you would like to save a copy of yours before we
add
the black
background and do the reflection behind the flame do so now by going to Window
Duplicate.
Save
the duplicate as a psp or merge the layers and export as a
tube.
24.) Back to your original canvas...
Hide layer 1 and merge all layers
visible renaming to candle.
25.) Make Layer 1 your active layer, if you wish you can add a new
layer, but I just used layer 1 for this
next step. Make your foreground color
black. Flood fill layer one with black.
26.) Now add a new layer naming it flame shadows.
Change foreground color to
#BD351C
Using
the airbrush set to the setting above (note change
brush size back to 15)
Spray a couple of clicks up and down
around and in back of your flame. Now switch the foreground color
to #F4CC71 and spray again
around your flame. You can also use some of the other colors we used on
the
candle if
you wish.
Change to the retouch tool (same ole settings as before) and
smudge these colors together. We just want
a light glow around our
flame.
You
should end up with something like this...
27.) Now make your merged candle layer your active layer. Add a new
raster layer.
Foreground color set to black. Click on your Airbush tool and lets
apply our final set to our candle.
Airbrush settings...
Round
Size 46
Hardness 30
Opacity 20
Step 25
Density 20

Spray the area around the
bottom of your candle so that it will fade into your black background. Use
your
retouch
tool to smooth out the black. (Note.. my black
background is turned off so you can see the shading)
You should end up with something like this..

That's it, merge all layers
flat, add text if you wish, and save as either a jpg or a
gif.
I hope you've enjoyed this tut
and have found it helpful in learning more about shading.
God Bless!
Until next time,
Connie
Designs By
Astro Index of
Tutorials
© Copyright 2001-2003 Designs
By Astro
All
rights reserved.