|

This tut also, isn't a
very difficult one. I have included the stairs, carpet fill and
wallpaper fill for you. I made the stairs in another programme I own
called "Architectural Series 18" created by Punch. I use it to
make houses and decks and some room shapes. This is the same
programme I used to make the house images I have offered for your
use as well.
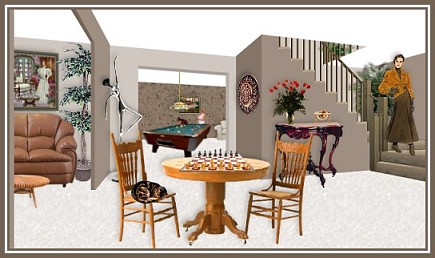
At the end I have included a quickie sample of how
I decorated this as a lower or basement family room area. You could
also treat this as if it was a foyer and then possibly a dining room
off to the left and the living room straight ahead. I also showed
you two alternatives that could be achieved with a couple of easy
steps.
I place absolutely NO restrictions on the use of this
tutorial or your finished image, except for reproducing the tutorial
on your own site without permission or claiming it as your own.
This tutorial was completed using PSP7 but can easily be
done in PSP6 or 8 I am sure.
What You Will
Need:
Paint Shop Pro: download a trial version here
Zip of my image files: you
can download it here
Zip
of my selections: you can download it here
PLEASE
save your work often!! I did it after every layer. It is better to
be safe than sorry. You don't know how many times I still forget
this and have to start all over again.
(1) Open a new
image 650 x 372, 16 mil colours, transparent background.
(sorry
for the odd second number)
(2) Create a new layer and call it
"carpet."
Load selection "carpet.sel"
Open the carpetfill
image provided in the zip and floodfill at 100 size, angle
0.
(3) Create a new layer and call it "back ceiling"
Load
selection "backceiling.sel"
Floodfill with white.
(4)
Create a new layer called "backwall"
Load selection
"backwall.sel"
Open the wallpaperfill image provided in the zip
and floodfill at 100 size, angle 0.
(5) Create a new layer
called "middle shadow side"
Load selection
"midshadowside.sel"
Floodfill with #D0C8C0 and then adjust the
brightness only to minus 25
(6) Create a new layer called
"middle shadow top"
load selection
"midshadowtop.sel"
Floodfill with #D0C8C0 and then adjust the
brightness only to minus 40
(7) Create a new layer called
"middle wall"
load selection "middlewall.sel"
Floodfill with
#D0C8C0
(8) Create a new layer called "upper stair
wall"
Load selection "upperstairwall.sel"
Floodfill with
#D0C8C0
(9) Create a new layer called "front right
wall"
load selection "frontrightwall.sel"
Floodfill with
#9E8F82
(10) Create a new layer called "tiny railing"
load
selection "tinyrailing.sel"
Open the image of the railing from
the zip and copy it.
Return to the main image, and while holding
down the shift key and the control key, press the L key
This is
the shortcut for pasting a copied image right into a
selection.
(11) Create a new layer called "front
ceiling"
Load selection "frontceiling.sel"
Floodfill with
white.
(12) Create a new layer called "left wall
edge"
load selection "leftwalledge.sel"
floodfill with colour
#9E8F82 and adjust the brightness to minus 25
(13) Create a
new layer called "left edge top"
load selection
"leftedgetop.sel"
floodfill with colour #9E8F82 and adjust the
brightness to minus 40
(14) Create a new layer called "left
partial wall"
load the selection
"leftpartialwall.sel"
Floodfill with #9E8F82
(15) Create
a new layer called "stairs"
load selection "stairs.sel"
Open the image of the stairs from the zip and copy it.
Return
to the main image, and while holding down the shift key and the control
key, press the L key
This is the shortcut for pasting a copied image
right into a selection.
(16) Create a new layer called "stair
backing"
load selection "stairbacking.sel"
floodfill with
colour #9E8F82 and adjust the brightness to minus 25
You are
now finished the basics so I hope you have fun filling the space
with furniture and decorations.
Remember, if you ever think
you might decorate or use this room again, save the original with
all the layers in psp format. Then duplicate it and work on
decorating the copy.
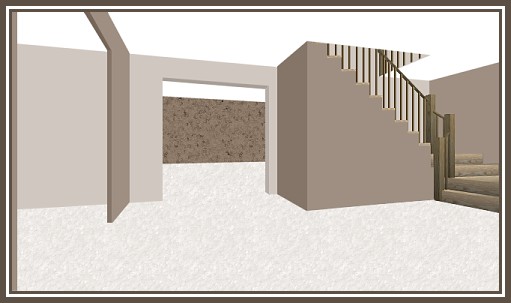
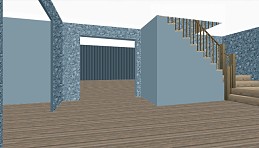
Here is the sample I decorated for you
just to give you an idea of how it might look with
furniture.
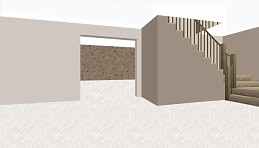
Here is an alternate look you can achieve by just
forgetting to do the 3 layers for the left wall.
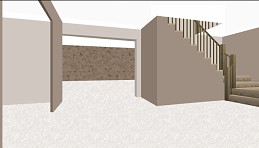
Here is another alternate that I achieved by
removing more of the centre wall, duplicating the layer for the
shadow area above and moving it to fill in the total area, and
finally I used the deformation tool to lengthen the filled back wall
to fill up the missing area on the left that appears with the larger
opening.
This is one I sampled with using more
wallpaper in different areas and I used the fill "phonepole" that
came with the programme at size 50 then used the perspective tiling
filter to achieve a wood floor look. Since it was a little darker
than the stairs I just lightened it up a bit until they looked
similar colouring.
If
you have any problems or need further explanations, please feel free
to email me here
TUTORIAL
PAGE ONE
TUTORIAL
PAGE TWO
TUTORIAL
PAGE THREE
This
tutorial was posted at the site of "P. Ann's Place" January 17, 2004
and written by Pat Sherman. All I ask is that you do not claim it as
your own or post it on your site without permission.
If you are
in a group and want to use this as a lesson, please use the link
freely and you do not have to write me to ask permission.
  
| |