

The image on the left was done in PSP 7 and the image on the right was done in PSP8!
Rick-Rack Frame
The image on the left was done in PSP
7 and the image on the right was done in PSP8!
This tutorial is best
viewed at 1024x768.
Please read my Terms of Use if
you have any questions.
At this time I am not allowing my tutorials to
be translated
so please don't ask!
All images are the sole property of
© Designs By Astro
Do not copy, reproduce or send through email
without
my prior written permission. A link is always
welcomed and appreciated
though!!
All rights reserved.
The image/images you make using this
tutorial
is your property to do with as you wish.
If you have any
questions or need further help you can Email
me
This tutorial give instruction for both Paint Shop Pro versions 7 and 8.
In this tute I will show
you how to make a simple rick-rack frame but the technique can be used
on
other projects also, such as rick-rack on a collar or a dress.
1.) Open a photo you'd
like to add a frame to or make an image you'd like to frame.
Merge all layers
flat on your finished image.
2.) If you'd like for your
image to have the smoky white edge around it like in my finished photo
above
of Bailey, go to Selections, Select All, Sections, Float. Apply a
cutout with the settings...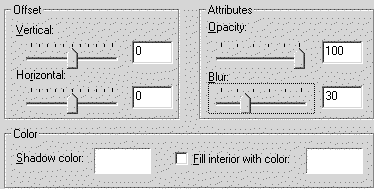
Adjust
the Blur on your cutout to suit your taste. Deselect.
3.) We need to chose 3
colors that will complement our photo/image. If you're using PSP 7, Chose the
first
color and set it as your background color. Go to Image, Add Borders,
the border size will depend on the
size of your overall image but a good size
is around 5 to10. I set mine at 8 with symmetric checked. If you're
using PSP
8 you will need to set your border color when you set the size.
Chose your
second color and add another border making it double the size as before...
example: mine was
8 on the first border so I set the second one to be 16. Do
the third border the same way, chose the third color,
add the same number
used on the first to the second number (8+8=16 16+8=24).
4.) You should now have 3
colored borders around your image. Use the Magic Wand to select the last
border
you added, hold the Shift key down and click on the other two borders
so that all 3 are selected as one
selection. Like this...
5.) With the 3 borders
selected in PSP 7 go to... Effects, Geometric Effects, Wave with these
settings...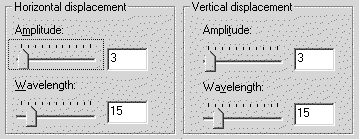
In PSP 8 go to ...
Effects, Distortion Effects, Wave with these settings...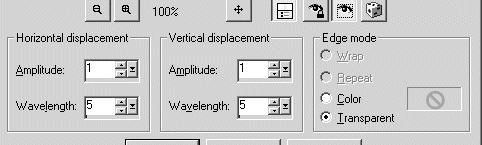
Setting
your Edge Mode to Transparent will leave a slight rick rack around the outer
edge of your image,
you can correct this by using the paint brush to paint in
the border color or by selecting it and flood filling
with your border
color.
You will get a slight
difference in look between PSP 7 and PSP 8. For the frame, I prefer 7's look
myself
but can see a lot of possibilities of use for the 8 look too.
6.) Deselect your borders.
Use the Magic Wand set with a Tolerance of 10 to select only the largest border.
Go to Effects, 3D Effects, Drop Shadow. Add a drop shadow with these
settings... (works in both PSP7 & 8)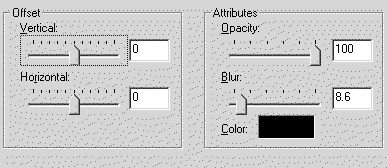
7.) With the border still
selected go to Effects, Texture Effects, Fine Leather, apply these settings...
(both PSP 7 & 8)
8.) Deselect the first
border and select the middle border, Modify your selection by Expanding it by
1.
Apply the same Drop Shadow and Fine Leather settings as you did above.
Deselect.
9.) Select your smallest
border and apply the same Drop Shadow and Fine Leather settings except set
the Number of furrows to 34.
Deselect and you're finished!
I hope you've enjoyed this quick and simple tute and will find many uses for the Rick-Rack!
Until next time... God
Bless!
Connie
Designs By
Astro Index of
Tutorials
Tutorial written December 4,
2003
© Copyright
2003 Designs By Astro
All rights reserved.