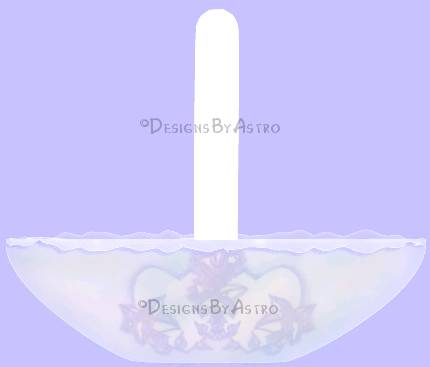
Opal
Finish Porcelain Basket
Please read my Terms of Use if you have any
questions.
The layout of this tutorial is set for 1024 x
768.
All images are the sole © property of Designs By
Astro.
Do not copy, reproduce or send through email without
my prior
written permission. Groups are welcome to provide a
text link to
any of my tutorials
without asking first but it's always nice to know
who is using
them and to see the results.
The
image/images you make using this tutorial is your
property
to do with as you wish. I only claim copyright to
the text of
this tute, the screenshots and the results made by
me!
If you have
any questions or need further help you can
Email
me
This tutorial
was written February 17, 2003.
I will be
using a ding font for this tutorial that I found at House Of Lime
called "Someone Special".
For best results the ding
should have areas of detail that are cutout in order to be more effective in
producing the "raised"
look we want without
having to do a lot of hand shading to raise the image. However if you're more
adventurous you can use one
of your own tubes. It can
be modified to get the same look by turning the tube white, (you can do this by
using the Adjust,
Brightness/Contrast
filter) then use the Airbrush, Push Tool, & Smudge Tool to apply shading to
the tube to give it a raised
appearance!
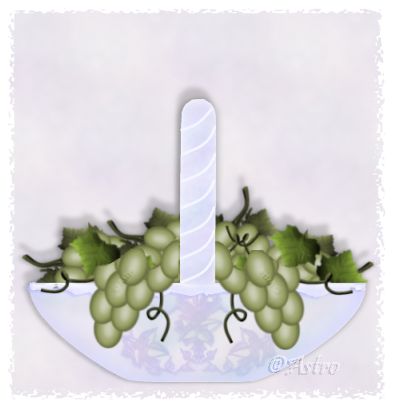
The grapes used in my
above finished image were done by me following a tutorial written by Liz.
1.) Open a
450x450 transparent canvas. Since we will be working with white I suggest you
flood fill layer 1 with a dark color
to help you see
better.
2.) Preset
shapes set to Ellipse, create as a vector and antialias both check. Background
color set white.
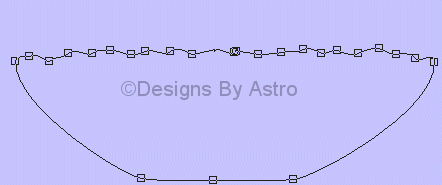
3.) Draw out
an oval, manipulate and add nodes until you have something like the screenshot
below...
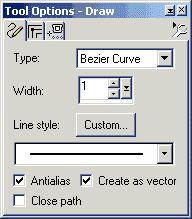
4.) Now we
need a handle, for this I used the the Draw Tool with these
settings...
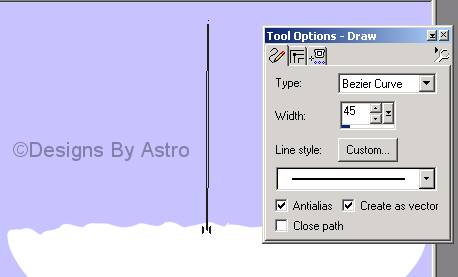
The
reason I chose to use the bezier line is so that once I drew the line I could
round it by setting the handles to look like
and upside
down U and then node edit it to bringing those nodes together at the bottom
forming a one sided handle but still
maintaining my rounded
arch at the top.
5.) You have
your basic vector shapes. Save a copy in its vector from if you wish but convert
the copy you will be working
with to Rasters, renaming
if you would like.
6.) Add a new
Raster layer, set your background color to White.... have the ding you wish to
use open or installed in your
front
folder.
Click on the Text Tool, find your font! If you're
using the font I'm using, set the size to 100 and type the lower case C key.
Have
your "Create As" set to "Floating" and Antialias
check. Have the "eye" button push in so that you can see what the ding looks
like.
Adjust the size of you ding of needed. Click okay,
your ding should be there with marching ants around it.
7. ) The next
steps will apply if you're using the same ding as I am or a similar one that is
only a cutout.
With the marching ants around your ding go to
Selections, and click on Invert. Switch your white background so that it
becomes
your foreground, use the Flood Fill Tool to add
color to the heart and a few of the flower petals. Go back to Selections, and
invert
once again. Now hit the delete key on your keyboard.
This should remove the outline white area. Keep
Selected.
8. )Now let's
add some color back to the outline area. Apply a Cutout with these
settings...
Color of
Cutout is.. #AEB2DC
9.) Do not
Deselect. Apply a Drop Shadow with these settings, (shadow color used is
same as for cutout color, even though
it doesn't look
it)...
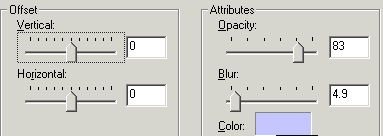
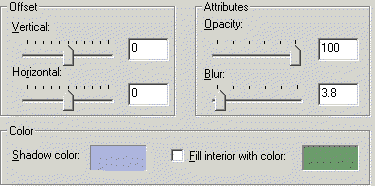
10.) Once
again apply a drop shadow same as above, but change the Blur to 21. See how once
you apply the last Drop Shadow
the heart jumps down and
there are two of them? Well let's use that to our advantage. Leave Selected and
click on your Mover
Tool. Move the top heart
so that it shows a little of the bottom heart, something like
this....
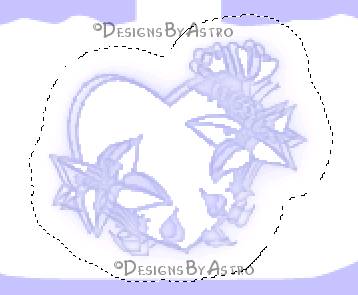
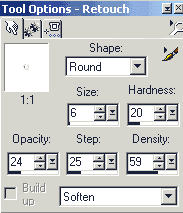
11. )
Deselect. Zoom in on your image so that you have a nice up-close view of your
heart.
Click on your Retouch Tool and set to these
settings...
I
want you to use the Push Tool to push around the back heart that shows giving
some dimension to your heart. Softly go around
the back
bold hard lines and blending them so that it will give an upward appearance to
the top heart. Use the Soften Tool
to smooth and fade out
the areas of the heart/flowers.
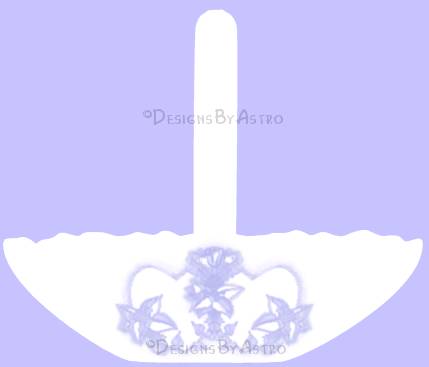
12.) Once I
had my heart the way I wanted it I chose to Duplicate and Mirror the layer. This
is what mine looks like at this stage...
14.) Make the
basket your active layer! Select your basket so that you have the marching ants
around it.
Then Contract the selection by 2. Add a new
Raster Layer. Click on the Airbrush Tool with these
settings...
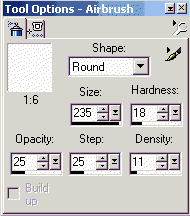
Below is the list of colors that I switched back and forth between to
get the pearly finish..
#C0C0FF
#F4D6E0
#94CAC7
15.) Play
around with the size on your Airbrush making some heavy and light areas of
color.
Use these settings to Blur your
colors...
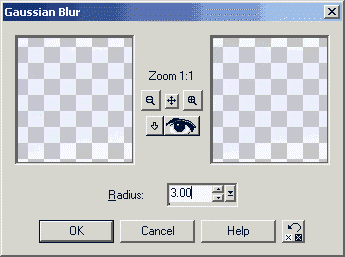
16.) Once
you're happy with the pearl effect you have, merge visible the bottom basket
layer, the ding layer and the shading layer.
Duplicate
the layer. Hide the duplicate, make your original your active layer, use the
Mover Tool to offset the back layer so that it will
show
slightly above the duplicated layer.
Then go to Colors,
Adjust, Brightness/Contrast and set the brightness to -10 or so. We want it a
few shades darker so that it will look
as if it is the inside of
the far side of the basket. Although in my finished image the back didn't show
but there might be a time you
want a part of it to
show.
17.) Make
active the Duplicated layer. Use your Selection Tool to select the top area of
your basket as I have in the screenshot below...
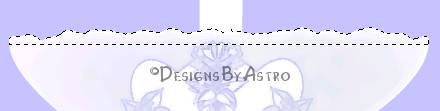
Once you have
it selected go to Selections, Promote to Layer. With the promoted layer active
go to Image, Flip, move the flipped
piece into place so that
it lines up with your basket. This will become the "lip" of the
basket.
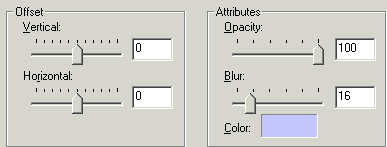
18.) Add a
shadow to the lip with these setting..
Shadow color used..
#C0C0FF
You should
have something that looks like this now..
19.) Select
your handle, add a new raster layer and use the colors you used for the basket
to shade the handle. Blur your
shading using the same
settings as for the basket.
20.) With
your shading layer your active lay, set your Draw Tool to these
settings...
Foreground color should be set to White! Use the bezier tool to draw
some detail on your handle, Copy and paste as a new
selection
the line you make to continue the design up the
handle.
You should end up with something like
this...

That's it,
all that's left is to hide your back layer and layer one, merge the handle and
the front layer visible. I chose to leave my back layer
as it's own
layer so that I could place things inside of the
basket!
I hope you've
enjoyed this tute and will make many different styles of
baskets!!
Until next
time, God Bless!
Connie
Designs By
Astro Index of
Tutorials
©2003 Designs
By Astro
All rights
reserved!