
All images are
the sole property of Designs By Astro
Do not copy or reproduce
in any manner
without prior written
permission.
Feel free to LINK to any of my
tutorials.
©2001 Designs By Astro
All images
created using this tutorial or any of my other
tutorials are YOUR
property to do with as you please.
Please take the time to
read my Terms of
Use
If you have any questions or need further help you
can
Email
me
Some of the screenshots in
this tutorial have been resized and colors lowered to save on load
time,
the
images may not look the same as what yours will.
This tutorial is written using
PSP7 but should work in PSP6. Note.. that if 6 is used the
position of the tools,
effects, and filter will be different or not available with
6.
This tutorial uses vectors and
assumes you have a working knowledge of PSP using Vectors and
Nodes.
Let's get
started.
Open a 600x600 transparent
Set your background color to a medium
gray, I'm using #C0C0C0
For this tutorial when I say
preset shapes, these are the settings we will be using unless otherwise
noted..
Note..
line width does not matter unless noted 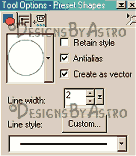
With your shape to the settings above,
draw out an oval in the top center of your canvas. Make it fairly
large, this will be the head
and trunk of the elephant.
Click on Object Selector then right click on your canvas and
select Node Edit. Pull the bottom node
down a little until you get something
that looks kind of like an egg. Something like this.. 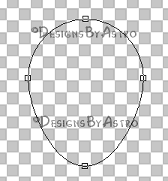
Now take the top Node and pull up and
out on the handles, then use the side Nodes to round out the face
so you have something that
looks like the start of a heart. Like this.. 
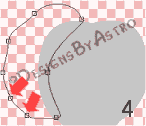
Add two Nodes on the right and left of
the bottom original Node (first screenshot below). Pull the
original
Node
down (screenshot 2). Add two more Nodes on the left and right so you can round
out what will be the
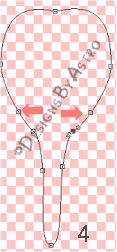
trunk (screenshot 3). Go back up to the face part of the vector
and place two more Nodes about where you
think the bottom jaw would be
(screenshot 4). Using the bottom handle of the node to turn them inward
slightly.
Look
at screenshot 5 below to see what I mean, screenshot 6 is how it should look
finished.... 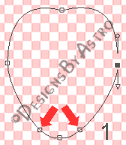


Convert to Raster when
finished, rename to head.
With the same settings as before on your preset shapes, draw out a
small circle that will be the end of the trunk where the
nostrils will go. Using Node edit to
shape it so that it will look sort of like a pigs nose, something like
this... 
Convert to Raster, rename to
nose.
Make Layer 1 your active
layer.
Use the
Preset Shapes tool to draw another oval on the left side of the head, this will
be the ear.
Grab the top node, pull it inward to meet the top of the head
where the hump in the head starts.
Pull up on the left handle of the node
to round it out some (screenshot 1 below). Grab and pull the
bottom node in and round out
like you did the top node (screenshot 2). Add two nodes on the
top left between the top node
and the left middle node (Screenshot 3). Pull them out to round
the ear some, turn the
handles to put dips in the ear. Add two more nodes between the
middle
and
bottom nodes and do the same things as last steps (Screenshot 4). You should
ended up with
something that looks like screenshot 5. 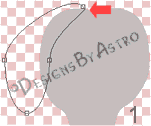


Doesn't look much like an elephant yet
does it? *L* But it will I promise!
Convert to Raster when you're
happy and rename to left ear.
I'm not going to Duplicate and mirror the ear now, we will do that
after we add our final touches to it later
on in the tute.
If you haven't already saved your work as a PSP do so now.
Once again make Layer1 your
active layer.
Preset Shapes tool. Draw out a large Horizontal Oval. This will
become the body, front legs and feet of the elephant.
Add 4 Nodes where indicated on
screenshot below.. 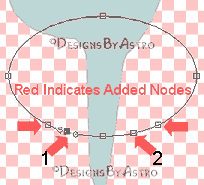
Take Node 1 shown on the screenshot
above and pull it down to start to form the left leg. Do the same thing
with
Node 2.
Look at the screenshot below and see where I've placed 4 more Nodes to help
shape the legs.. 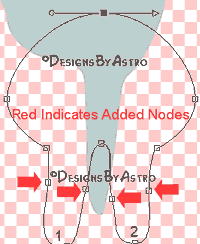
Use those 4 nodes to help round out the
legs.
Now on to
bringing out his feet.
Working on the left foot first. Place nodes where I have indicated
on the screenshot below.. 
Pull what was Node 1 down and the two
nodes that are beside Node 1 out and round them some.
When you are happy with your left foot
place the same nodes on the right and create the right foot
as you did the left, you
don't have to make them look the same.
Now before converting to raster lets
play a little with the body part of the elephant. Pull on the
nodes
some to
give the elephants body a little less oval look and more of a full figure look
*L* Look closely at the
above screenshot to see how mine looks.
Convert to Raster now, and rename to
body.
Now for
the back left leg.
Make Layer1 your active layer.
With your Preset Shapes tool draw out a
long slender oval on the left side, just to the side of where the left
front
leg is.
Below is a screenshot of my back leg. As you can see it's pretty much like the
front legs but without the body
on it of course. 
When you are happy with your back leg
Convert to Raster, rename to backleft leg.
Okay, we have all the parts to our
elephant made, no more vectors from here on!! We will duplicate and
mirror
our back
leg and ear after we add some texture and shadows to them.
You may want to Save again
about now! *S* Sure wouldn't want you to lose all that hard work!
Ready to get started making
this elephant come to life? I have to say this is actually the hardest part of
making
him. I
really had a hard time getting the eyes to look right, so take your time and
play around a lot with different
shades of gray and even black to get
the shading to look right in his face and behind the eyes to give them
lots
of
depth.
With your head Layer your
active layer, Go to Selection, Select All, Selections, Float.
Add a new Layer naming it
highlights.
Foreground color set to a darker gray, I'm using
#8E8E8E
Airbrush to these settings.. 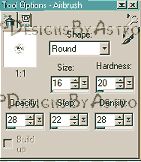
Spray some areas on his trunk and
around his face. Change the size of your brush, to large and then smaller,
lower
and raise
Opacity and Density of your brush to get different shadows. Even change the
color to different grays and
even black to get more shadows. Check from time to time by using
Gaussian Blur set to around 5, 6 or 7 to see how
it's looking. As you can see in the
screenshot below I did place two dark sprays where I thought I would want my
eyes
just to
give me a perspective to go by with the rest of the sprays. You can always hit
the undo button if you're not
happy with the look. I waited until after I had my real eyes in
place before I did the dark shadowing behind them. 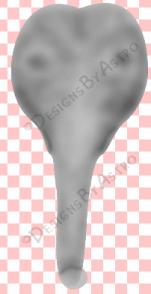
Okay let's work on the eyes
then we will do some more shadowing on the face and a cutout.
Add a new Layer naming
it eyes..
Change the foreground color to black, background color to a light
gray/white #D6D6D6.
Okay so I lied a little, we do have one more vector to do *L* But
it's just the eye!!
Preset Shapes tool to the same settings as we used for the
elephant except make the line
width 1. Draw out a small oval on the left side of the head. Now
add a new layer without converting
the other layer. Change the background
color to black, foreground should be Null. Draw out another
oval that will be the center
of the eye. Use the nodes to fit in inside of the white area of the
eye.
Convert
both layers to Raster when you are happy with the look. Make the white area of
the eye layer
your active layer. Now use the Draw tool set to single line, width
1, foreground color black. Draw a line
coming off the inside corner of the eye
and one coming off the outside corner. Look at the image below to
see what I
mean. 
With the black part of the eye
your active layer, go to Selections, Select All, Selections,
Float.
Go to
Effects, 3D Effects, Inner Bevel, use the round preset, but then change the
shininess to
69
and the angle to 189 but leave all other settings as they are. Click
okay.
Make
invisible all layers except the two eye layers, merge
visible.
Now that the eye is merged go
back to Inner Bevel, click on the Preset and select Round again.
Do
not make any
changes to the settings from there. Click okay.
Duplicate and Mirror the eye and move
into position on the other side.
I thought the eye and face
area still needed something, so I went back to my head layer and selected it
again
then
added a new layer and applied more shadowing around the eye using the dark gray
#8E8E8E
and
black, I then used Gaussian Blur with a radius of 7 to smooth out the shadowing.
Here is what I got... 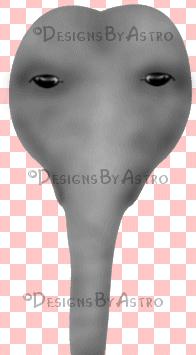
Make invisible all layers of the head
except the nose layer. Now lets work on that nose. Make the nose
layer your active
layer.
With
your background set to the dark gray, Preset shapes tool set to the teardrop.
Draw out a small teardrop
to be the nostril. Convert to Raster, Duplicate, move into
position as the other nostril. You can add a drop
shadow behind the nostrils if you
wish.
Select
your nose. Selections, Select All, Selections, Float. Add a new layer and apply
some Airbrush sprays to
the nose using the dark gray and black like you did to the face of
the elephant. Select None. Merge nose layers
visible with your face and rename to
head. Now let's Apply a cutout to our head..
Go to Selections, Select All,
Selections, Float. Go to Effects, 3D Effects, Cutout, apply these
settings... 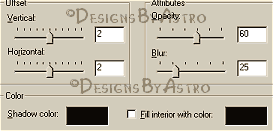
While still selected add a new layer
and apply the same cutout but make the Vertical and Horizontal both minus
2
Deselect
Merge cutout layer with head layer and rename to head.
Now let's work on the
ear.
Make your
left ear layer your active layer. Go to Selections, Select All,
Selections, Float. Add a new
layer. With your Airbrush at the settings we used for the head. Foreground
color
to the
gray. Start spraying some shadow areas on the ear. Change the setting on the
Airbrush just like you did for
the head and you can change the color
to black and other gray tones too. Place close attention to the
shadowing
close
where the ear meets the face. That area should be shadowed darker. Here is what
mine look like... 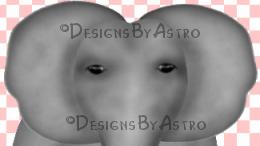
Use the Gaussian Blur with a radius of
7 to blur your sprays.
While still selected add a New layer and apply a cutout using
these settings... 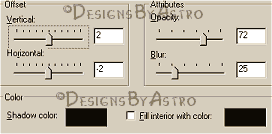
Deselect and merge ear layers visible
renaming to left ear. Duplicate and Mirror the ear, move into
position,
rename to right ear.
Make Body Layer your active Layer. Go
to Selections, Select All,
Selections, Float. Add a new layer. With your Airbrush at these
settings as for the ear and head.
Spray some areas of shadows on
the body of the elephant, changing from the grays to the black to get the
shadows.
Had
some hard lines to the legs and around the foot area.
Use the Gaussian Blur with a
radius of 5 to blur your sprays.
While still Selected, add a new layer
and apply a Cutout using these settings.. 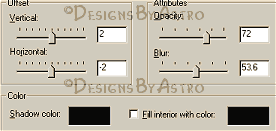
Deselect. Hide all Layers except the
body layer, Airbrushed layer and the Cutout Layer and merge
visible.
Rename
to body.
Make
the left back foot layer active. Go to Selections, Select All,
Selections, Float. Add a new
layer.
Spray
the back leg just like you did the legs on the front. Use the Gaussian Blur with
a radius of 5 to blur
your sprays. While still selected add a new layer and apply a
cutout using the same settings as before.
Hide all Layers except the back leg,
Airbrushed Layer and the Cutout layer and merge visible, rename to
left back leg. Duplicate and
Mirror the layer, move into position and rename to right back leg.
Looks more like an elephant
now, doesn't it? *L*
Here is my finished elephant.. 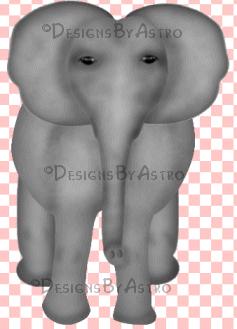
You are ready now to merge all your
layers visible and export as a tube or whatever you would like to
do
with it. I
hope you have enjoyed this tutorial.
Until next time,
God
Bless,
Connie
Designs By Astro Index of Tutorials
© Copyright
2001-2003 Designs By Astro
All rights
reserved.