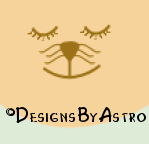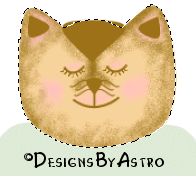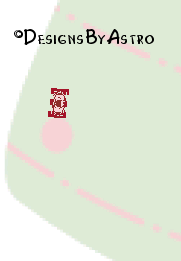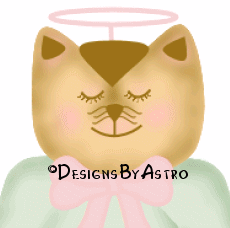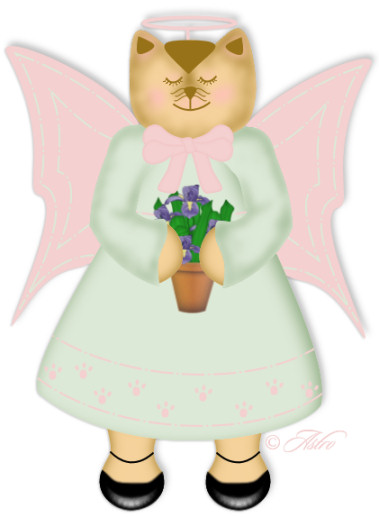
Cat Angel
from
the
"Heavenly Farm Angels Series"
This tutorial is
best viewed at 1024x768.
Please read my Terms of Use if you have any questions.
At this
time I am not allowing my tutorials to be translated
so please don't
ask!
All images are the sole property of © Designs By Astro
Do not
copy, place on CD, make into Scripts or send
through email without my prior
written permission.
A link is always welcomed and appreciated though!!
All rights reserved.
The image/images you make using this tutorial
is your property to do with as you wish.
If you have any questions
or need further help you can
Email
me!
Tutorial written April 27, 2005.
This tutorial is written using PSP 9 but can be done in other version with a little
modification of tool locations.This is a vector tutorial so a working knowledge of PSP is helpful but I will try
to explain so that those fairly new to vectors can follow.Let's get started!
1. Open a new 425 x 600 transparent canvas. Go to File, Save As. Name this canvas
and save as a .pspimage.Making the Head
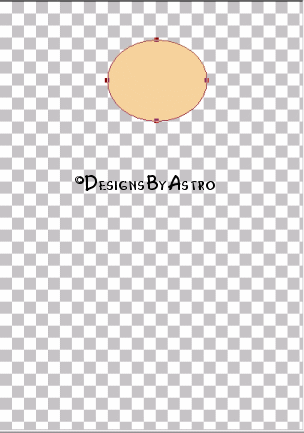
2. Set your background color to #f5d29b. Foreground should be off.
3. Preset Shapes set to Ellipse, create as a vector and show nodes checked, line style should
be solid.4. Draw out an oval at the top center of your canvas leaving enough room at the top for the
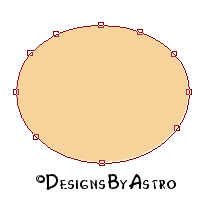
halo....5. Right click on your image and select Convert to Path. Click on the Pen Tool.
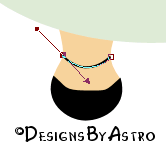
6. Add 6 new nodes as I have in the screenshot below.
To add a new node; hold the CTRL key on your keyboard while running your mouse
pointer around the line where you want the new node to be. When you see a + ADD,
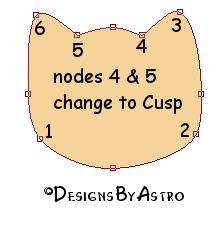
Click once.7. Position the nodes as I have in the screenshot below....
To change a node type; Right click on the node you wish to change, from the drop down
menu select Node Type, then Cusp.8. When you're finished moving your nodes around, right click anywhere on the image and
select Apply. This does not convert your nodes to raster, it only brings you out of editing mode.In the Layer Palette rename this layer to Head.
File, Save!
Making the Dress.
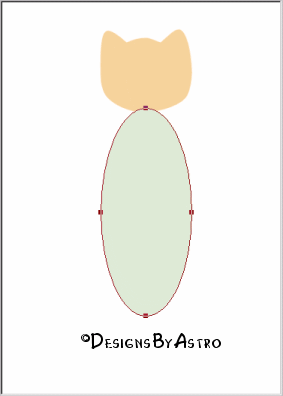
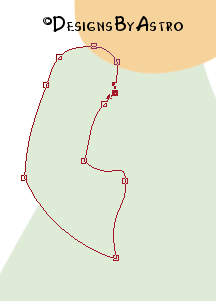
9. Go to Layers, New Vector Layer, name this layer Dress.
Set your background color to #dde9d7 Foreground should be off.
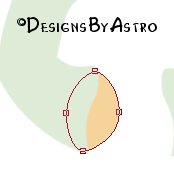
Preset Shapes, same as above. Draw out a large vertical oval just below the head....10. Right click on the image, select Convert to path. Click on the Pen Tool.
11. Hold the Shift key on your keyboard while clicking once on each of the 4 nodes
to select them all. Right click, choose Node Type, Cusp. Click once anywhere on your
image to deselect the nodes.12. Bring the left center node up to the top. Move the top node over to the right a
little to square off the top. Bring the right center node down, move the bottom node
to the left to square of the bottom. Use the handles on the nodes to make something
like this....13. Right click and choose Apply.
14. In your layer palette, drag this layer so that it is below your Head layer.
File, Save!
Making the Arms.
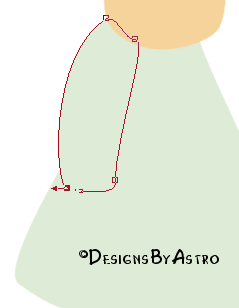
Add a New Vector Layer, name as Left Arm.
15. Preset Shapes and color same as for the Dress.16. Draw out a long narrow oval on the left side of her dress. Right click and choose
Convert to path.17. Click on the Pen Tool. Hold the Shift key on your keyboard while clicking once on
each of the 4 nodes. Right click, change Node Type to Cusp.18. Pull the top node over towards her cheek. Bring the left center node up to square
the top and the right center node down to square the bottom....19. Add new nodes as I have below to shape her arm. Change the nodes types to Cusp.
You want something like this....20. Right click, choose Apply.
21. Go to Layers, Duplicate, Image, Mirror. In your Layer Palette, rename this layer
to Right Arm. Click on the Object Selector to move the image into position. Right
Click, Apply.
Note... it might be easier to see the position by clicking on the eye beside your Dress
layer to make it invisible. Click on the eye again to make the layer visible.File, Save!
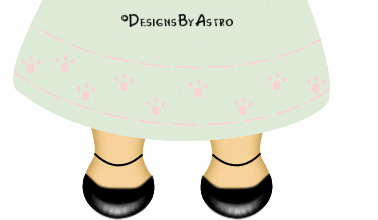
Making the Leg/Paws
22. Set your background color to #f5d29b foreground should be off.
23. Make Raster 1 layer your active layer. Add a New Vector Layer naming it
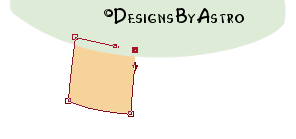
Left Leg.24. Preset Shape set to Rectangle, other settings the same as we've been using.
Draw out a rectangle at the bottom left of her dress. Hold the Shift key while
clicking on the 4 nodes. Right click, change the Node Type to Symmetric, right
click again and change node type to Cusp. Square the nodes off again....25. Use the handles to shape the leg something like this....
26. Right click, Apply!
27. Layers, Duplicate, Image, Mirror. In the layer palette rename this layer to
Right Leg. Move into position as the right leg. Right click, Apply if you need to.Making the shoe.
28. Set your background color to Black, foreground should be off.
29. Preset Shapes set to Ellipse, other settings the same. Add a New Vector Layer
naming it Left Shoe.30. At the bottom of her left leg draw out a small oval. Right click, Convert to path.
31. Click on the Pen Tool. Change the two side nodes to Cusp. Move the middle node
down and bring the two side nodes up to form something like this....Right click, Apply!
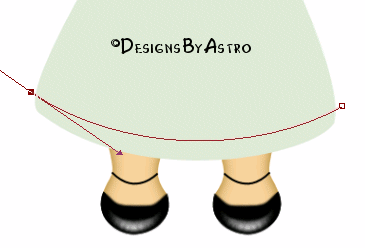
32. Add a New Vector layer naming it Left Strap. Switch your black so that it is your
foreground color.File, Save!
33. Click on the Pen Tool with these settings....
34. Click once on the left side of the ankle and once on the right side to draw your line.
Right click on the left node, chose Node Type, Symmetric.
Pull in and down on the handle....Making the Hands.
35. Set your background color to the Head color #f5d29b
36. Make your Dress layer your active layer, click on the eye to make it invisible.
Add a New Vector Layer naming it Left Hand.37. Preset Shapes set to Ellipse. Draw out a small oval near where her left sleeve ends.
Right click, choose Convert to path. Click on the Pen Tool.38. All I did here was move the left center node so that it was past my sleeve and brought
the top and bottom nodes over to meet the edge of the sleeve...Right click, Apply!
39. Duplicate and mirror this layer renaming as Right Hand, move into position.
File, Save!
Before we start converting layers you may want to save this image in vector layers. You can
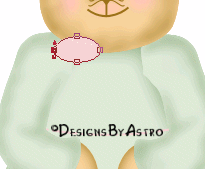
do that by going to Windows, Duplicate. Name and save the original as a pspimage and close
it. Name your duplicate image to something different than the original, save it as a pspimage
also.Merging Layers, Adding Detail.
40. In the Layer Palette right click on your Head layer and Convert to Raster.
41. Add a New Vector Layer naming it Eyes. Set your Foreground color to #987218
background should be off.42. Click on the Pen Tool and set to these settings....
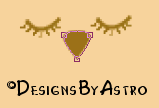
43. Zoom in so you can see. Draw out the right eye line. Change the left node to Cusp and
pull down and in a little on the handle....Right Click, Convert to Raster.
44. Activate your Push Tool
with these settings...
45. Zoom way in so you can see the eye line. Using the Push Tool, pull down on the line to make
eye lashes....46. Go to Edit, Copy, Edit, Paste as a New Selection and move into position as the other eye...
File, Save!
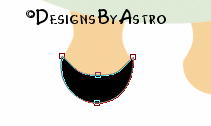
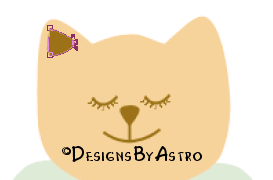
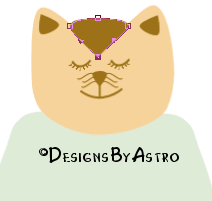
47. Add a New Vector Layer naming it Nose. Switch your foreground color so that it is your
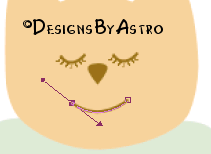
background color.48. Preset Shapes set to Triangle. Draw out an upside-down triangle below the center of her eyes.
49. Click on the Pen Tool, change the top two nodes to Symmetric, this should automatically shape the
nose like this...Right click, Convert to Raster.
50. Add a New Vector Layer naming it Mouth.
Click on your Pen Tool. Same settings as used for the Eyes. Switch the background color so that
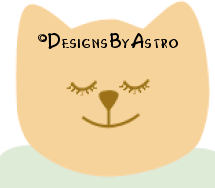
it is your foreground color.51. Draw out a small line just below the nose. Right click on the left node and change to Symmetric.
Pull down and in on the handle to form a smile...Convert to Raster. Move the mouth line up so it's closer to the nose than I show in the screenshot
above.52. Uncheck Create as a Vector on your Pen Tool settings. Draw a line from the nose to the
mouth....File, Save!
53. Add a New Raster Layer naming it whiskers.
Lower the size on the Pen Tool to width size 1. Draw out 3 whiskers, change the nodes
on each line to Symmetric to shape the whiskers....Move this layer so that it is below your Nose layer in your Layer Palette.
54. Switch your foreground color so that it is your background color. Preset Shapes set to
the nose settings (Triangle).55. On the left ear area draw out a triangle. Use the rotation handle to rotate the triangle to
fit in the ear. Click on the Pen Tool. Change the bottom nodes to Symmetric, pull them out a little
to enlarge the bottom....Right click, Convert to Raster.
File, Save!
56. Go to Edit, Copy, Edit, Paste as a New Selection. Image, Mirror. Move into position as the
right ear.57. Change your Preset Shape to Ellipse. Draw out a small oval between her ears. Using the
existing nodes shape the top to fit the top of her head by pulling the two end nodes up to
meet the corners of her ear. Pull down on the middle bottom node to make a point...Convert to Raster, rename as Hair.
58. Make your Head your active layer. Go to Selections, Select All, Selections, Float. Add a
new Raster layer, naming it Face Shading.59. Set the brown #987218 so that it is your foreground color. Click on the Airbrush Tool
and set to these settings...60. With the Airbrush go around the head area making some areas darker, make the area between
the eyes and the nose pretty dark. Look at the screenshot below to see my shading....61. Change the foreground color to #ffc0c0 Spray in a circular motion around the cheek area
and across the top of the mouth area and even a little on the top of her eyes and maybe even a
little around the ears....62. Go to Adjust, Blur, Gaussian Blur, set the radius to 4.
File, Save!
63. Selections, Select None. Go to Layers, View, None. In the Layer Palette, uncheck the eyes
beside all the layers of the head. The eyes, the nose, the mouth, ears, hair, whiskers and the
shading layer also. Merge these layers visible, rename as Head.
Go to Layers. View, All.64. Make active your Right Arm, right click, convert to raster. Go to Selections, Select All,
Selections, Float. Add a New Raster layer naming it shading.65. Set your foreground color to #95b088. Click on your Airbrush Tool.
66. Using the same settings we used for the face spray some areas around the arm as I have
below...67. Go to Adjust, Blur, Gaussian Blur with a radius of 4. Selections, Select None.
68. Hide all layers except the Right Arm and Shading. Merge Visible renaming as Right Arm.
69. Convert your Left Arm to Raster and repeat the process for the Left Arm. Hide the layers
and merge visible the left arm and shading layer, rename as Left Arm.File, Save!
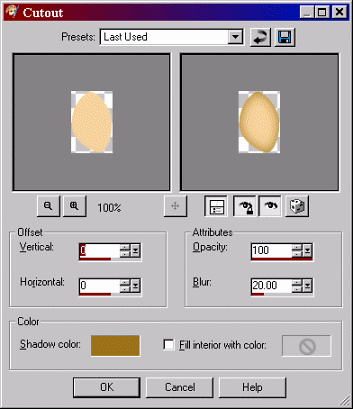
70. Make active your Right Hand layer. Convert to Raster. Go to Selections, Select All,
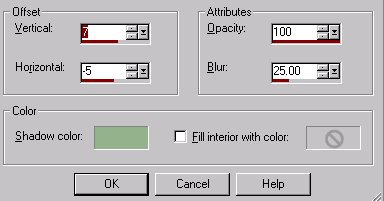
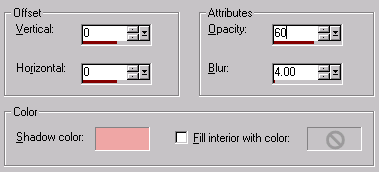
Selections, Float.71. Go to Effects, 3D Effects, Cutout and apply these settings....
Shadow Color.. #98721872. Select None.
73. Make active your Left Hand. Convert to Raster, select and apply the same Cutout.
74. Make active the Right Leg. Convert to Raster, select and apply the same Cutout.
75. Do this again to the Left Leg.
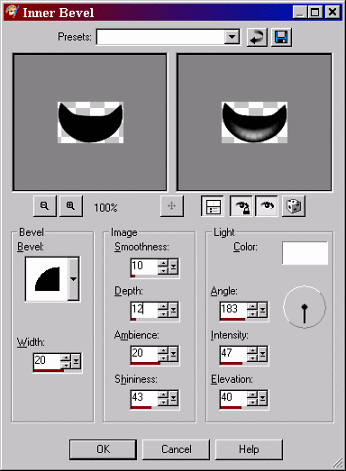
76. Make active the Left Shoe layer. Go to Selections, Select All, Selections, Float.
77. Go to Effects, 3D Effects, Inner Bevel and apply these settings...
78. Select None. Layers, Duplicate, Layer Mirror. Move into position as the Right Shoe.
File, Save!
79. Make your Shoe Strap layer your active layer. Convert to Raster. Duplicate, Mirror
and move into position on the right foot.80. Convert your Dress layer to Raster. Make your dress layer your active layer. Add a
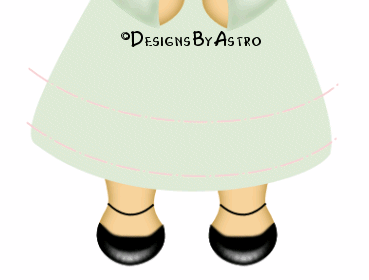
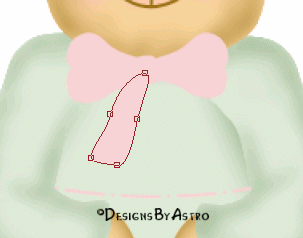
New Raster layer, naming it dress detail.81. Set your foreground color to #f4d0d0 background should be off. Click on the Pen Tool
with these settings....Note the Line Style, it's set to Dash Dot.
82. Close to the bottom of your dress draw out a line, extend it a little past each side. Change
both nodes to Symmetric. Pull down on the handles to make a smiley seam along the edge of your
dress....83. Right click choose Apply.
84. Go to Edit, Copy, Edit, Paste as New Selection. Paste this above the first line....
85. Go to Edit, Paste as New Selection again. Paste it between her arms about where
you think her waist would be...86. Select None. Make your Dress layer your active layer. Go to Selections, Select All,
Selections Float, Selections, Invert. Make the Dress Detail your active layer, push the
delete key on your keyboard. This will remove the over lap of your lines.File, Save!
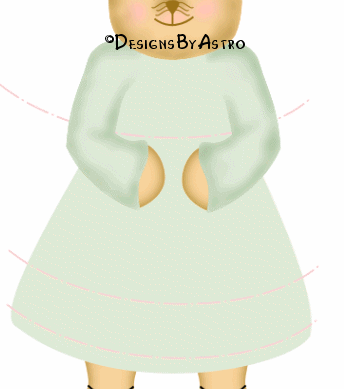
87. Switch your foreground color so that it becomes your background color. Preset Shapes
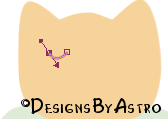
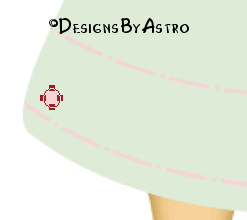
set to Ellipse, other settings the same as we've used in this tut.88. Add a New Vector Layer naming it Paws. Between your two bottom lines on the left side,
draw out a small circle...89. Right click and choose Apply. Just above the circle draw a tiny vertical oval. Click on the
Object Selector to rotate it so that it lines up with the circle. It's going to be hard to see so
zoom way in....90. Right click and choose Apply. In your layer palette click on the + in front of your Paws layer
to open your layers, Click on the first new Ellipse to make it your active layer. Go to Edit, Copy,
Edit, Paste as a New Vector Selection. Paste this selection beside the first small oval. Click on the
Object Selector to rotate. Click on the Pen Tool, right click on the image and choose Apply. Do this
again so that you have 3 toes....Convert this layer to Raster.
File, Save!
91. Copy and Paste as a New Selection the Paw, do this several times from one side of the dress to
the other....92. Make your Dress Layer your active layer. Go to Selections, Select All, Selections, Float.
93. Go to Effects, 3D Effects, Cutout and apply these settings...
Shadow Color is #95b088
Select None.
94. Make your top layer your active layer (should be the Head layer). Set your background
color to the pink #f4d0d095. Preset Shapes set to Ellipse ( you can use the Tear Drop if you have it). Draw out a small
horizontal oval at the left side of her neck....96. Right click, Convert to path. Click on the Pen Tool. Moving the handles on the top and bottom
nodes make something that looks like a sideways light bulb or a ice cream cone....97. Move the right node so that it is center under her chin. When you're happy, right click
and apply. Then Convert to Raster.98. Duplicate this layer, use the Raster Deform Tool to rotate, move into position just below
the other one. Now duplicate and Mirror these two layers to the other side....99. Use the Ellipse to make a small oval in the center. You can Convert to Path and edit the
nodes a little if you want. Once finished convert this layer to Raster.100. Make your Head layer your active layer, use the Ellipse to make a long vertical oval.
Right click, Convert to Path, click on the Pen Tool. I added one new node at the bottom, then
shaped my oval like this....101. Convert to Raster, Duplicate and Mirror this layer and move into position as the other tie.
File, Save!
102. Select and Float each layer of your bow and apply a Cutout using these settings...
Shadow color is #eca4a4
103. Hide all layers except the bow layers, merge them visible renaming as Bow.
104. Hide all layers, except the Dress, Dress Detail, and Paws, Merge these layers visible
renaming as Dress.105. Make your Dress layer your active layer. Add a New Raster layer. Place a tube of your
choice on this layer. It could be a flower, a book, or a star even.106. Make your bottom layer your active layer (should be Raster 1 layer). Set your foreground
color to the pink #f4d0d0107. Preset Shapes set to these settings....
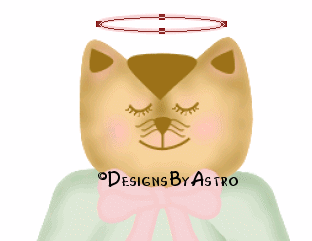
108. Draw out a narrow oval at the top of her head as her halo...
109. Convert to Raster. Click on the Pen Tool. Set the Line Style to Solid and the Size to 4.
Draw a line straight down from the center of the bottom of the oval to the top of her head...Rename this layer as Halo.
File, Save!
Now to give our angel some wings!!
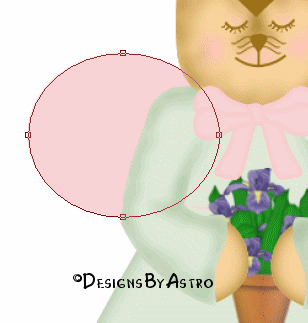
110. Make Raster 1 (your bottom layer) your active layer. Preset Shapes set to Ellipse.
111. Draw out a large oval to the left of her shoulder area....
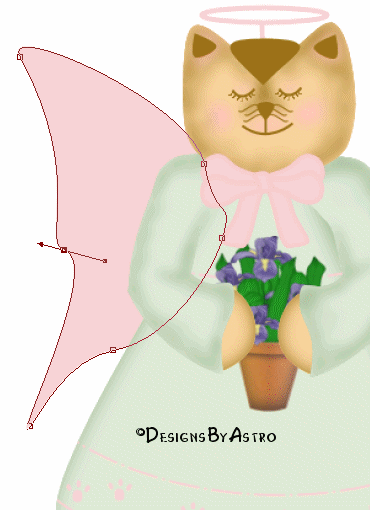
112. Right click, Convert to Path. Click on the Pen Tool. Add 2 new nodes between the bottom
middle and the left side node. Use the nodes to shape your wing something like this...Convert to Raster, rename as Left Wing.
File, Save!
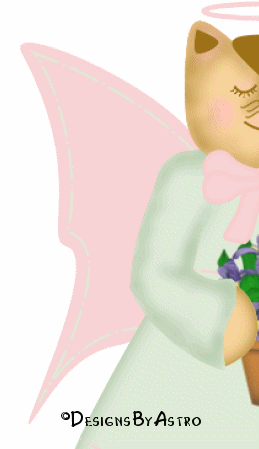
113. Add a New Raster layer naming it wing 2. Set your foreground color #dde9d7
background should be off.114. Click on the Pen Tool. Set the Line Style to Dash Dot (like we did for our dress) Width
should set to 2. Use this to follow the outline of your wing....115. Add a New Raster Layer naming it Wing 3. Use the Pen Tool settings to follow the outline
again except, bring it way in....116. Close all layers except the 3 wing layers. Merge them visible renaming as Left Wing.
117. I chose not to apply a cutout to my wing but if you want to you can apply the cutout we
used to the bow.118. Duplicate and mirror your wing layer, rename as Right Wing.
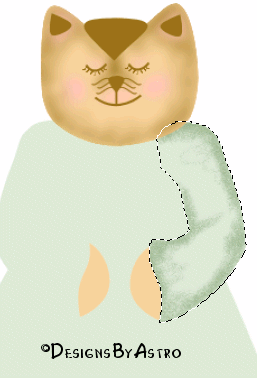
That's your finished Cat Angel! I hope you've enjoyed and learned from this tut!
Until next time, God Bless!
Connie
Designs By Astro Index of
Tutorials
Tutorial written April, 2005
© Copyright
2005 Designs By Astro
All rights reserved.