
|
|
|
|
| For this tutorial you will
need: ULead PhotoImpact - available for purchase here or Adobe Photoshop - available for purchase here or Adobe Photoshop Elements - available for purchase here or Jasc Paint Shop Pro - available for purchase here This tutorial will work in any of these programs. Filters and Materials needed Simple filters - Quick Tile - available free here Mura Seamless - available free here (middle of page) Fantastic Machines Paint Engine - available free here (Optional) FM Tile Tools - Blend Emboss - available as a trial here (7 of these filters continue to work when trial is over, Blend Emboss is one of them) My plugin windows may look different from yours as I use Filters Unlimited 2 to manage my plugins - available for purchase here. I am assuming you know the basics of your graphics program and where the tools can be located. Some abbreviations I used: PSP is Paint Shop Pro, PI is PhotoImpact, PS is Photoshop, and PSE is Photoshop Elements. |
|
Let's get started! |
| 1. Open a graphic or tube,
duplicate, close original. If you use a tube, open a new canvas, 300 X 300 pixels, new raster layer, pull to bottom and flood fill with a complementary color from your tube. Merge all. If you use a graphic, resize to 300X300 with Lock Aspect Ratio unchecked.  |
2. Go to
Effects>Simple>Quick tile |
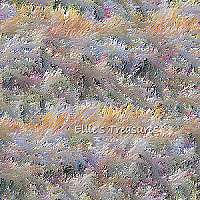
3. Go to Effects>Mura
Seamless>Shift at Random>60-255-133-254  |
4. Go to Effects>Mura
Seamless>Shift at Random>255-16-0-0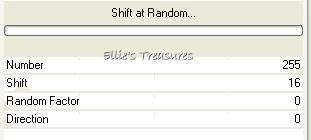 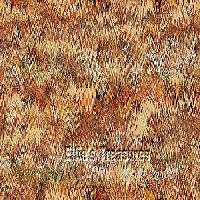 |
| 5. Effects>FantasticMachine
Paint Engine>Impression 2 preset or set as screenshot, once done,
save it as a new preset Brush: .42,.6,.11,.86,.5,.00; Effect:1.70; Type: Intensity 1, Input and Line unchecked; Length 17, Radiate 1.0, motion angle -41, Curl 2, Operation Angle -32, Curl 1, Direction channel R, Wrap Edges checked (or open your fmmachine.ini file in C:/Windows (open it with notepad) and copy and paste this setting into it: Setting22=impression 2;1,1,0,0,0,4,319,328,17,2,100,170,42,86,6,-5,-11,0,2,1 (you can change the setting number if you already have one at setting22), save this file before closing) 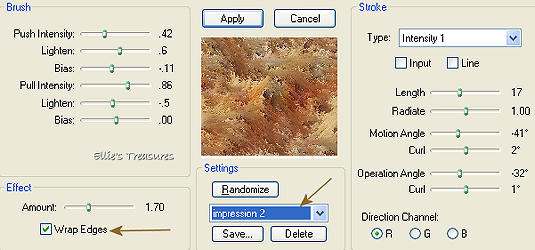 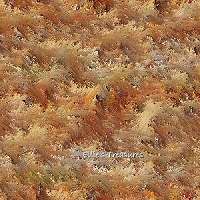 |
| You're done, you can now save it
as a jpg, don't forget to optimize. (Optionally, you can also apply FM Tile Tools>Blend Emboss once at default settings, and then save) |
|
|
 makes
this makes
this  |
 makes
this makes
this 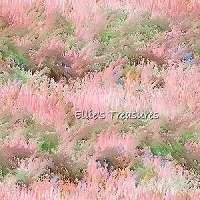 |
|
If you have
any questions or suggestions, click on the email button below to
contact me. |
|
|
|
|


 makes this