|


The
inspiration for this frame came from the DSB FLux filter and one of
the effects that I did not cover in the other tutorial. I was
playing with the "Blast" function to see what it did and I arrived
at this effect. I have no idea whether this effect has already been
done in a tutorial before, but I thought I would add to my
collection of DSB effects with this one anyway.
What You Will Need to Start
...PSP 6
or 7 (this was done in 6)...
Visit JASC to download a free
trial
...DSB Flux Filter that you can download here...
(this link
leads to their opening page, enter the site then look in the top
menu bar to the right for "plugins")
... blade pro preset called
"copper shimmer" from Dee...
...
the picture below that you can right click and copy to your hard
drive...
It is an image from my purchased CD graphic collection
by Imsi

Open the image in PSP. Add a white symmetrical
border of 4.
Take the magic wand and click in the white border
area to have it selected and see "the marching ants". Go to Blade
Pro and apply the "copper shimmer".
Go to "Selections - invert"
and apply the "Cutout" effect using these
settings
Colour.....black
Opacity.....60
Blur.....30
Vertical
and Horizontal.....0
Deselect the image and then you are
going to go "shift D" to duplicate the picture and give you a second
copy that we will continue our work on. Minimize and hide the
original at the bottom of your work area for now.
On the
duplicate copy, go to "image - resize" and enlarge it by using the
percentage 125%.
Then go to your DSBFlux filter and find "Blast".
When the screen opens the preset number is 20%. That is fine and
leave it as it is. You will notice in the window is says "Left".
Just click on OK and see the results.
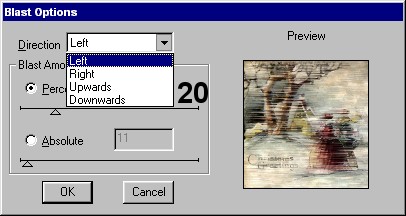
Immediately go back to the Blast and this time
change the effect to "Right".
Immediately go back to the Blast
and this time change the effect to "Upwards".
Immediately go
back to the Blast and this time change the effect to "Downwards".
All in all, you have applied this effect 4 times in all the
different directions possible.
Because our nice blade pro
edging has been altered, we will remove the edge part. Go to
"Selections - Select All" Then go to "Selections - modify - contract
- contract by 4". Then double click on the crop tool and change the
settings to "surround a selection" found near the bottom of the
screen. Then you can go to "Image - crop".
Leave this image
open, and reopen our original picture that has been sitting at the
bottom. Activate the original, then click on "control C" to copy it.
Then activate the "blasted image" and press "control L" and your
image will be pasted exactly in the centre of the larger copy on a
new layer.
Using the magic wand, click outside the area of
the pasted image to get the marching ants and then go to "Selection
- invert". Apply a drop shadow with these
settings
Opacity.....60
Blur.....15
Vertical and
Horizontal.....4
Then immediately go back and add another
drop shadow but change the vertical and horizontal to -4 (minus
4)
Go to "Layers....merge all"
We will return our nice
edging by re-adding a white symmetrical border of 4. Activate it
with the magic wand, then reapply the "copper shimmer" blade pro
setting. Finish off by choosing "Selections - invert" and then go to
effects - cutout - and use the following
settings
Opacity.....80
Blur.....30
Horizontal and
Vertical.....0
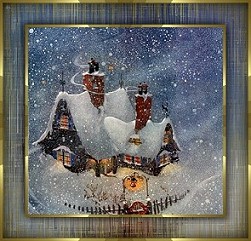
Deselect your image and your framed image
should now be finished.
Afterthoughts: Each frame will
be different depending on the image you choose. The effects will
also be different if you apply the "Blast" effects in a different
order. Instead of going "left, right, up and down", try "up, down,
left, right" for a different look. The look will also change
depending on the blade pro setting you use and what colour it is.
You will see several examples below just to emphasize how each will
look different.
This is a still shot of the animation I did
last year following FBN's tutorial. These have been reduced quite a
bit but I hope the different look is still apparent.
 
This next image used the Ulead Art Texture gold
instead of a blade pro setting.
This
last image uses another of Dee's blade pro settings - "olive
shimmer". Please make sure you revisit her site and check out what
she has to offer. She has some beautiful settings that I use often
in making my snowglobe bases and images.

If you
have any problems or need further explanations, please feel free to
email me here
MAIN
TUTORIAL LIST
This
tutorial was posted at the site of "P. Ann's Place" Nov.4,2001 and
written by P. Sherman. All I ask is that you do not claim it as your
own.
| |