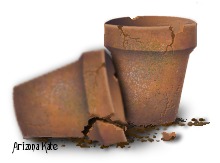
Used, Weathered & Broken Flower Pots
Created by Arizona Kate ©2000 All rights reserved.All tutorials, including images, remain the property of Arizona Kate and
may not be sold or distributed in any format without purchasing a license from ArizonaKate.com
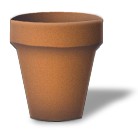
With this tutorial we'll be taking the nice, new clay pot made in my basic Clay Flower Pot tutorial, and, with just a little editing, turn it into a used and weathered pot.
Open the pots color swatch already downloaded from the basic pot tutorial (or snag it again below!). For this tutorial you'll also need the 'weathered clay' texture tile shown below. RC, copy and place on your workspace.

Also open the PSP version of the Basic Clay Pot that you
saved and set aside for use in this tutorial. This PSP copy of the pot
should have been saved with layers intact...the shading separate from the
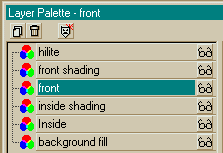
shapes. The Layer Palette should look like the image below. Duplicate your
image, close original, and work with a copy.
Window>Duplicate
Oops! I just noticed that the screenshot below shows a cast shadow for the pot....your copy of pot should have been saved before cast shadow was added in 'new' pot tutorial! A cast shadow won't be needed yet...refer back to the 'new' pot tutorial if you want to add a shadow to this 'used' pot when you're done!
Change Pot Texture
Make the front/outside layer on your Layer Palette the active layer. Using the Magic Wand, select the blank area around the pot. Reverse your selection. Modify and contract the selection by 1. Selections>Modify>Contract>1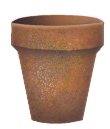
Select the stroke Styles box, change the Style to pattern. Edit pattern style and select the clay texture. If you have the clay texture tile open in your workspace, it should be displayed at the very top of all the pattern tile choices. Flood fill the selection area with the clay texture pattern. De-select!
That's it!! You now have an old pot!! *S*...It can't get
much easier!! By having the shading and highlights on different
layers...the color and texture of the pot can be quickly changed without
having to re-do any shaping!
You can merge all layers and save the pot as is if you want ...but you could also continue on and add some more details!!
Rename this layer INSIDE.
Hide the visibility for your background color and the INSIDE layer ...merge the rest. Merge>Merge Visible Rename this layer OUTSIDE.
You can merge all layers and save the pot as is if you want ...but you could also continue on and add some more details!!
Adding Details
Hide the visibility for your background color and all "outside" layers ...merge the rest. Merge>Merge VisibleRename this layer INSIDE.
Hide the visibility for your background color and the INSIDE layer ...merge the rest. Merge>Merge Visible Rename this layer OUTSIDE.

Create a new layer called CRACKS (this will be
uppermost layer). Select the darkest color in the bottom row of the pot
color swatch as your stroke color. Select paintbrush tool. Shape
square, size 1, opacity 50, step 1, Density 100
Paint some cracks on your pot. Go back over some portions of these cracks if you think they need to be darker or keep changing the opacity setting for the brush!
ZOOM IN very close to see better!!
Paint some cracks on your pot. Go back over some portions of these cracks if you think they need to be darker or keep changing the opacity setting for the brush!
ZOOM IN very close to see better!!
Go to the OUTSIDE layer or the INSIDE layer of your pot
and erase some small bits and pieces to chip the pot edge. Go back to the
CRACKS layer and add some shading to these new chips.
Next, add some highlights to your cracks and chips using Drop Shadow. Go to the Effects menu to select Drop Shadow with these settings:
Vertical 1, Horizontal 1, Opacity 70-80, Blur 0
Highlight color...use the middle color in the bottom row of the pots color swatch.
You could also add some highlights with the paintbrush...be creative!
Your weathered pot is done! Now you can create a vignette painting with a few old pots and gardening tools or a potted plant. Let's see what you can create with these old and weathered pots! Have fun!!
Arizona Kate Homepage ~ What's New
back to>> Weathered Flower Pot tutorial, page 1
~ tutorial hints & tips, guest book, translation links, tut index and navigation menu ~