Making a
Gerbera Daisy 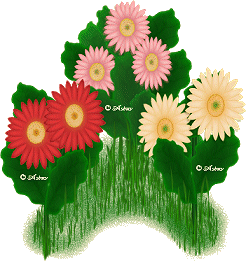
Please read my Terms of Use if you have any
questions.
The layout of this tutorial is set for 1024 x
768
All images are the sole property of © 2001Designs By
Astro.
Do not copy, reproduce or send through
email
without my prior written
permission.
All rights reserved.
The image/images
you make using this tutorial
is your property to do
with as you wish.
If you have any
questions or need further help you can
Email me!
You probably have seen these
Daisies in the nurseries or at your favorite supermarket that
has plants. My daughter and I
were out shopping one day and she saw a pretty deep pink one
and just had to have it. So I
bought it and brought it home and got to looking at it and thought
Hummm this would make a
pretty flower to make in Paint Shop Pro, so I set out to see if
I could do it. *L* Isn't that
how all PSP addicts think? Everything we see we ask ourselves
could we make it in PSP?!?!
*LOL* So here I am writing a tutorial on how to create my
version of a Gerbera Daisy. I
hope you will enjoy this tutorial as much as I did creating it.
Just remember these Daisies
come in all different colors so have fun deciding what color
you want yours to be or hey
make one in several colors like I did!! *L*
I freehand drew my leaf to use
with my Daisy. I won't be going into how to make it here since I
have
no idea
how to even start to teach you how to freehand mouse draw! *L* However I did
save it as
a
psp file (for PSP6 and up) and have zipped it up so that you can download it
here if you wish to use
my leaf or maybe you have one of your own you'd like to
use.
Remember to SAVE OFTEN!
I will be using PSP7 so my screen shots
may look different if you are using a different version.
All screen shots are sized smaller than
actual image will be.
The materials you will need are pretty simple.
I am assuming you have a
basic knowledge of PSP, but have tried to be clear enough
in writing this tutorial so
that even advanced beginners can understand it.
Now let's get started!!
Open a 400x400 transparent 16
million colors.
Set your foreground color to just a little bit darker color than
what you want to use for your daisy color
I'm using #FBA3A3 as my foreground
color. Set your background color to the color you want the daisy
to be. I'm using
#F4CCCC
Now click on your preset
shapes tool using the following settings 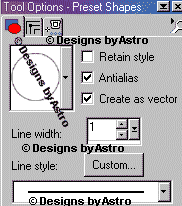
Draw out a long slender oval
something like this.. 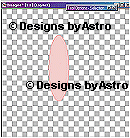
Now lets turn that oval into a
flower petal by clicking on the Object Selector,
then clicking on the node editing
button in your tool options box.
You will see your image color
leave and only and outline of the oval will be apparent and have
small little boxes on the
top, bottom and sides of it. These are nodes, click on the top one and you
will
see an
arrow appear, take the left side of that arrow and move it down, then do the
same thing to the right
side of the arrow. You want to form kind of a point at the top.
Click and hold the top box and pull it up
just a little to define your point
more. Now click and hold on the left middle node and bring it
inwards,
do the
same thing with the right middle node. You should now have something that looks
kind of like
the image below. 
When you're happy with the look set it
by clicking on your taskbar or on an area outside
of your palette, (NOTE.. if you're not
happy with the look click the node edit button in
your tool option box again and continue
to edit until you like it.), then go to"Layers",
"Convert to Raster
Layer".
Now
change your background color to a nice soft yellow. I'm using #F2F2CE as
my
background
color and #E5E688 as my foreground color.
Go back to your preset shapes, same
settings as before, except make the Line Width 2
Draw out a circle on your palette. Then
go to "Layers", "Convert to Raster Layer".
Go back to your petal layer
and lets add some definition to it.
Go to "Selections", "Select All", back
to "Selections", "Float"
Your petal should now have marching ants around it.
With the ants around it make a
New Layer and lets apply a cutout ("Effects", "3D Effect",
"Cutout") using these
settings... 
Now add a New Layer and apply the same
cutout as above except with minus -6 on the Vertical,
and minus -8 on the
Horizontal.
Deselect
Hide Layer 1 & Layer 3
(your center circle layer) and lets merge visible the 3 petal
layers.
Rename
to petal 1. Now lets copy and paste our petal as a NEW IMAGE so that
we
will have it
later at the large size for our back petal layers.
Go back to your original image and make
visible your center layer.
Go to "Selections", "Select All", back to "Selections", "Float"
You know
have
ants around the center of your flower. Make a New Layer,
and lets apply a cutout to our center
using the same settings we used for
our petal except change the color to
#EFBE15
Apply
the first cutout then add a New Layer, and apply the same cutout as
above
except
with minus -6 on the Vertical, and minus -8 on the Horizontal.
Now before we deselect our
center lets add a few touches with our Airbrush.
Add a New Layer, foreground color to
#0A6A0A, background color Null.
Airbrush set to these
settings... 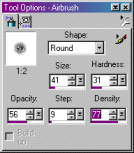
Click once right in the very center of
your circle. Do Not Deselect.
Now..
Add a New Layer & change your foreground color to #C07114
leaving your
background color on Null. Still on your Airbrush, but change your
setting
to
these... 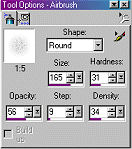
Click once or twice on the center image
to add the color to it, then change your
foreground color to #EEA34A and spray
once or twice with it. Now go to
"Effects", "Blur", "Gaussian Blur and
apply a 0.81 radius on the blur. Deselect
Hide Layers 1 & Petal1
layer and merge all Layers Visible.
Make Petal Layer visible.
Now here comes the fun part
*L*
Make your
petal layer your active layer. And let's resize it a little to make it
fit
more with
our center. Click on the Deformation tool, pull the top middle
box down until you get a size
you think will look about right for your center petals.
Click on the selection tool to set
deformation.
Go
to "Layers" "Duplicate Layer" then to "Image", "Flip"and move into
position
at the
bottom of your center. (Note, you can rename your layers if you
wish.)
Go to
"Edit", "Copy", "Edit", "Paste as New Layer"
Now use your deformation tool to turn
the peddle so it will fit at the top
beside your first petal, you should
have something like this... 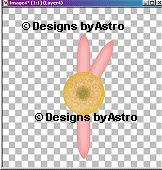
Now you can either copy and paste this
one as a New Layer or you can Duplicate
and flip or mirror, which ever you
prefer doing. Continue to do that until you have
made petals completely around your
center.
You should end up with
something like this... 
Now lets hide Layer 1 &
our center Layer and merge all other layers visible. Rename
layer to petal 1. Keep Layer
1 and the center layer invisible and petal 1 as you active
layer, go to "Selections",
"Select All", "Selections", "Float", "Selections","Defloat"
Now add a New Layer, with you
foreground color set to #E57575, your background
set on Null, click on your Airbush tool
using these settings... 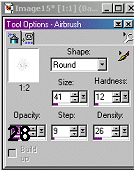
Spray a couple of clicks on each petal
starting at the middle and coming
up through the petal a little bit,
something like this.. 
Okay let's apply a Blur to those
Airbrush strokes, "Effects", "Blur", "Gaussian
Blur and apply a 6 radius on the
blur. Deselect
Hide Layer 1, and your center layer and merge visible, rename to
top petals.
Remember the petal we copy and pasted as a new layer? Well let's
make
it active
and copy it, then go back to your flower and paste as a New Layer.
Move this layer underneath
the top petal layer (Remember we left this
petal large so you will have to resize
it to fit). Use the Deformation tool
to move/resize your petal into position
in between so that it will be
in between the top petals. Duplicate, mirror, flip, or copy and
paste
as new
layer until you have all the petals done around the flower like
you did for the top petal
layer. When you are happy with the position
of the bottom layer of petals (check
them by making your center and
top petals visible from time to time.)
Hide Layer 1, top petals,
Center layer and merge all visible. Now go to Go to
"Selections",
"Select All", back to "Selections", "Float", "Selections",
"Defloat"
you
know the drill by now *L* Add a new Layer, using your
Airbrush lets add a few sprays at the
same settings as we used for the
top petals, except with a slightly
darker color #DD7D7D, do the
sprays just like you did for the top petals bring the spray from
the
center up
the petals about ½ way. Now apply the Gaussian Blur
of 6. Deselect. Hide your Layer 1, top
petals, and center Layer
and merge visible Rename to bottom petals. Now Check
you
flower by
making all layers visible. Looking more like a
Daisy now?? *L* This is how mine
looks.... 
We're almost through. Make your center
layer your active layer.
Click on your Retouch tool
with these settings.. 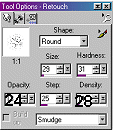
We want to smudge the edges around our
center some and pull some the yellow
out into our petals to make it look
like pollen on them. Don't get to carried away
tho *L* We're finished with the flower.
Here is what I did, I duplicated my window
then merged visible my duplicate, then
copied and pasted as a new layer to get rid of
any excess around it then exported as a
tube. I then saved my other copy without
merging the layers so that I could use
the color changer to make daisies in
different colors like you see on the
banner above. You can make a stem and
use my leaf and the daisy you tubed to
create whatever you like. Use the
deformation tool and the
lightning/brightening effects on the leaf to get
different looks.
That's it, I hope you enjoyed
this tutorial and have fun with your Daisies!
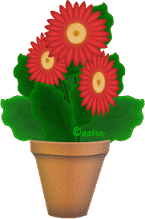
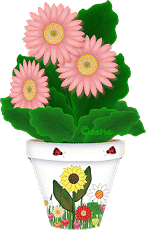
Here are a few more examples of what I
did with my Daisies. The flower
pots I used are created from a tutorial
written by Arizona
Kate.
Thanks Kate!!

Tutorial
Index
Designs By Astro
©2001
Designs By Astro
All
reserved!