|
 The original artwork used is © Stephanie Law, and its used with permission, this image it's a detail of the Image Secrets. Click here to view more of your wonderful job.
This tutorial was made in Paint Shop Pro 8 , but also can be done in version 7 . I'm assuming you have a working knowledge in PSP at intermediate level. Click here to download the PSP Script to this frame, it comes with two background tiles. If you need help in filters installation click here, to some tips.
You will need the following tools : Paint Shop Pro, click here to download a trial version. FM Tile Tools - click here to download Greg's Factory Output Vol II, click here to download. Andrew's Filters 13 - Warp Warposity - click here to download The material I used , click here to download
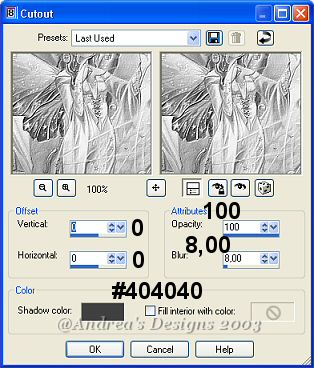
1- Unzip and open the supplies in PSP, make a copy of your image and close the original. Use a small image , because the final result looks a little different, if you do the resize at the end, due the textures. If you want a small frame, you should do a resize to about 200px in the bigger side of your image, and then Adjust - Sharpness - Sharpen. Remember save often. 2- Image - Add Borders - 1px - color : # 000000. Every border in this tutorial, will be with Symmetric checked. 3- Select the black border with the Magic Wand - Mode : Replace , Match Mode: RGB Value,Tolerance: 0, Sample Merged: unchecked, Feather: 0,Antialias: checked, Outside. We will use this settings everytime we do a selection. If you are using PSP 7, use the settings below: 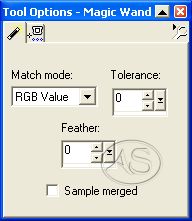 4- Selections Invert - Effects - 3D Effects - Cut Out with the following settings:
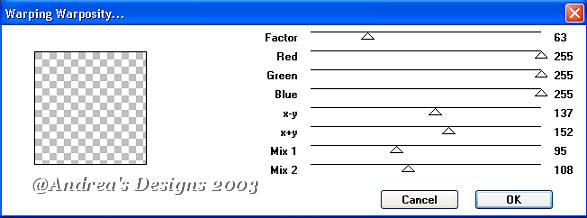
5- Hold down your CTRL key and press D to deselect. 6- Image Add Borders - 2px - color : # C0C0C0. Select the border , Effects -Plugins - Greg's Factory Output Vol II - Pool Shadow with default settings (we will use this setting in all tutorial. Deselect. 7- Image Add Borders - 1px - color : # 000000. 8- Image Add Borders - 5 px - color: #C0C0C0. Select this border with the magic wand using the same settings before. Change your foreground to pattern and choose my pattern 1, angle - "0" scale- "100", flood fill the border. 9- Image Add Borders - 1px - color : # 000000. 10- Image Add Borders - 2px - color : # C0C0C0. Select the border , apply the Pool Shadow. Deselect. 11- Image Add Borders - 1px - color : # 000000. 12- Image Add Borders - 10px - color : # C0C0C0. Select the border, apply the Pool Shadow, Effects - 3D Effects - Inner Bevel - Metalic preset. Deselect. 13- Image Add Borders - 1 px - color : # 000000. 14- Image Add Borders - 2px - color : # C0C0C0. Select the border , apply the Pool Shadow. Deselect. 15- Image Add Borders - 1px - color : # 000000. 16- Image Add Borders - 20px - color : # C0C0C0. Select the border , Effects - Plugins - Andrew's Filters 13 - Warp Warposity, with this settings:
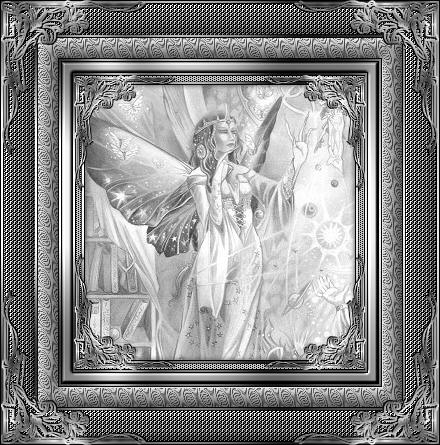
Keep selected, Effects - Plugins - FM Tile Tools - Blend Emboss. Effects - 3D Effects - Inner Bevel - Pillow preset, if you are using PSP 8, change the Intensity to 50. Deselect. 17- Image Add Borders - 1 px - color : # 000000. 18- Image Add Borders - 2px - color : # C0C0C0. Select the border , apply the Pool Shadow. Deselect. 19- Image Add Borders - 1px - color : # 000000. 20- Image Add Borders 30px - color : # C0C0C0.Select this border, go to your foreground and choose pattern2 with angle -"0" scale - "100",and flood fill the border. Effects - Plugins -FM Tile Tools - Blend Emboss with default settings. Apply the Inner Bevel Pillow preset, Intensity=60. Deselect. 21- Image Add Borders - 1 px - color : # 000000. 22- Image Add Borders - 2px - color: #C0C0C0. Select the border , apply the Pool Shadow. Deselect. 23- Image Add Borders - 1px - color : # 000000. 24- Copy the corner and paste as new layer, put in the position, then duplicate this layer, Image - Mirror. Duplicate again this layer, Image -Flip. Duplicate this last layer and Image - Mirror. 25- Duplicate again the layer and choose the position in the inner corner of the frame, resize using the Deformation tool, Sharpen if you wish and then proced as the item above. 26- If you wish store the frame for use with another pictures, before you merge all layers, highlight you first layer, right click in this layer on your layer palette and promote from background to layer, select your image if your selection tool using rectangular shape and press delete. Go to Layers -merge visible - File export as Picture Frame. Undo until you have your image back and deselect. Layers - Merge all. 27- At least go to Image - Grey Scale and save your work as JPG, using the bigger compression, preserving the look of your image. If you are using a colored image you don't need to do the gray scale, just save your work. Click in the tumbnail to see another result. 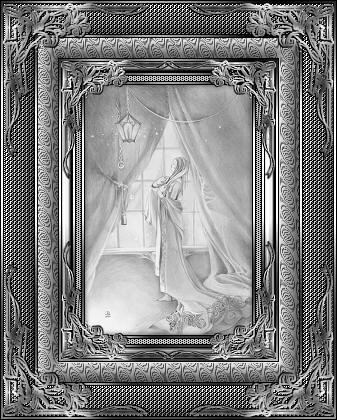
Thank you for do my tutorial , wish you had enjoy it! If you have any question about this tutorial feel free to contact me. ® Copyright 2003 - 2006 Andrea Sampaio Free JavaScripts provided |